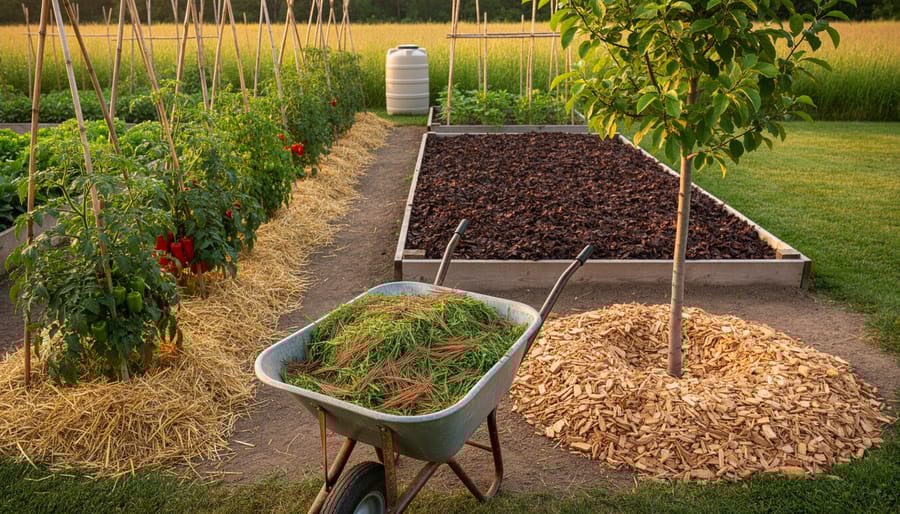
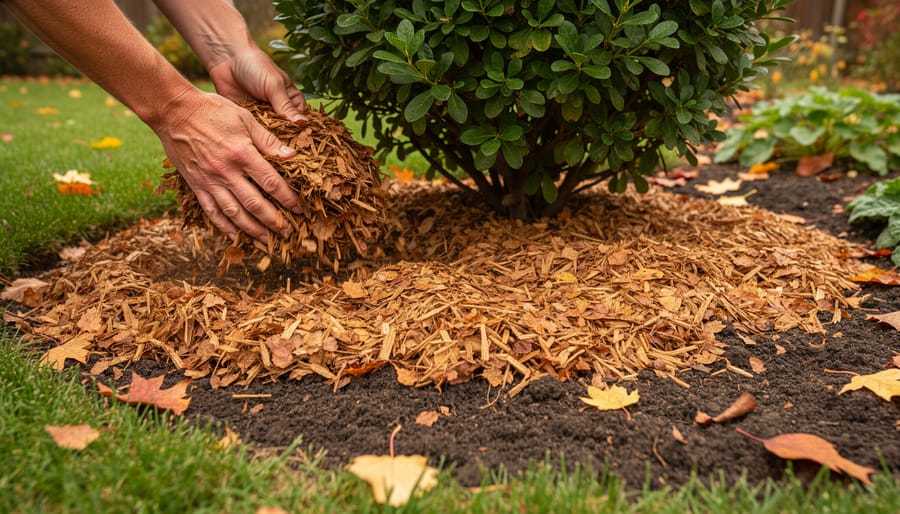
Layer wood chips 2-4 inches deep around trees and shrubs to suppress weeds while slowly releasing nutrients as they decompose. Spread shredded leaves across vegetable beds each fall to protect soil organisms, retain moisture through winter, and create nutrient-rich humus by spring planting season. Apply straw mulch 3-6 inches thick between tomato and pepper rows to keep fruits clean, prevent soil-borne diseases from splashing onto leaves, and maintain consistent soil temperatures during summer heat. Mix grass clippings with coarser materials like pine needles to avoid matting, ensuring proper air circulation while adding nitrogen back into your garden beds.
Choosing the right organic mulch transforms your garden from a maintenance burden into a thriving, self-sustaining ecosystem. Each material offers distinct advantages depending on your plants, climate, and availability. Understanding these options empowers you to make informed decisions that align with sustainable farming practices, whether you’re managing a small backyard plot or working toward your own farming venture. The beauty of organic mulches lies in their dual purpose: protecting your soil today while building its fertility for tomorrow’s harvests.
What Makes a Mulch ‘Organic’ (And Why It Matters)
When we talk about organic mulch, we’re referring to any covering material that comes from natural, once-living sources. Unlike synthetic alternatives made from rubber or plastic, organic mulches are biodegradable materials that break down over time, returning valuable nutrients to the earth. Think wood chips, straw, grass clippings, leaves, and compost—all materials that nature can recycle back into the soil.
What makes organic mulch truly special is its ability to work with your garden ecosystem rather than simply sitting on top of it. As these materials decompose, they contribute to organic soil health by improving soil structure, increasing beneficial microbial activity, and adding essential organic matter. This natural process creates a living, breathing foundation that supports robust plant growth year after year.
Beyond soil enrichment, organic mulches excel at moisture retention. They act like a protective blanket, reducing water evaporation during hot summer days and helping maintain consistent soil moisture levels. This means less frequent watering and healthier plants with stronger root systems.
Weed suppression is another significant advantage. A proper layer of organic mulch blocks sunlight from reaching weed seeds, preventing germination and reducing the time you spend pulling unwanted plants. When weeds do appear, they’re typically easier to remove from mulched soil.
Perhaps most importantly for environmentally conscious gardeners and farmers, organic mulches align perfectly with sustainable growing practices. They’re renewable resources that reduce waste, eliminate the need for synthetic chemicals, and support the natural cycles that healthy ecosystems depend on. By choosing organic mulch, you’re not just covering bare ground—you’re actively building a more resilient, productive growing environment.
Wood-Based Mulches: The Garden Workhorses

Wood Chips and Shredded Bark
Wood chips and shredded bark rank among the most popular organic mulches for good reason. These materials excel at suppressing weeds, retaining soil moisture, and gradually improving soil structure as they decompose. You’ll find them particularly valuable for pathways, ornamental beds, and around trees and shrubs where their slower decomposition rate means less frequent reapplication.
When applying wood chips or shredded bark, aim for a depth of 2-4 inches. Too thin, and weeds will push through easily. Too thick, and you risk creating a barrier that prevents water from reaching plant roots. For pathways, you can go slightly deeper at 4-6 inches to create a comfortable walking surface that stays relatively weed-free.
Here’s an important tip: avoid placing fresh wood chips directly around nitrogen-hungry plants like vegetables or annual flowers. Fresh chips temporarily tie up nitrogen as they begin decomposing, potentially stunting plant growth. Instead, use aged chips that have already started breaking down, or apply fresh chips in fall when most plants are dormant. For vegetable gardens, save your wood chips for pathways between beds rather than around the plants themselves.
Sourcing locally makes economic and environmental sense. Contact local tree services, arborists, or municipal yard waste facilities—many offer free or low-cost wood chips. Some even deliver. Just verify that chips come from untreated wood and don’t contain diseased material. Community gardeners often share leads on free mulch sources, creating a wonderful example of neighbors supporting sustainable practices together.
Shredded bark, while typically more expensive than basic wood chips, offers a more refined appearance perfect for front yard beds and ornamental gardens where aesthetics matter most.
Sawdust and Fine Wood Particles
Sawdust and fine wood particles can be valuable mulch materials, but they require some understanding before you spread them around your garden. This byproduct from woodworking shops and sawmills works best in pathways and around established trees and shrubs rather than in vegetable beds.
The main consideration with sawdust is its high carbon-to-nitrogen ratio. As it breaks down, soil microorganisms consume nitrogen from the surrounding soil, potentially creating a temporary nitrogen deficiency for your plants. This is why many experienced gardeners compost sawdust for six months to a year before using it as mulch. During composting, adding a nitrogen source like grass clippings or finished compost helps balance the carbon content and speeds decomposition.
Fresh sawdust works well in areas where you’re not growing food crops immediately. Consider using it around fruit trees, in garden pathways, or in ornamental beds where you can monitor and supplement nitrogen levels as needed. Apply it no more than two inches deep to prevent matting and water repellency.
Always verify your sawdust source comes from untreated wood. Sawdust from pressure-treated lumber, painted wood, or chemically treated materials can introduce harmful substances into your soil and ultimately into your food crops.
A helpful tip from successful organic farmers: mix fresh sawdust with aged manure or compost at a 3:1 ratio before application. This simple practice prevents nitrogen tie-up while still giving you the benefits of this readily available, often free mulch material.
Straw and Hay: The Farmer’s Favorite
Straw Mulch for Vegetable Gardens
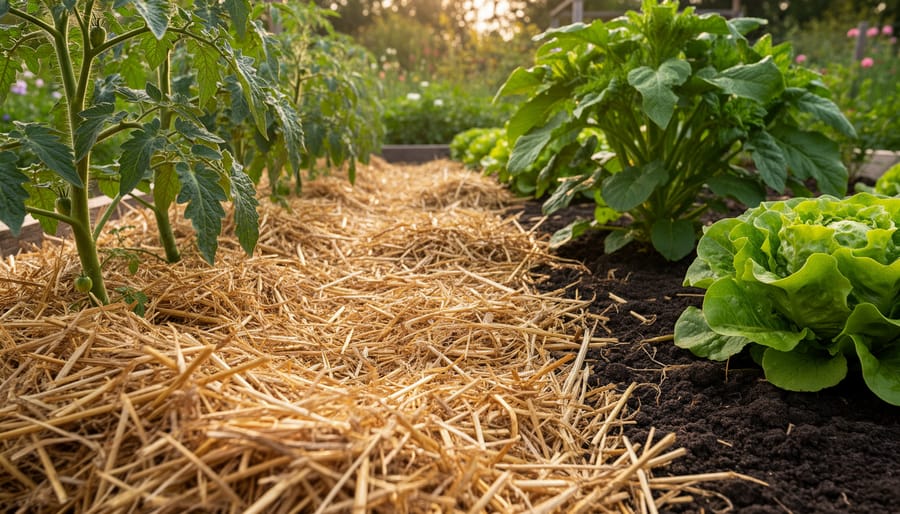
Straw mulch is a fantastic choice for vegetable gardens, especially around annual crops. This lightweight, affordable option helps regulate soil temperature, retain moisture, and suppress weeds while gradually breaking down to add organic matter to your soil. It works particularly well around quick-growing vegetables like lettuce, beans, and squash, creating a clean barrier between produce and soil.
To apply straw mulch effectively, spread a 2-4 inch layer around your plants after the soil has warmed in spring. Keep it a few inches away from plant stems to prevent rot and pest issues. The loose texture allows water and air to penetrate easily while creating an inhospitable environment for weeds.
One important consideration: conventional straw may contain weed seeds or herbicide residues from grain production. Look for certified organic straw or seed-free options when available. If you notice unwanted grass sprouting, simply pull it early or add another layer of mulch. Many farmers find that despite occasional weeds, straw’s benefits far outweigh this minor inconvenience, making it a staple in sustainable vegetable production.
When to Use Hay Instead
Hay offers something straw doesn’t: extra nutrients. Unlike its seed-free cousin, hay includes dried grasses, legumes, and their nutrient-dense seed heads, making it a two-in-one solution for gardeners who want both mulch and slow-release fertilization. As it breaks down, hay feeds your soil with nitrogen and other organic matter, creating rich conditions that earthworms absolutely love.
The catch? Those seeds can sprout into weeds if you’re not careful. But here’s when that trade-off makes sense: use hay in pathways where a little grass growth actually helps prevent erosion, or apply thick layers in established perennial beds where you can easily pull any volunteers. It shines in fall gardens when cooler temperatures slow germination, and it’s perfect for lasagna gardening projects where you’re building new beds from scratch.
Many small-scale farmers swear by hay for their pumpkin patches and squash hills, where the nutrient boost supports heavy feeders and any sprouted grass gets shaded out quickly. If you’re sourcing hay locally from organic farms, you’re supporting your community while building healthier soil. Just remember to pile it on thick, around four to six inches, to suppress most unwanted growth while maximizing those soil-building benefits.
Leaf Mulch and Compost: Free Resources from Your Own Yard
Shredded Leaves and Leaf Mold
Fallen leaves are nature’s free gift to gardeners, transforming from yard waste into valuable mulch with minimal effort. Start collecting leaves in autumn using a rake or leaf blower, focusing on varieties like oak, maple, and beech that break down at moderate rates. Shredding is essential—whole leaves mat together and repel water. Run your lawn mower over dry leaves several times, or invest in a leaf shredder for larger quantities. The smaller pieces decompose faster and create better soil contact.
Fresh shredded leaves work wonderfully as mulch around trees, shrubs, and vegetable gardens, providing 2-4 inches of insulating coverage. For something even better, create leaf mold by piling dampened shredded leaves in a corner of your yard for 6-12 months. This dark, crumbly material becomes a soil conditioner that rivals expensive compost. Leaf mold excels in perennial beds, improving moisture retention and adding organic matter without introducing excess nutrients that might encourage leafy growth over blooms. Many community gardeners collect bags of leaves from neighbors each fall, turning curb-side discards into next season’s soil-building treasure.
Compost as a Mulch Layer
Finished compost serves double duty as both a mulch and soil amendment, making it a powerhouse option for improving soil naturally. When spread as a mulch layer, compost provides essential nutrients while suppressing weeds and retaining moisture. For best results, apply a 1-2 inch layer around established plants, keeping it slightly away from stems to prevent rot.
One limitation of compost mulch is that its dark color can absorb heat and it breaks down relatively quickly, requiring more frequent replenishment than wood-based mulches. Many gardeners solve this by combining compost with other organic mulches. Try layering compost directly on the soil first, then top it with straw or wood chips. This combination gives you the nutrient boost of compost with the longer-lasting coverage of a bulkier material.
Fresh compost works wonderfully in vegetable gardens where you want maximum fertility. A local Ontario CSA farmer shares that she applies compost mulch every spring around tomatoes and peppers, crediting this practice with exceptional yields and reduced disease pressure. For perennial beds requiring less feeding, mixing compost with shredded leaves creates a balanced, attractive mulch that nourishes without overwhelming.
Grass Clippings: Quick Coverage for Quick Results
Grass clippings are one of the most accessible mulch options, especially if you already maintain a lawn. This free resource offers quick nitrogen delivery to your soil while providing immediate ground coverage. Fresh clippings work particularly well in vegetable gardens where you need a fast-decomposing mulch that feeds heavy feeders like tomatoes, squash, and corn.
The key to success with grass clippings is avoiding thick, matted layers that can turn slimy and block air circulation. Apply them in thin layers, about one to two inches maximum, and let each layer dry before adding more. Dried clippings spread more evenly and break down more slowly than fresh ones, giving you better coverage without the risk of compacting. Many gardeners alternate between fresh and dried applications throughout the growing season.
One important consideration: only use clippings from lawns maintained through natural lawn care practices. Herbicide residues from chemically treated lawns can persist through multiple mowing cycles and damage sensitive vegetable plants. Even some “weed and feed” products remain active long enough to harm your garden crops. If you’re unsure about your lawn’s treatment history, it’s best to skip grass clippings or transition to organic lawn management first.
Sarah, an urban farmer in Ontario, discovered this benefit accidentally. After switching to organic lawn care, she began composting her clippings in place around her raised beds. Within one season, she noticed improved soil texture and reduced watering needs. Now she considers her lawn a productive part of her growing system rather than just ornamental space. The practice has cut her fertilizer costs while improving yields in her market garden operation.
Specialty Organic Mulches for Specific Needs
Pine Needles and Cocoa Hulls
If you’re growing blueberries, azaleas, rhododendrons, or other acid-loving plants, pine needles and cocoa hulls are excellent mulch choices that do double duty. Pine needles, often called pine straw, gradually lower soil pH as they decompose, creating ideal conditions for plants that thrive in acidic environments. They’re lightweight, allow water to penetrate easily, and won’t mat down like some other mulches. Many gardeners appreciate their neat, uniform appearance that adds a natural aesthetic to garden beds.
Cocoa hulls offer similar benefits with a bonus—they smell like chocolate when first applied! These byproducts from chocolate production are rich in nutrients and create an attractive, dark brown finish. However, they can be pricey and aren’t recommended if you have dogs, as they contain compounds toxic to pets.
Sourcing these mulches sustainably makes a difference. Pine needles can often be collected free from your property or local pine forests with permission. For cocoa hulls, look for certified organic options to ensure they’re chemical-free. Both mulches typically need replenishing annually as they break down, feeding your soil while maintaining that acidic environment your plants love. Consider them an investment in both plant health and garden beauty.
Paper Products and Cardboard
Before you recycle those newspapers and cardboard boxes, consider giving them new life in your garden as effective organic mulch. These humble paper products make excellent biodegradable weed barriers and work wonderfully for sheet mulching techniques that can transform problem areas into productive growing spaces.
Newspaper works particularly well when layered 6-10 sheets thick around plants or across entire bed areas. The overlapping layers block light from reaching weed seeds while still allowing water and air to penetrate to the soil below. As the paper decomposes over the growing season, it adds organic matter to your soil. Just avoid glossy advertisements or colored inks—stick with black and white newsprint for the safest option.
Cardboard is the heavyweight champion of paper mulches. Flattened boxes create an almost impenetrable barrier against persistent weeds like quackgrass or bindweed. Many CSA farmers use cardboard for establishing new growing areas, laying it down over existing vegetation before topping with compost or other mulches. This “lasagna gardening” approach smothers unwanted plants while building soil fertility, much like cover cropping techniques improve soil health between plantings.
The beauty of paper mulches is their accessibility and cost-effectiveness. Remove any tape or staples, wet the material thoroughly before applying, and top with a more decorative mulch like straw to hold everything in place. Within months, earthworms will begin breaking down the paper, enriching your soil naturally.
Real Results: A CSA Farmer’s Mulching Success
When Sarah Martinez started her 10-acre CSA farm in Vermont, she quickly discovered that weeding was consuming nearly 40% of her workweek. With limited labor and ambitious production goals, she knew something had to change. That’s when she turned to a strategic mulching approach that transformed her operation.
Sarah began by partnering with a local tree care company to source wood chips at no cost—they were happy to have a nearby drop-off location. She applied a 4-inch layer of these chips around her perennial crops, fruit trees, and between raised beds. For her annual vegetable rows, she chose locally sourced straw, which breaks down more quickly and integrates into the soil by season’s end.
The results were remarkable. Within the first season, Sarah reduced her weeding time by nearly 60%. Her soil stayed consistently moist even during dry spells, cutting her irrigation needs in half. But the real magic happened over time. After three seasons of consistent mulching, soil tests revealed a 2% increase in organic matter—a significant improvement that typically takes years to achieve.
“The wood chips created these incredible pathways that stay firm even after heavy rain,” Sarah explains. “My CSA members love visiting the farm now because they’re not trudging through mud.” She also noticed earthworm populations exploding in mulched areas, a clear sign of improving soil health.
Sarah’s advice for new farmers? Start small and source locally. She began with just her main pathways and expanded gradually. By building relationships with local suppliers, she’s maintained a steady, free supply of quality mulch materials. Today, mulching is the cornerstone of her sustainable farming system, allowing her to focus energy on growing nutrient-dense food for her community rather than battling weeds.
Choosing the Right Mulch for Your Garden
Selecting the perfect mulch doesn’t need to be complicated when you follow a simple framework based on your specific needs. Think about three key factors: what you have available locally, your budget, and what you want to achieve in your garden.
For vegetable gardens, straw and grass clippings work wonderfully around tomatoes, peppers, and squash. They break down relatively quickly, adding nutrients just when your crops need them most. If you’re growing acid-loving plants like blueberries or potatoes, pine needles are your best friend. They’re often free for the taking if you have pine trees nearby.
Perennial beds and ornamental areas benefit from longer-lasting options like wood chips or shredded bark. These suppress weeds effectively and maintain a tidy appearance throughout the season. Just remember to keep wood-based mulches a few inches away from plant stems to prevent moisture issues.
Consider your climate too. In hot, dry regions, opt for materials that retain moisture well, like compost or leaf mold. If you’re dealing with heavy rainfall, choose lighter mulches that won’t compact and suffocate plant roots.
Here’s a practical tip from successful organic farmer Maria Chen, who runs a thriving CSA in Oregon: “I use a combination approach. Wood chips on pathways where I need longevity, straw around annual vegetables for easy end-of-season cleanup, and finished compost as mulch for my greens. This saves money and gives each area what it needs.”
Start with what’s readily available in your community. Check local tree services for free wood chips, save your fall leaves, or connect with nearby farms for straw. The best mulch is the one you’ll actually use consistently, so choose options that fit your time and resources.
You don’t need to transform your entire garden overnight. Start with one or two readily available organic mulch types and see what works best in your space. Maybe you’ll begin with shredded leaves this fall or grab a few bags of straw for your vegetable beds next spring. The beauty of organic mulching lies in experimentation—each garden has unique needs, and discovering what thrives in yours is part of the journey.
The benefits speak for themselves: healthier soil, reduced watering needs, fewer weeds, and a smaller environmental footprint. You’re not just improving your garden; you’re participating in a cycle that nurtures the earth rather than depleting it. Plus, many organic mulches cost little to nothing, especially if you’re composting kitchen scraps or collecting leaves from your own yard.
Looking for sustainable mulch sourcing ideas? Connect with your local CSA farm. Many community-supported agriculture programs offer compost, wood chips, or straw to members, and farmers are often happy to share practical tips for sustainable living. These connections strengthen your local food system while giving you access to quality materials and knowledge from experienced growers who understand your region’s specific conditions.