Smart Crop Rotation That Supercharges Your CSA Farm’s Soil

Rotate crops strategically by grouping plants into families – nightshades, legumes, brassicas, and root vegetables – to maximize soil health and naturally prevent pest cycles. Following intensive feeders like tomatoes with nitrogen-fixing legumes restores vital nutrients, while implementing cover crops between main growing seasons delivers profound organic crop rotation benefits. Map your fields into distinct zones and maintain detailed rotation records spanning 3-5 years to optimize production and build resilient soil ecosystems.
Plan companion planting combinations within each rotation block – marigolds deter pests from tomatoes, while basil enhances pepper growth. This integrated approach creates natural synergies that boost yields while maintaining organic certification standards. The living soil web thrives when diverse plant families take turns nurturing distinct microbial communities.
Small-scale farmers find particular success rotating high-value crops like salad greens through multiple succession plantings, followed by soil-building cover crop periods. This intensive yet sustainable method maximizes both land use and soil fertility while meeting consistent CSA customer demand throughout the growing season.

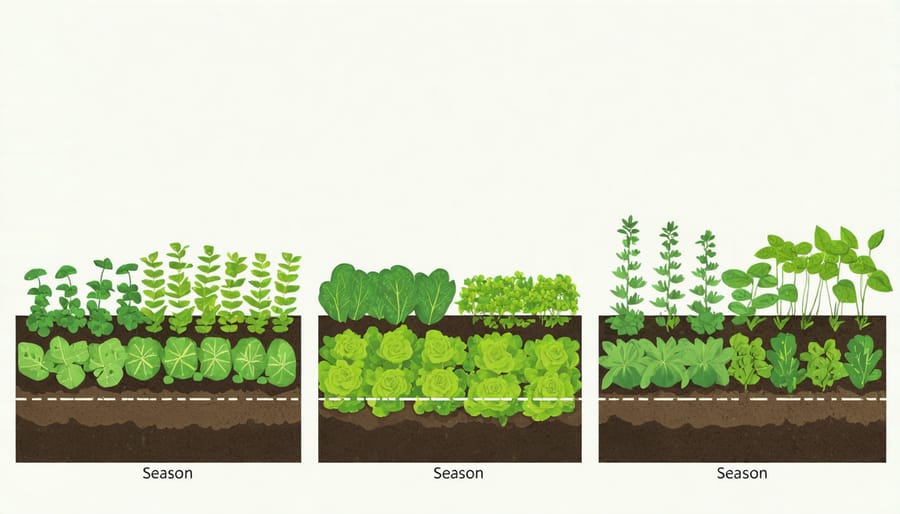
The Four-Season Rotation System
Season-by-Season Planning
Spring kicks off the rotation cycle with nitrogen-fixing legumes like peas and fava beans, which enrich the soil for heavy-feeding summer crops. These early plantings can be followed by quick-growing leafy greens such as lettuce and spinach, taking advantage of the cool, wet conditions.
As summer approaches, transition to heat-loving crops like tomatoes, peppers, and eggplants in areas where legumes previously grew. These nightshades benefit from the nitrogen-rich soil left behind. Alongside these, plant companion crops like basil and marigolds to naturally deter pests and enhance growth.
Fall presents an opportunity for root vegetables such as carrots, beets, and parsnips, which can be planted in areas where summer crops have depleted upper soil nutrients. These root crops help break up soil compaction and access nutrients from deeper layers. Plant brassicas like kale and cabbage in separate beds, as they have different nutrient needs.
Winter is ideal for soil building with cover crops like winter rye or clover in empty beds. In warmer zones, continue growing hardy greens and root vegetables. Use this quieter season to plan next year’s rotation, considering which areas need rest and rejuvenation.
Remember to keep detailed records of what grows where each season. This helps track nutrient needs and prevents disease buildup by ensuring the same plant families don’t return to the same location for at least three years.
Plant Family Groups
Understanding plant family groups is key to successful crop rotation. Plants within the same family often share similar nutrient needs and are vulnerable to the same pests and diseases, making family-based rotation essential for soil health and pest management.
The main plant families for rotation planning include:
Nightshades (Solanaceae): Tomatoes, peppers, potatoes, and eggplants are heavy feeders that deplete soil nitrogen. These should be followed by nitrogen-fixing legumes in the rotation.
Legumes (Fabaceae): Peas, beans, and other legumes enrich soil by fixing nitrogen from the air. They make excellent predecessors for heavy-feeding crops like brassicas.
Brassicas (Brassicaceae): Cabbage, broccoli, and kale have deep roots that help break up soil compaction. They thrive in nitrogen-rich soil after legumes.
Alliums (Amaryllidaceae): Onions, garlic, and leeks have shallow roots and specific nutrient needs. They work well following brassicas but before root crops.
Root Vegetables (Apiaceae): Carrots, parsnips, and their relatives prefer loose, well-worked soil with moderate nutrients. Plant these after alliums have helped clear the soil of certain pests.
Cucurbits (Cucurbitaceae): Squash, cucumbers, and melons are heavy feeders that spread widely. They benefit from rich soil and work well in rotation after composted areas.
For best results, wait at least three years before planting members of the same family in the same location. This practice helps break pest cycles and maintains optimal soil nutrition.
Building Soil Health Through Strategic Rotation
Nitrogen-Fixing Crops
Nitrogen-fixing crops, particularly legumes, are the unsung heroes of organic crop rotation. These remarkable plants form a symbiotic relationship with beneficial bacteria in their root nodules, naturally converting atmospheric nitrogen into a form that creates a thriving living soil ecosystem. Common nitrogen-fixing crops include peas, beans, clover, and alfalfa.
When incorporated into your rotation plan, these plants act as natural fertilizer factories. They can add up to 200 pounds of nitrogen per acre annually, significantly reducing or eliminating the need for external fertilizers. The best part? This nitrogen remains in the soil, feeding the next crop in your rotation sequence.
Sarah, one of our local CSA farmers, found that incorporating crimson clover as a winter cover crop doubled her tomato yields the following season. The key is timing – allow nitrogen-fixing crops to grow for at least 6-8 weeks before turning them into the soil. This ensures maximum nitrogen fixation and soil enrichment benefits.
These crops also improve soil structure, prevent erosion, and support beneficial insects, making them true multitaskers in your organic farming toolkit.

Heavy Feeders vs. Light Feeders
Understanding the difference between heavy and light feeders is crucial for successful crop rotation. Heavy feeders, like tomatoes, corn, and brassicas, require abundant nutrients to thrive and can quickly deplete soil. These hungry plants need rich, fertile soil with plenty of organic matter and nutrients, particularly nitrogen.
On the flip side, light feeders such as root vegetables, herbs, and beans are more modest in their nutrient requirements. Many light feeders, especially legumes, actually help improve soil quality by fixing nitrogen from the air into the ground. This makes them perfect follow-up crops after heavy feeders have used up soil nutrients.
Smart rotation planning involves alternating between these two groups. For example, following nitrogen-hungry tomatoes with nitrogen-fixing peas helps restore soil balance naturally. Some crops, like lettuce and herbs, fall into a middle category of moderate feeders, offering flexible placement in your rotation schedule.
By understanding these feeding patterns, you can create a rotation sequence that maintains soil fertility while maximizing crop yields naturally, without relying on external inputs.
CSA-Specific Rotation Strategies
Succession Planting Integration
Integrating succession planting into your crop rotation plan maximizes land use and ensures a steady harvest throughout the growing season. By staggering plantings of quick-growing crops for succession planting, you can maintain continuous production while still adhering to rotation principles.
Start by dividing your rotation blocks into smaller sections, planting the same crop family at 2-3 week intervals. For example, you might plant lettuce in one section, then follow with another lettuce planting a few weeks later, ensuring both fit within your designated leafy greens rotation block.
Consider using season extension techniques like row covers or cold frames to lengthen your growing windows. This allows for more succession opportunities within each rotation cycle. Many CSA farmers find success by maintaining detailed planting calendars that track both succession schedules and rotation requirements.
Remember to account for seasonal variations when planning successions. Spring and fall plantings may need different spacing intervals than summer ones due to changing day lengths and temperatures. Keep good records of what works best in your specific climate and soil conditions.
Organic crop rotation stands as a cornerstone of sustainable agriculture, offering numerous benefits for soil health, pest management, and crop yield optimization. By implementing thoughtful rotation plans, farmers can create resilient agricultural systems that work in harmony with nature. Remember to start small, perhaps with a three-crop rotation, and gradually expand as you become more comfortable with the process.
Success stories from organic farmers across the country demonstrate that proper crop rotation can reduce input costs while improving soil fertility and crop quality. Take inspiration from Sarah Miller’s farm in Vermont, where implementing a five-year rotation plan led to a 40% increase in soil organic matter and significantly reduced pest problems.
Ready to get started? Begin by mapping your available land, researching companion planting possibilities, and creating a seasonal calendar. Consider joining local farming networks or attending workshops to learn from experienced organic farmers. Document your rotation plans and outcomes, making adjustments based on your observations and results.
With patience and dedication, organic crop rotation can transform your farming operation into a more sustainable and profitable venture while contributing to environmental conservation.