darrell


Gardening Jeopardy: Trivia Questions and Answers

Posted by darrell on
0
Gardening for Beginners
Gardening Jeopardy: Trivia Questions and Answers

Welcome to Gardening Jeopardy, where your green thumb knowledge can earn you big points! Dive into various categories all about gardening, from common plants to garden pests and famous gardens around the world. Each category is divided into five levels based on difficulty, with point values increasing from $200 to $1000. Test your skills or challenge others to see who is the ultimate gardening guru! If you’re looking to engage your students in a fun and interactive way to review class content, consider using a Jeopardy review game template to create a customized game tailored to your curriculum.

Category 1: Common Plants

$200 Question

It is a common name for plants in the genus Narcissus, and it is known for its early spring bloom.

Answer: What are daffodils?

$400 Question

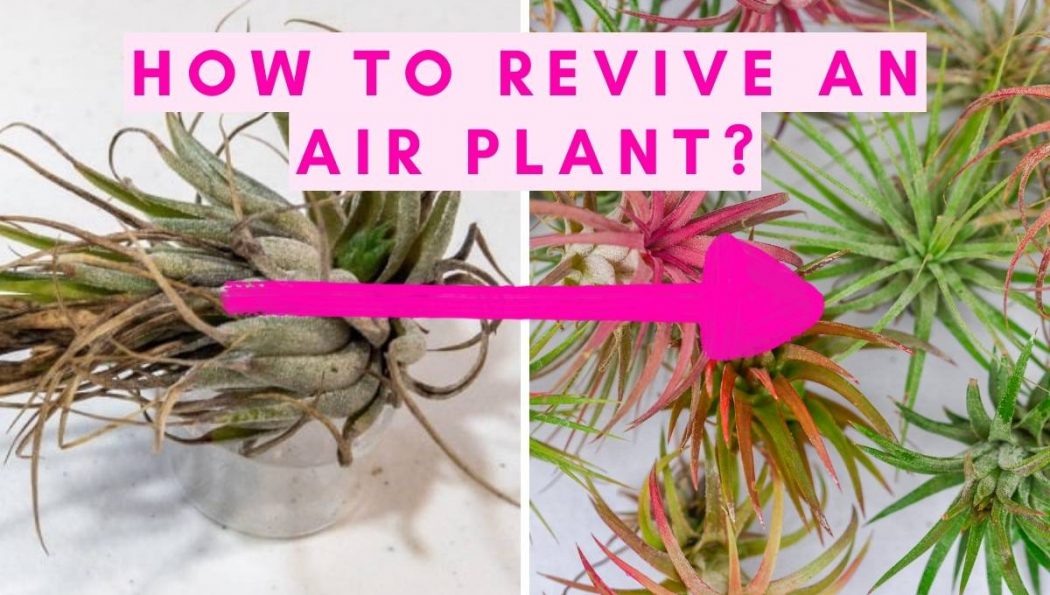
This low-maintenance plant, known for surviving in minimal soil and needing occasional soaking, might droop when thirsty.

Answer: What is an air plant?

$600 Question

This plant, also known as Lavandula, is famous for its calming scent and purple flowers.

Answer: What is lavender?

$800 Question

This common houseplant is known as Ficus elastica and is celebrated for its large, glossy leaves.

Answer: What is the rubber plant?

$1000 Question

Identify this perennial herb, Artemisia dracunculus, known for its use in French cuisine.

Answer: What is tarragon?

Category 2: Garden Pests

$200 Question

This slimy creature is known for eating leaves and leaving a silvery trail behind.

Answer: What is a slug?

$400 Question

This insect in larval stage is known for voraciously consuming plant leaves, especially in vegetable gardens.

Answer: What is a caterpillar?

$600 Question

Identify the small, sap-sucking insect that often forms large colonies on the undersides of leaves.

Answer: What are aphids?

$800 Question

This pest, often found in damp areas, can roll into a ball when disturbed.

Answer: What is a pill bug?

$1000 Question

Name the burrowing rodent that can cause damage to gardens by creating extensive underground tunnels.

Answer: What is a mole?

Category 3: Famous Gardens

$200 Question

This iconic garden, located in France, is known for its geometric hedge mazes and fountains.

Answer: What are the Gardens of Versailles?

$400 Question

A garden in England famous for its rock garden and large collection of water lilies.

Answer: What is the Royal Botanic Gardens, Kew?

$600 Question

Identify the historic garden in Italy, known for its Renaissance design and panoramic views of Florence.

Answer: What are the Boboli Gardens?

$800 Question

This garden in Japan is celebrated for its traditional design and stunning cherry blossoms in spring.

Answer: What is Kenroku-en?

$1000 Question

Name the garden in Canada that transforms into a winter wonderland of lights during the holiday season.

Answer: What are the Butchart Gardens?

Category 4: Gardening Techniques

$200 Question

The term for the method of growing plants in a water-based solution without soil.

Answer: What is hydroponics?

$400 Question

This technique involves cutting away parts of a plant to improve its shape or productivity.

Answer: What is pruning?

$600 Question

The term for the practice of growing plants in vertical layers to save space.

Answer: What is vertical gardening?

$800 Question

This ancient Japanese technique involves sculpting trees into artistic shapes.

Answer: What is bonsai?

$1000 Question

Identify the method of propagating new plants from a ‘mother’ plant’s leaf, stem, or root cuttings.

Answer:  What is cloning?

Category 5: Soil & Compost

$200 Question

This type of soil is ideal for gardening due to its balanced mixture of sand, silt, and clay.

Answer: What is loam?

$400 Question

The term for the decomposition process of organic matter to create a nutrient-rich soil amendment.

Answer: What is composting?

$600 Question

Identify the measure used to describe how acidic or alkaline soil is.

Answer: What is pH?

$800 Question

This organic material, derived from sphagnum moss, is used to improve soil moisture retention.

Answer: What is peat moss?

$1000 Question

Name the process of turning over the upper layer of soil to mix in organic matter and nutrients.

Answer: What is tilling?

Category 6: Historical Gardens

$200 Question

This ancient garden, one of the Seven Wonders of the Ancient World, was said to be located in the city-state of Babylon.

Answer: What are the Hanging Gardens of Babylon?

$400 Question

A medieval garden, often enclosed by walls, was dedicated to growing medicinal herbs and plants.

Answer: What is a physic garden?

$600 Question

Identify the famous garden designed by André Le Nôtre, featuring an iconic symmetrical layout, located in France.

Answer: What are the Gardens of Versailles?

$800 Question

This garden, associated with an iconic English playwright, is located in Stratford-upon-Avon.

Answer: What is Shakespeare’s Garden?

$1000 Question

Name the Mughal garden in India, known for its Persian-inspired design and location near the Taj Mahal.

Answer: What is the Mehtab Bagh?

Brushed vs Brushless Lawn Mower

Posted by darrell on
0
Gardening Tools
Brushed vs Brushless Lawn Mower

The main difference between a brushed and brushless lawn mower lies in the type of motor they use, which affects their efficiency, durability, maintenance requirements, and performance. Brushless lawn mowers offer improved efficiency, durability, and performance at a higher upfront cost, while brushed lawn mowers are more affordable but come with higher maintenance and lower efficiency.

Brushed Lawn Mowers

Motor Design

Brushed motors operate with carbon brushes that maintain physical contact with the motor’s commutator to facilitate electrical conductivity. This traditional motor design is simpler and has been used in various electrical devices for decades, providing a proven but somewhat less efficient method of power transmission.

Efficiency

The efficiency of brushed motors is generally lower compared to their brushless counterparts. The friction generated by the brushes against the commutator results in energy loss, primarily through heat. This not only reduces the motor’s overall efficiency but can also lead to faster depletion of the power source, particularly in battery-operated lawn mowers.

Durability

The physical contact between the brushes and the commutator leads to wear and tear over time. As the brushes degrade, their performance diminishes, which can result in the motor running less smoothly and eventually requiring maintenance or replacement of the brushes to maintain performance.

Cost

Brushed motors are less expensive to manufacture due to their simpler design and the established production processes. This cost advantage is often passed on to the consumer, making brushed lawn mowers a more budget-friendly option for those who prioritize initial cost savings over long-term efficiency and maintenance.

Heat and Noise

The friction between the brushes and the commutator not only reduces efficiency in your mowing practices but also generates heat and mechanical noise. This can make brushed lawn mowers noisier and potentially overheat during prolonged use, which might be a consideration for user comfort and the longevity of the mower.

Brushless Lawn Mowers

Motor Design

A brushless lawn mower has a motor that eliminates the need for physical brushes by using an electronic controller to switch the current within the motor. This advanced design allows for more precise control of the motor’s power and speed, leading to enhanced performance and efficiency.

Efficiency

Without the friction and energy loss associated with brushes, brushless motors operate more efficiently. This translates to less heat generation, lower energy consumption, and the ability to provide more power to the cutting blades when needed, making them ideal for varying lawn conditions.

Durability

The absence of brushes in these motors means there’s no wear and tear from brush friction, significantly extending the lifespan of the motor. Brushless motors are known for their reliability and reduced maintenance needs, making them a worthwhile investment for those looking for longevity in their lawn care equipment.

Cost

The technology behind brushless motors is more sophisticated, leading to higher production costs. These costs are reflected in the price of brushless lawn mowers, which are typically higher than their brushed counterparts. However, the increased upfront cost can be offset by the motor’s longer lifespan and lower maintenance requirements.

Performance

Brushless motors can adjust their power output based on the resistance they encounter, such as when cutting through thick grass. This adaptive power delivery not only conserves energy when the load is light but also provides extra power when needed, ensuring efficient and effective mowing under various conditions.

Comparison Chart

This comparison chart that outlines the differences and similarities between brushed and brushless lawn mowers:

FeatureBrushed Lawn MowersBrushless Lawn Mowers
Motor DesignUtilize carbon brushes for electrical conductivity, simpler design.Use an electronic controller for current switching, more complex and efficient design.
EfficiencyLower due to friction and energy loss from brushes.Higher as there's no brush friction, leading to better energy use and less heat generation.
DurabilityLower because brushes wear out over time, requiring maintenance or replacement.Higher as there are no brushes to wear out, leading to less maintenance.
CostGenerally cheaper due to simpler design and established manufacturing processes.More expensive upfront due to advanced technology and manufacturing costs.
Heat and NoiseTend to generate more heat and noise due to brush friction.Typically run cooler and quieter as there's no brush friction.
PerformanceConsistent power output but may struggle under heavy load due to efficiency losses.Can adapt power output to the task, providing more power when needed and conserving energy when not.
MaintenanceRequires periodic maintenance to replace worn brushes.Minimal maintenance needed, mainly for cleaning and blade care.
LongevityGenerally shorter lifespan due to brush wear.Longer lifespan due to lack of mechanical wear in the motor.

Commonalities

Functionality: Both types are designed to cut grass effectively, with options available in various sizes and power outputs to suit different lawn care needs.

Power Source: Both brushed and brushless lawn mowers can be powered by electricity (corded) or batteries (cordless), offering flexibility in how they are used.

User Interface: Typically, both types will offer similar user interfaces, with controls for power, blade height adjustment, and safety features.

In summary, the choice between brushed and brushless lawn mowers involves considering the balance between initial cost and long-term benefits such as efficiency, durability, and performance. Brushless mowers offer significant advantages in these areas, making them a preferred choice for those willing to invest in higher quality and performance.

How to Clean a Sprinkler Head

Posted by darrell on
0
Gardening Tools
How to Clean a Sprinkler Head

Sprinkler heads, regardless of the sprinkler head types you have, can become clogged over time due to dirt, debris, and mineral build-up. To ensure your sprinkler head is functioning properly, regular cleaning is essential. Here’s a straightforward guide to help you with the cleaning process, even if you have never done it before.

Tools You Need

Before you start, gather the necessary tools. This will help you perform the task efficiently.

  1. Needle nose pliers: To grab and hold the filter inside the sprinkler head
  2. Adjustable vise-grips: To clamp onto the sprinkler riser
  3. Soft cloth: To clean any dirt that is stuck inside the filter.

Remove the Filter

The filter is often where most of the debris accumulates. Pull up the top of the sprinkler head and pull the sprinkler tip up. Clamp on the vise-grip to hold up the sprinkler. Twist and lift the head counterclockwise. Some sprinkler heads may simply pop off, while others might need to be unscrewed. Inside the sprinkler head, you’ll find the filter in the filter line. It’s usually a small mesh or plastic piece. Gently remove this filter, being careful not to damage it. Take the cloth to remove dirt and other debris. Let it soak it in some warm water if needed.

Purge the Line

Purging the line helps to remove any remaining debris that might be trapped inside the sprinkler system. Turn on the sprinkler system briefly. This will force water through the lines and push out any lingering debris. Allow the water to run for a few seconds, and then turn it off. You should notice dirt and other particles coming out. Discarding this water will ensure that the debris is completely removed from the system.

Reassemble the Sprinkler

Once the filter and the line are clean, it’s time to put the sprinkler head back together. Begin by placing the filter back inside the sprinkler head. Ensure it fits snugly and is positioned correctly. Then, reattach the sprinkler head to its base. Twist it in a clockwise direction until it’s secure. Make sure it’s tightened properly, but avoid over-tightening, as that might damage the threads. Finally, test the sprinkler to make sure it’s working correctly. Turn on the system briefly and check that the water is running smoothly. If everything looks good, you’ve successfully cleaned your sprinkler head!

How Often Should You Be Cleaning Sprinkler Heads?

It is very normal that, over time, a sprinkler head gets clogged. Dirt, grass, and other minerals build up. This affects its performance. To keep the sprinkler head working well, regular cleaning is necessary. The environment and water quality determine cleaning frequency. However, a good rule is to clean the sprinkler head at least once a season. This ensures optimal water flow. It also extends the life of your sprinkler system. Regular maintenance saves water and keeps your green spaces vibrant. By regularly cleaning your sprinkler heads, you can ensure they function efficiently, saving you water and keeping your lawn and garden healthy. It’s a simple maintenance task that can make a big difference in the long run.

Why Does My Lawn Mower Backfire When I Try to Start It?

Posted by darrell on
0
Gardening Tools
Why Does My Lawn Mower Backfire When I Try to Start It?

Ever tried starting your lawn mower only to have it sputter, cough, and backfire in protest? Frustrating, right? You are ready to finish your yard work, and your mower has other plans. No, you are probably stuck in a rut asking: Why does my lawn mower backfire when I try to start it? Don’t worry; we’ve got you covered. To care for your lawn organically without issues, ensure you read this to the end. We’ll walk you through the possible reasons your mower is backfiring and the steps you can take to get it running smoothly again.

Common Causes of Lawn Mower Backfiring on Start-Up

When your lawn mower backfires and sputters when you try to start it, it can be frustrating and mess with your gardening plans. But don’t worry; the problem is usually an easy fix. Here are the most common causes of lawn mower backfiring and what you can do about them:

Dirty or Clogged Air Filter

The air filter cleans the air before it enters the lawn mower engine. Not enough air can get in if it’s clogged with dirt and debris. Replace your air filter once a season or every 25 hours of use.

Old or Bad Gasoline

Gasoline starts to break down after just 30 days, and it releases volatile compounds that ignite too early. So, drain your mower’s fuel tank and refill it with fresh, high-octane gas. You may also need to clean the carburetor.

Spark Plug Issues

Faulty or fouled spark plugs won’t ignite the fuel-air mixture properly. In such a case, remove and inspect your spark plug. Clean or replace it if the electrode is worn down or coated in carbon buildup. Ensure the spark plug gap is set to the recommended distance for your mower’s engine.

Carburetor Problems

If your carburetor is stuck, clogged, or out of adjustment, it won’t supply the right fuel-air mixture to the engine. In fact, it may cause too much air or insufficient air. Consequently, you may need to clean or rebuild the carburetor. Check your mower’s manual for the proper carburetor settings and adjustment procedures.

Troubles With Combustion Chamber

If lawnmower engines backfire when you try to start it, it might indicate a disturbance in the normal operation of the engine. Most times, it’s linked to the combustion chamber. The combustion chamber is where the air-fuel mixture ignites to produce power. The balance of this mixture is critical. Hence, an incorrect ratio causes the engine to behave erratically.

Check Exhaust System

When the combustion process is interrupted or doesn’t complete correctly, unburned fuel can make its way into the exhaust system. Given the high temperatures within this system, this fuel can spontaneously ignite. When this occurs, it results in a loud pop or bang – the characteristic sound of a backfire.

Fuel-Related Issues Leading to Backfiring Lawn Mowers

If your lawn mower is backfiring when you try to start it, it is likely fuel-related. Check these common culprits:

Incorrect Fuel-to-air Ratio

The carburetor mixes fuel and air to power lawn mower engines. If the mixture is off, it leads to backfiring. First, check that your air filter is clean and unobstructed. A clogged filter reduces airflow and leans out the mixture. You may also need to adjust the carburetor settings – consult your owner’s manual for the proper procedure.

Vacuum leak

If there’s an air leak in the fuel system, extra air gets mixed into the fuel-air mixture and causes backfiring. Check that all fuel lines, gaskets, and seals are intact and securely connected. Tighten or replace damaged components as needed.

By draining old fuel, ensuring the proper fuel-to-air ratio, and fixing any vacuum leaks, you should be able to get your lawn mower started without the backfire. If issues continue, it’s best to have your mower serviced by a certified technician to check for additional carburetor or ignition problems before further damage occurs.

Ignition System Problems Causing Backfiring

Weak Magneto or Ignition Coil

The magneto and ignition coil produce the spark plug’s electrical current. If either part fails, it won’t generate a robust enough charge. You can test the magneto and ignition coil to determine if it is a replacement.

Incorrect Spark Plug Gap

The spark plug gap refers to the space between the center and side electrodes on the spark plug. The spark may be too weak to ignite the fuel properly if the gap is too wide or narrow. Check your owner’s manual for your lawn mower model’s correct spark plug gap. Carefully adjust the gap or install a new pre-gapped spark plug.

Faulty Ignition Timing

The ignition timing controls when the spark plug fires to ignite the fuel in the engine. If the lawnmower engine timing is off, the spark may fire at the wrong time, leading to backfiring and trouble starting. Have your lawn mower serviced to check and adjust the ignition timing. The technician can also test other ignition system components to diagnose and repair the issue.

How to Troubleshoot a Backfiring Lawn Mower

A man checking a lawn mower

If your lawn mower is backfiring when you try to start it, it likely means there’s an issue with the carburetor or ignition system. The good news is that basic tools and troubleshooting can fix many of these problems at home.

Check the Air Filter

A clogged air filter prevents enough air from getting into the carburetor, causing the engine to run rich in fuel. Replace or clean your mower’s air filter—this is an easy fix and could solve your backfiring problem.

Clean the Carburetor

Over time, gunk and debris build up in the carburetor, disrupting the air-fuel mixture. Remove the carburetor bowl and main jet, then clean them out with carburetor cleaner or solvent and compressed air. Be sure all holes and passages are clear before reassembling the carburetor. Cleaning the carburetor is one of the most effective ways to remedy a backfiring engine and get your mower running smoothly again.

Inspect the Spark Plug

A faulty spark plug won’t ignite the air-fuel mixture properly, causing the engine to backfire. Remove your mower’s spark plug and check that the electrode gap is set correctly, usually around 0.030 inches. The spark plug should also be clean and undamaged. So, replace the spark plug if needed.

Check for Vacuum Leaks

An air leak in the intake manifold or vacuum hoses upsets the air-fuel ratio, often leading to backfiring. Inspect all hoses and the intake manifold for cracks or holes and replace damaged components. And ensure you seal all connections tightly and properly.

Review the Engine Speed

Also, the rapid deceleration causes backfiring. If your mower is prone to backfiring when shutting down, gradually reduce the engine speed before turning it off.

Consider Engine Tune-Up

If the above steps don’t solve the problem, servicing the mower by a small engine mechanic is a good idea. They can perform an engine tune-up to replace additional parts like the ignition coil, magneto, or engine valves. Plus, they will ensure everything is properly adjusted to prevent backfiring and keep your mower running well.

Final Thoughts

Your lawn mower engine requires maximum care- the same goes for other parts. This is especially crucial when wondering why does my lawn mower backfires when I try to start it. Now, you can troubleshoot the issue, determine the culprit, and get your mower running smoothly again to get back to making your garden look pristine or attractive to hedgehogs.

Remember, it could be something simple like old gas, a clogged air filter or spark plug, or an issue with the carburetor. With some basic mechanical skills and the correct replacement parts, you’ll be back to mowing in no time. And when your mower starts on the first pull, you’ll feel a surge of satisfaction knowing you solved the problem yourself. Happy mowing!

Overwatered vs Underwatered Christmas Cactus: Identifying the Signs

Posted by darrell on
0
Gardening Tips
Overwatered vs Underwatered Christmas Cactus: Identifying the Signs

Taking care of a Christmas cactus plant is not difficult, but knowing signs when you’ve overwatered or underwatered your plant can be tricky. When your Christmas cactus leaves are limp, it can be a sign that you are overwatering your plant, while drooping leaves can be a sign of an underwatered cactus. However, there are more signs we want to discuss.

Signs of an Underwatered Christmas Cactus Plant

Underwatering a Christmas cactus plant can cause the plant to become severely stressed and show signs of dehydration. This type of stress often leads to stunted growth, brown and wilting leaves, and brown stems.

Some signs that your Christmas cactus may be underwatered include:

Dry Soil

The first sign of underwatering is usually dry soil. To test your soil’s moisture level, stick your finger in the soil. If it feels dry to the touch, it’s a sign that you must water your Christmas cactus.

Wilting Leaves

Wilting or drooping leaves can occur when the plant has gone too long without water, and its roots cannot absorb enough moisture from the air around them. When you notice this symptom, water your Christmas cactus to regain strength.

Shriveled Stem

If the stems look shriveled, you may be under-watering your cactus.

Signs of an Overwatered Christmas Cactus Plant

Overwatering a Christmas cactus can lead to root rot, nutrient deficiencies, and eventually, death of the overwatered plant if not corrected.

Here are some common signs your Christmas cacti have too much moisture:

Soggy Soil

If the potting soil feels overly wet or the cactus sits in standing water, it’s a sign that you are overwatering your Christmas cactus and need to adjust how often you water it.

Limp Leaves

Another sign of overwatering is limp leaves. This happens when too much water has been applied to the plant, and its roots cannot absorb so much. As soon as you notice this symptom, reduce watering for your Christmas cactus so it can remain healthy and vibrant.

Mushy Stems & Roots

Suppose your Christmas cactus isn’t receiving enough air circulation or has been consistently overwatered. In that case, it may show signs of mushy stems and roots, eventually leading to root rot if not corrected immediately. It’s important to monitor closely how often you water your cacti and ensure that they’re getting enough air circulation.

Watering a Christmas Cactus

woman sprays green christmas cactus leaves

To keep your Christmas cactus happy, mist the leaves of your cactus with a spray bottle daily. When the soil is completely dry, water the base of the plant (every two weeks). When watering a Christmas Cactus, water from the bottom up. Put the pot in a dish or tray filled with just enough water so that when the soil absorbs moisture from the bottom, it comes out of the drainage holes at the pot’s base. Leave for about 20 minutes, then remove any excess moisture in the tray so your cactus is not left in wet soil. Do not let your cactus sit in standing water. Overly wet soil, especially in the colder months, could lead to root rot.

Revive an Overwatered or Underwatered Christmas Cactus

To revive an overwatered Christmas cactus, you should first let the soil dry out before watering again – avoid repotting until dryness has been achieved. Reduce the watering frequency and use only lukewarm water when watering again; also, make sure that your pot has good drainage holes so that excess water can escape more easily.

To revive an underwatered Christmas cactus, slowly increase its water intake, but don’t overdo it all at once – start with small doses of water every other day until your plant looks revived and green again. You should also ensure adequate humidity for your plant – misting with a spray bottle every other day helps! Additionally, if the plant is underwatered for too long, repotting into fresh soil may be necessary to give your holiday cactus a second chance at life.

How to Revive an Air Plant

Posted by darrell on
0
Gardening Tips
How to Revive an Air Plant

If you are looking for a way to revive your dying air plant, follow quick solutions like soaking the plant in clean water and trimming off the dead and affected parts.

Air plants (also called Tillandsia) are special plants that can grow anywhere. These epiphytic plants are from another planet and require no soil to grow. The air plants absorb water and moisture through their leaves and require a moderate quantity of water to survive.

Caring for these plants may not require much, but sometimes they start looking sickly (limp, droopy, shriveled, or brown). What will you do in such a condition? This write-up will teach you how to pump life into dying indoor air plants.

How to Revive Dying Air Plants

Knowing the real reason for air plants’ sickness is very important. For instance, when an air plant needs water, it turns brown or limp. You can easily revive an air plant by taking the following actions.

Overnight soak

When an air plant lacks water, its leaf ends will start turning brown or curling. Also, air plants show a yellow/brown color when they are too exposed to sunlight. You can revive your air plant in such a condition by immersing it overnight in clean water. This gives them enough time to absorb the nutrients and moisture they need. You can start by filling a bowl with lukewarm water and soaking the air plant entirely.

Cut off brown or dead leaves

Removing dead parts allow air plants to absorb more sunshine, look beautiful and regenerate. The brown and dead leaves are easy to come off, so gently tug at the leaves until fresher leaves are left. With this, your air plant will gently and naturally pump back to life.

When the healthier leaves come to the surface, it’s easier for the plant to get moisture and nutrient from the atmosphere. Removing the dead parts also keep the pest at bay, as most pests are attracted to dead leaves.

Get rid of pests

One of the main causes of your dying air plants may be pests. The mealybug is one of the major dangers to air plants. So, you must keep insects and pests away from the plants to prevent them from dying.

Separate the affected plants from the healthy ones first. After that, spray them with a disinfectant solution like neem oil, dish soap, or baking soda. By doing so, you can keep the plant healthy and eliminate most pests, which will help it recover.

Provide air circulation and sunlight

An air plant needs good air circulation, as important as sunshine and water. Compared to most home plant decorations, air plants have tiny fuzzy white fibers on the leaves known as trichomes, allowing them to grow without soil. It helps them absorb water and airborne minerals and also regulates their temperature.

This means bad air regulation around your Tillandsia plant reduces its growth and causes its cores to rot or die. However, you can avoid this by checking your air plant regularly or ensuring they get excess moisture. Also, bright light exposure helps healthy air plants bloom. But leaving them under direct sunlight for too long makes them dry or die.

Remove excess water

Your air plants must be watered to survive, but too much water will damage the green leaves and roots. Hence, try to avoid running much tap water on the air plant and keep them dry. You can use a dry paper towel to carefully wipe away any excess water from the plant. You must be careful not to harm the leaves and roots when you drain the water.

Air Plant (Tillandsia) Care

Air plants can go for a long period without much attention. They might be small by nature, but they make stunning standalone houseplants.

Here is air plant care guides you should know.

Temperature

The best temperature to keep Tillandsia healthy and happy is between 50 to 900F and about 100F cooler at night. Air plants are sensitive to extreme cold and can survive a short freeze. However, once the temperature drops below 350F, they will require protection.

Air condition

Bad air circulation reduces growth in air plants and mostly rots their cores.  So when taking care of the air plant, remember that it requires good air, moderate sunshine, and water. Check your plant from time to time to ensure that they are getting adequate nutrients and moisture. Also, avoid putting air plants in a closed container or spots near fans or vents.

Light exposure

Light exposure plays a major role in air plants to look healthy and bloom. Leaving them under direct sunlight for too long may lead to burns and death. Your Tillandsia container should be placed under bright indirect light. Ideally, 7 am to 11 am is the best time ever.

Water needs

Care for air plants includes knowing how to water them to keep them healthy and happy properly. Directly watering your plant can be tricky. It’s advisable to water air plants deeply at least twice a week. You can mist them with spray bottles or soak them in water for an hour. You can also combine the two methods by soaking for 20 to 60 minutes daily with a supplemental misting, depending on the current climate and time of the year.

Regardless of your chosen method, always place the plant on top of a paper towel and allow it to air dry for a few hours before placing it gently in its containers. This is to protect them from rotting. Additionally, it is best to always look at your air plant’s tips to check its condition.

Feeding

Fertilizing air plants is not really for them to look their best, but it is an ideal way to encourage them to bloom and produce offsets. Use liquid fertilizer for the plants, especially natural/organic fertilizer.

It is easy to feed air plants by adding low-nitrogen bromeliad fertilizer or regular water solution houseplant fertilizer. The recommended strength is preferably a spray bottle, making it possible to feed and water your air plant at the same time.

Air plants naturally absorb enough moisture from high humidity and rain. But due to the dryness in most homes, indoor air plants require frequent watering. So, it’s best to monitor your air plants, water them as required, add fertilizer, monitor their exposure to light, etc. You don’t want them dried and dead over time.

FAQs

How long should I soak my air plant?

It’s best to soak your air plant overnight for 6 to 7 hours. After soaking, ensure you dry it before placing it in a container.

How do you revive air plants turning brown?

An air plant turning brown majorly signifies dryness. By watering your air plant deeply, you can revive it.

What type of water should be used for air plants?

You should use fresh and clean water to soak your air plant.

What causes dead air plants?

Causes of death are plants’ lack of light, too much sunlight, lack of water, poor air circulation, and too much water.

What Kind of Water Is Best for Your Plants?

Posted by darrell on
0
Gardening Tips
What Kind of Water Is Best for Your Plants?

One of the most fundamental aspects of caring for a plant is ensuring it gets enough water. What many people don’t realize, however, is that the type of water that you feed to your plants can have a huge impact on their health. While tap water has been chemically treated to be safe for human consumption, the purification methods leave traces of chemicals like fluoride and chlorine, which can harm your plants, killing good bacteria on their roots. A simple way to circumvent this is to use a water filter to remove contaminants. This way, you can ensure that you are providing your plants with the purest kind of water, encouraging them to thrive.

The Characteristics of Water

Differences in the makeup of your water depend largely on the region you live in, mostly due to the type of rock at your water source.

Soft Water

When rain falls from the sky, it is naturally soft. However, if it meets a porous material like chalk or limestone when it reaches the ground, it soaks up minerals such as calcium and magnesium, making it ‘hard.’

So that these minerals don’t build up in our plumbing systems, most water is treated with water softeners, which work by replacing existing minerals with potassium or sodium ions.

The problem is that the elevated sodium content can trick your plants and lawn and disrupt their water balance. In a worst-case scenario, your plants will die of thirst, and the salt build-up in the soil will also prevent future plants from growing.

Hard Water

As you now know, the most prevalent minerals found within hard water are dissolved calcium and magnesium, which are responsible for limescale deposits and blockages in pipes, heating systems, and appliances.

Whilst you might be forgiven for thinking extra minerals can only benefit your plants, there can be too much of a good thing. Over time, these minerals can accumulate, reducing the presence of other essential nutrients and altering the pH levels in the soil.

Choosing the Right Water for Your Plants

Tap Water

Whilst many houseplants can survive on a diet of tap water, some more sensitive plants can suffer or even die. This is because of the trace chemicals left in treated water, most typically fluoride and chlorine. If you must use tap water to feed your plants, naturally dissipate the chlorine by leaving it in a container to sit (uncovered) for a day or so.

Rainwater

rainwater for plants

Rainwater is great for your plants as it is naturally soft. However, there are some cons to consider, such as difficulty collecting sufficient quantities and pollution, and high acidity if you live in the city or an industrial area.

Bottled Water

Bottled water can contain useful nutrients and minerals that encourage healthy plant growth; however, we would not recommend this method due to the serious environmental impact of plastic waste.

Filtered Water

Installing a water filter at home is easy and effective. You can remove dangerous viruses, bacteria, compounds, and toxins responsible for causing illness not just in plants but also in humans. Pre-filtering your water will not just boost growth in your leafy companions but improve the quality of your drinking water as well.

To help your plants live their best life, filtered water is your safest bet. You can be confident that any contaminants and nasty chemicals have been removed, and your plant’s roots can absorb all the hydrating water they need, free of impurities.

11 Natural Lawn Care Techniques

Posted by darrell on
0
Gardening Tips
11 Natural Lawn Care Techniques

How to take care of your lawn organically? Is lawn care without chemicals possible? As the world is transitioning to more sustainable ways of living and doing business, we need to find better ways of taking care of our properties. A lush green lawn starts with healthy soil. The truth is that synthetic fertilizers and weed killers actually only work temporarily and deplete the soil over time. Fertilizers work on the blades of grass, making it look greener. The better way is to take care of your lawn naturally – from the ground up – as healthy soil is a sustainable way to take care of the lawn. Here are several steps that you can use to transform your property’s lawn into a thriving green paradise!

1. Test your soil

Your lawn requires the right pH levels to survive. Most grasses thrive in slightly acidic soils in the 6-7 pH range. If the pH levels go too acidic or too alkaline, you can end up with thin spots. You can get the soil testing kit at your local home and garden store or order it online.

2. Improve the soil based on the soil test results

Finding that balance is the perfect way to start working towards that lush lawn. Try adding lime if the ph level is below 6.0 or garden sulfur if it is above 7.0.

3. Aerating

Aerating is the process of removing 2-3 inch deep core plugs that consist of soil, thatch, and roots. Aerating ensures that air, water, and nutrients can reach the roots to develop the proper growth of your lawn. This type of lawn care service is typically recommended once a year.

4. Mow often, but not too short

Everyone loves a fresh, crisp lawn, but did you know you can actually cause your lawn harm if you mow it too short? Mowing your lawn too short makes it prone to weeds and drought. Grass needs a certain height to produce the proper amount of nutrients via photosynthesis, so both grass and roots are healthy.

5. Sharpen your mower blade

This one may seem obvious, but it’s crazy to hear how many people don’t do this! Why do you have to ensure that your lawn mower’s blades are sharp? Because a dull blade damages grass, therefore taking a long time to recover.

6. Leave the lawn clippings

Go bagless! Clippings break down quickly and return valuable nutrients to the soil. And you save time and won’t need to use plastic bags. Good for your lawn and the environment.

7. Get rid of weeds or pests

No one likes to look out their window and see a farm of weeds and other unwanted growth around their property. Use gardening tools that help to get rid of weeds while getting at the roots deeply and not removing too much soil around. You can use natural and organic agents such as gluten cornmeal during the beginning of the season to stunt the growth of weeds such as dandelion or plantain.

8. Water deeply but not too often

To water or not to water? Finding the perfect compromise for your lawn depends on a variety of factors. If you water it for not long enough, the roots won’t get enough moisture. Watering it too often encourages weed growth. Generally, watering is recommended to be done in the morning or evening time when the temperature isn’t very high so that it won’t evaporate a lot, and you save on water.

9. Overseed

If you’re searching for a luscious lawn this Summer, this is a key step in your yard care journey! Applying an overseeding mix after you mow the lawn will cover any dead patches on the lawn and help it return to its once-perfect state. (You might need to dethatch first if the dead layer is too thick). Make sure to water well the next few days.

10. Dethatching

Dethatching is usually recommended during the beginning of Spring to give your lawn a nice wake-up call for the warmer months ahead! This lawn care service is completed by using an electromechanical dethatcher with rotating steel tines or blades that quickly and thoroughly take care of your thatch problem.

11. Fertilizing

Natural and organic is the way to go when it comes to fertilizing! Choose from various organic fertilizers available on the market or use a local compost from a nursery nearby for the best results. Apply 1 cm. layer and distribute it evenly by raking it through your lawn. This will provide crucial nutrients needed in your soil.

Last Words

These are some important steps on how to take care of your lawn organically. Focus on the health of your soil by testing its pH and adjusting ph levels if necessary. Make sure to aerate once a year to provide the necessary nutrients to the soil. Take care of your lawn by cutting it often but not too short. Sharpen your mower blade for the best results. Overseeding and dethatching help to achieve the proper lawn consistency. If you don’t have enough time or tools to do all the work, you can hire a local natural lawn care company to help with your lawn maintenance.

8 Top Gardening Tips for Beginners

Posted by darrell on
0
Gardening for Beginners
8 Top Gardening Tips for Beginners

Gardening is a fun and rewarding activity that anyone can enjoy. In a survey done in 2018, it was reported that 11% of Americans aged 18 to 29 years old did gardening. 29% are 50 to 64 years old, and 39% are over 65 years old or younger than 18. Therefore, you do not need to feel intimidated if you have not tried gardening before. In this article, we will explore some top gardening tips for beginners.

8 Top Gardening Tips for Beginners

1. Choose the Right Location

Location is very important when you begin gardening. You should put your garden in an area where you can regularly see it. That is because you are likely to work more on it when you see it regularly.

When scouting for a location, you also want to ensure that the gardening spot is near a water source. This will make it easier for you to water your plants. Similarly, you need to consider the sun when finding a spot for your garden.

A common beginner gardener’s mistake is miscalculating the sunlight. Many fruits, vegetables, and herbs must be exposed to the sun for at least 6 hours to grow. Hence, before picking a garden arena, make sure that you consider the sun.

2. Invest in the Right Tools

You cannot practice gardening successfully without the appropriate tools at hand. These include a garden fork, pruners, a hose, a spade, a rake, water-resistant gloves, a wheelbarrow, and a hose or watering can.

3. Test the Soil

When just starting gardening, you need to invest in great soil that drains well and is rich in nutrients. It is recommended to test the soil to ensure that it is healthy enough for your plants. If you want to plant in the ground or raised bed, you can mix all-purpose garden soil with the existing soil.

4. Provide Nutrients to Your Plants Regularly

Besides using the right type of soil, you must also ensure that your plants get the right nutrients. You will more likely succeed in gardening using quality soil and plant food.

5. Use Raised Beds

Anyone new to gardening should consider getting a raised bed. Although this can be expensive initially, it will give you more control over the soil and pests. A raised bed also allows you to grow different plants based on their needs.

6. Pick the Right Plants

Remember that you cannot just plant any plant that you want. You have to choose plants that suit your growing environment. Therefore, place plants that need more sun in a sunny area and pick plants that can tolerate hot weather if you live in a tropical area. If you have adequate space, you can grow melons or pumpkins.

It is best to research well so you can grow your plants well at home. You can also start from young plants if you want to grow herbs and vegetables instead of seeds. Another tip is to never grow your vegetables in the same plot for two or more years. You need to rotate them for your soil to maintain the right nutrients.

7. Understanding the Frost Schedule

You will likely make a huge mistake if you plant too early or late in the season. Therefore, you must know the last average spring frost date in your location so as not to kill your plants. Knowing the first average fall frost date is also helpful in knowing when to move your plants inside your home or harvest them so that the cold weather will not kill them.

8. Add Mulch

Mulch may be worth considering depending on what you are growing. It helps to feed the soil with the right nutrients and protect against soil erosion.

Around every plant, make sure that you put mulch that is 2 to 3 inches deep. This can help to lessen the weeds that block sunlight and reduce moisture loss due to evaporation. As a result, you do not have to water too much. If you don’t have mulch, you can utilize shredded leaves, straws, pine straws, and other available materials in your area.

Whether you are an experienced or a novice gardener, these tips will help you get your garden up and going. You just need to research how to properly grow the plants you want and have some basic gardening tools on hand. Also, learn to be patient since growing plants takes time.

Ways to Power Outdoor Lighting Without Electricity

Posted by darrell on
0
Gardening Tips
Ways to Power Outdoor Lighting Without Electricity

Lighting and electricity go hand in hand. However, there are many ways to have outdoor lighting without electricity. There are wireless outdoor lighting systems such as solar, solar outdoor chandeliers, battery-operated outdoor lights, battery-operated outdoor chandeliers, solar garden globes, etc.

Numerous solar outdoor lighting options are not dependent on conventional electricity. So you don’t have to worry about power outages during the winter season. Aside from convenience and comfort, an outdoor light fixture fulfills other needs.

Outdoor light fixtures provide bright light for the external premises of your home. This illumination serves as a form of security because it can scare away home invaders or burglars. In addition, it enhances the ambiance of your outdoor surroundings for parties. It can also make you feel safe during strolls around your yard at dusk.

After carrying out some research into the subject, we’ve come up with a list of lighting fixtures that can illuminate your surroundings without electricity.

Before we do that, let’s first consider factors that should influence your choice.

Choose the Outdoor Lighting Fixtures

There are some essential factors to consider when choosing outdoor lighting fixtures. They include:

Outdoor Lighting Cost or Budget

Before deciding how to power outdoor lights, consider the cost of light fixtures and how much you can afford to spend on them. Outdoor light fixtures come in different types and have a wide range of prices.

Have a spending plan for your lighting project. Without budgeting, you may buy what you don’t need or spend more than you planned to. Budgeting gives you control over how much you spend and helps you buy what you can afford.

Color and Style of the Outdoor Light Fixture

What color and style of light fixture do you need on your premises? There are cool light fixtures and warm light fixtures. The color and style of your light fixtures influence the mood or ambiance of your premises. So first, determine what kind of ambiance you want.

Some colors provide illumination. On the other hand, other lighting colors provide illumination and give your outdoor settings a relaxing atmosphere. Cool light fixtures are ideal for this.

If you want to use your outdoor space for hosting a party, a warm light fixture will serve you best.

The durability of Outdoor Lights

Certain light fixtures last longer than others. For durability, we recommend going for LED lights. An LED light fixture can provide sufficient outdoor lighting and also save you the cost of frequent replacements.

This helps you save money. LED lighting is also a popular lighting option, and it’s used in many households.

Positioning of Light Fixture

Consider where you’re going to install the wireless outdoor lighting. Placing your light strategically can beautify your outdoor space. It will also add character and make it an appealing sight to onlookers. Good lighting placement also helps in preventing certain accidents.

Depending on where you want to install outdoor lighting systems, you can go for garden lights, path lights, porch lights, etc. First, consider the kind of lights that are ideal for your placement strategy.

Some lights are installed on the ground, some are installed on the wall of your home, and others are hung on tree branches.

Wattage

Outdoor lighting varies in wattage. So go for the one that meets your needs. If you’re installing lighting for decorative, ambiance, or accent purposes, go for lighting with lower wattage.

However, if you aim to light up the dark parts of your premises at night, go for lighting with higher wattage.

How to Power Outdoor Lights Without Electricity?

Solar Stake Lights

Solar Stake Lights

Solar lights are one of the best options to illuminate your premises without increasing your monthly utility bills. It draws its energy from the sun and converts it to electrical power through photovoltaic cells.

During the daytime, it uses its solar panels to accumulate enough power to provide night-time illumination for your premises. A cost-effective solar lighting option is solar garden lights.

Aside from the primary function of providing illumination at night, they also enhance the ambiance of your settings because they are accent lights.

Solar-powered lights are pretty easy to install because they don’t require electrical cords or wires. They are also lightweight, which is an added advantage. We advise you to install your solar-powered lighting where you’re likely to spend more time when you’re outdoors. Good examples are dining and seating areas.

Once the sun sets, your solar power feature lights will detect the absence of the sun and automatically switch on. It’s an intuitive lighting system.

Solar Outdoor Chandeliers

An outdoor chandelier powered by solar energy gives you unlimited options for decorating your patio, deck, gazebo, and other outdoor areas. Outdoor chandeliers are energy-efficient and eco-friendly lights. It’s accent lighting, adding aesthetic effect to your premises. It will also highlight outdoor features as well as your outdoor furniture.

Most outdoor hanging chandeliers are ambient lights. One unique advantage that comes with it is that you can install it anywhere. You can use it to provide lighting for a sculpture and enjoy the view at night. It can even offer aesthetics for an outdoor party.

This ambient light is weatherproof and safe to use during the rainy season. It also comes with rechargeable solar batteries.

Solar String Lights

Solar String Lights

If you want to install new light fixtures in your compound, this is an excellent option. String lights provide a warm glow. It’s an ideal outdoor lighting design if you’ll be hosting guests or parties frequently.

You can install this battery-operated outdoor lighting system anywhere. For instance, on your lawn, rooftop, or your furniture. You can choose a light string with LED lights to illuminate far corners of your premises. This way, you won’t need an extension cord.

Also, a light string connects to your phone like a smart home system. This makes it easy for you to operate or configure it. We also recommend you go for waterproof string lights so that illumination won’t be a problem when there is snow or rainfalls.

Battery-Powered Outdoor Lights

This is another ideal option for outdoor lighting without electricity. We recommend going with battery-powered lighting that is durable and can reach expansive areas.

Also, go for brands that use weather-resistant materials to design outdoor lighting. Please consider the duration of illumination, too. Good batteries can last for up to 10 hours for a session.

Some of these lights are equipped with a sensor responsive light. The motion sensor lighting switches on when it detects movements. This wireless functionality is excellent for security purposes.

We recommend switching off the light manually when you’re not using it to make the battery last longer.

Battery-Operated Outdoor Chandelier

This battery-powered outdoor lighting is lightweight and easy to install. It provides purely practical security and ambiance. Furthermore, it’s also cost-effective. With the flip of a switch, it can shine brightly on your outdoor premises.

Several of these battery-powered chandeliers come with teardrop-shaped bulbs to provide aesthetic lighting. They add glamour, style, and class to where you sit and dine outdoors. An added advantage is that you can hang this battery-powered outlet anywhere you choose.

No matter where you install the battery-operated chandelier, it will have a strong aesthetic effect. It’s a great choice if you frequently entertain your guests till the wee hours of the morning.

Solar Garden Globes

Solar Garden Globes

This is arguably the most aesthetic outdoor lighting option. It can be installed as a permanent fixture in your garden, and it doesn’t require electrical outlets, wires, or even solar panels.

This light comes with replaceable batteries, and it’s a buyers’ favorite because you can create a pattern of your choice. For example, you can decide to spread the globes or clutter them in a particular area.

This lighting is best placed on your patio and deck, besides your swimming pool and garden path. The color emissions from this lighting can make the appearance of your garden a view you can’t get tired of.

They can be installed with screws, and most of them are weatherproof. So you don’t have to worry about the weather when you’re installing them. They are versatile lights and can be installed anywhere on your outdoor premises.

Wax/LED Candles

LED Candles Outdoor Lighting

This is old-fashioned for outdoor lighting, which is precisely where its appeal lies. They are incredibly affordable and easily accessible. Aside from providing illumination, you can use LED or wax candles to enhance the mood or create a romantic setting.

There are house owners who love old-fashioned lighting but don’t want the naked flame. For this category of buyers, we recommend flame-flickering LED candles. They resemble real wax candles, but they’re safer because their wax doesn’t drip.

So you can decide to go for LED or real candles. For wax candles, we recommend going for candles of various sizes. Use old but clean jars to place them, creating homemade lanterns in the process. You can even add some citronella oil to the wax to make a natural mosquito repellent.