Category Archives

25 Articles

Your CSA Box is Losing Nutrients Before Dinner (Here’s How to Stop It)

Posted by darrell on
0
Culinary and Food Preservation
Your CSA Box is Losing Nutrients Before Dinner (Here’s How to Stop It)

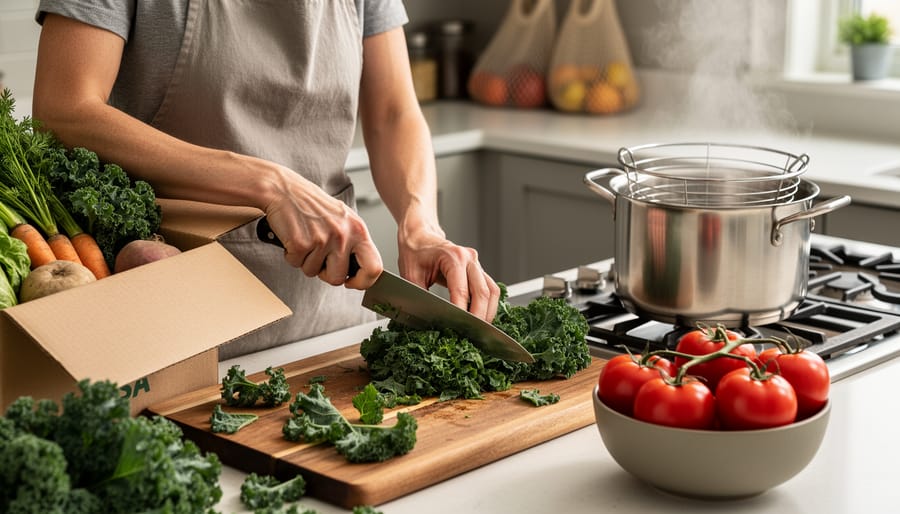
Steam vegetables for 3-5 minutes maximum to retain up to 90% of water-soluble vitamins like vitamin C and folate, compared to boiling which destroys nearly half. Cut your CSA greens immediately before cooking rather than hours in advance—exposure to air degrades nutrients rapidly, with some vegetables losing 25% of their vitamin content within the first hour of chopping.

Store your farm-fresh produce properly the moment it arrives: keep leafy greens in breathable bags in high-humidity crisper drawers, tomatoes at room temperature away from sunlight, and root vegetables in cool, dark spaces. This simple triage prevents nutrient loss before cooking even begins. When you do cook, embrace quick, high-heat methods like stir-frying or roasting at 400°F for 15-20 minutes. These techniques create flavorful caramelization while minimizing the time nutrients are exposed to heat.

The beauty of CSA cooking lies in working with produce picked at peak ripeness just days earlier—vegetables that already contain 30-50% more nutrients than supermarket equivalents. Your challenge isn’t just preserving these nutrients but celebrating them through cooking methods that honor the farmer’s work and your commitment to nourishing your family. Every technique you master transforms your weekly CSA box from overwhelming abundance into therapeutic, nutrient-dense meals that taste as vibrant as they look.

Why CSA Produce Demands Different Cooking Strategies

When you pick up your CSA box each week, you’re receiving produce at its nutritional peak. That bundle of kale was likely harvested just hours or days before reaching your kitchen, compared to store-bought greens that may have traveled thousands of miles over one to two weeks. This freshness creates a remarkable difference in vitamin content, enzyme activity, and phytonutrient levels.

Here’s what many home cooks don’t realize: ultra-fresh CSA produce contains significantly higher levels of water-soluble vitamins like vitamin C and folate, along with active enzymes that support digestion. Studies show that some vegetables lose up to 50% of their vitamin C within a week of harvest. Your CSA carrots, tomatoes, and leafy greens arrive with their nutritional armor intact.

Traditional cooking methods were developed partly to make aging produce palatable and safe. Boiling vegetables for extended periods, for instance, made sense when produce sat in storage or traveled long distances. But these same methods become wasteful when applied to farm-fresh ingredients. When you boil just-picked broccoli for ten minutes, you’re pouring precious nutrients straight down the drain.

Sarah Chen, a CSA member from Oregon, discovered this firsthand. After switching from boiling to quick-steaming her weekly greens, she noticed her family actually enjoyed the vegetables more. The vibrant colors, crisp textures, and sweeter flavors of minimally cooked fresh produce won over even her skeptical teenagers. Understanding this freshness advantage helps you choose cooking techniques that honor the farmer’s careful work and your produce’s exceptional quality.

Overhead view of fresh CSA produce box filled with colorful vegetables and herbs
A typical CSA box contains nutrient-dense, freshly harvested produce that requires specific handling to preserve its superior nutritional value.

The Science Behind Nutrient Loss in Your Kitchen

Water-Soluble vs. Fat-Soluble Nutrients

Understanding how nutrients behave in cooking helps you make the best choices with your CSA bounty. Nutrients fall into two categories: water-soluble and fat-soluble, and each responds differently to heat and cooking methods.

Water-soluble nutrients include vitamin C and B vitamins. These delicate compounds dissolve in water and can leach out when you boil or blanch vegetables. When CSA member Maria started steaming her leafy greens instead of boiling them, she noticed they tasted brighter and retained more color—signs that nutrients were staying put. Save cooking water from vegetables to use in soups or stocks, capturing those nutrients that did escape.

Fat-soluble nutrients like vitamins A, D, E, and K need fat for your body to absorb them properly. This is great news for your fresh CSA carrots and kale. Adding a drizzle of olive oil or a pat of butter to these vegetables doesn’t just enhance flavor—it actually helps you absorb more nutrients. Lightly sautéing tomatoes in healthy fat increases your absorption of lycopene, turning simple cooking into nutritional amplification.

The key is matching your method to your produce’s nutritional profile for maximum benefit.

Heat Sensitivity of Common Vegetables

Understanding how heat affects your CSA haul helps you make smart cooking choices. Delicate greens like spinach, kale, and chard lose vitamin C and folate quickly when exposed to high heat, so save these for quick sautés or enjoy them raw in salads. Broccoli, cauliflower, and Brussels sprouts retain more nutrients with gentle steaming rather than boiling.

Here’s the good news: some vegetables actually become more nutritious when cooked. Tomatoes release more lycopene when heated, making that fresh CSA tomato sauce a nutritional powerhouse. Carrots increase their beta-carotene availability through light cooking, and mushrooms boost their antioxidant levels when gently sautéed.

Local farmer Maria Chen from Riverside Organic Farm shares her approach: “I tell my CSA members to think of cooking as unlocking potential. Those beautiful heirloom tomatoes? Roast half for enhanced nutrition and slice the rest fresh for vitamin C.”

The key is matching your method to the vegetable. Water-soluble vitamins in peppers, cucumbers, and summer squash benefit from quick, minimal cooking or raw preparations, while root vegetables like beets and sweet potatoes release beneficial compounds through roasting or steaming.

Preservation Techniques That Lock in Maximum Nutrition

Fresh green vegetables being blanched in pot of boiling water
Quick blanching preserves both the vibrant color and nutritional content of fresh greens from your CSA box.

Quick Blanching and Shocking

This simple two-step technique helps you lock in those vibrant colors and essential nutrients when your CSA box arrives packed with greens and fresh vegetables. Here’s how to do it right:

Start by bringing a large pot of water to a rolling boil—no salt needed, as it can actually diminish nutrient retention. While waiting, prepare an ice bath in a large bowl. Drop your vegetables into the boiling water for just 30-90 seconds, depending on thickness. Tender greens like spinach need only 30 seconds, while heartier vegetables like green beans or broccoli benefit from 60-90 seconds.

Immediately transfer the vegetables to your ice bath using a slotted spoon or spider strainer. This shocking process halts the cooking instantly, preserving heat-sensitive vitamins like vitamin C and folate while keeping that gorgeous farm-fresh color intact. Let them sit for the same amount of time they were blanched.

Local farmer Maria Sanchez swears by this method for her weekly CSA prep. “I blanch and shock everything Sunday evening,” she shares. “It cuts my weeknight cooking time in half, and my kale still tastes garden-fresh on Friday.” Pat your vegetables completely dry before storing in airtight containers—they’ll stay crisp and ready-to-eat for up to five days, making nutritious meals effortless all week long.

Hands holding bamboo steamer basket with colorful fresh vegetables and rising steam
Low-temperature steaming preserves maximum nutrients while achieving perfectly tender vegetables.

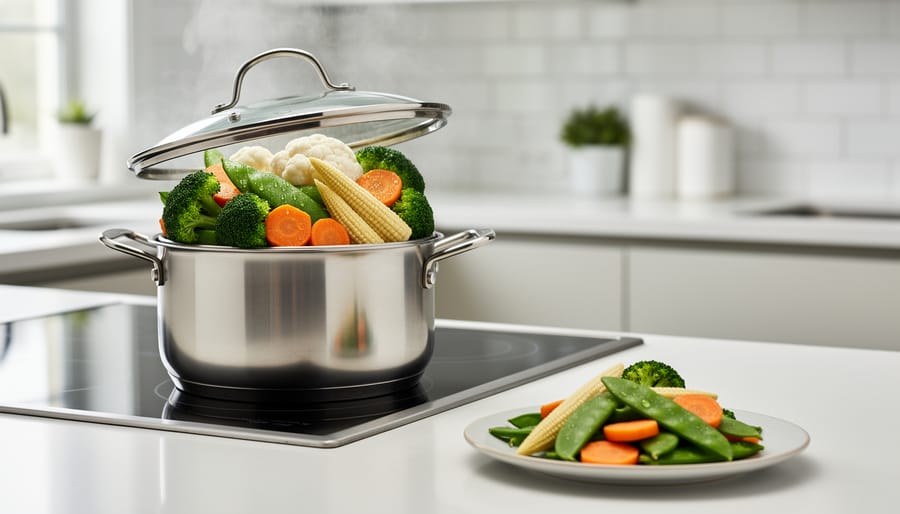
Low-Temperature Steaming

Low-temperature steaming preserves up to 90% of water-soluble vitamins in your CSA vegetables, making it one of the gentlest cooking methods available. The key is keeping your steaming temperature between 180-200°F rather than a rolling boil, which typically reaches 212°F.

To steam at lower temperatures, bring water to a gentle simmer before adding your steamer basket. You’ll know it’s right when you see light wisps of steam rather than vigorous clouds. This approach works beautifully with delicate greens like chard and spinach, which cook in just 2-3 minutes, and heartier vegetables like broccoli and carrots that need 5-7 minutes.

Local farmer Sarah Chen from Green Valley Farm shares her favorite tip: “I add fresh herbs from my garden to the steaming water. The aromatic steam infuses subtle flavor into the vegetables without adding salt or oil.” This technique especially enhances the natural sweetness of your farm-fresh produce.

For best results, cut vegetables into uniform sizes to ensure even cooking, and avoid overcrowding your steamer basket. The vegetables should sit in a single layer with space for steam to circulate. This gentle method maintains the crisp texture and vibrant colors that make CSA produce so appealing while keeping all those valuable nutrients intact.

The Raw Integration Method

Think of raw integration as giving your CSA veggies a nutrient-packed encore. The technique is simple: finish your cooked dishes with a generous handful of fresh, raw produce right before serving. When Sarah Chen started adding raw spinach to her just-drained pasta and tossing shredded kale into hot grain bowls, she noticed her family enjoyed brighter flavors while preserving those delicate vitamin C and B vitamins that cooking destroys.

The heat from your cooked base gently wilts the raw additions without demolishing their living enzymes. Try stirring fresh arugula into warm soups, topping roasted vegetables with chopped fresh herbs and diced tomatoes, or mixing raw grated beets into hot quinoa. This method works beautifully with your weekly CSA haul since you’re using produce at peak freshness when enzyme activity is highest. The contrast in textures adds appeal too—crisp cucumber ribbons over warm lentil stew or fresh corn kernels scattered across black bean tacos create satisfying variety that makes nutritious eating genuinely enjoyable.

Smart Sautéing with Healthy Fats

Here’s a cooking secret that might surprise you: adding healthy fats to your CSA vegetables isn’t just delicious—it actually helps your body absorb more nutrients. Many vitamins in your farm-fresh greens, carrots, and tomatoes are fat-soluble, meaning they need a little fat to be properly absorbed during digestion.

When sautéing your weekly haul, choose nutrient-friendly fats like olive oil, avocado oil, or grass-fed butter. The key is temperature control: keep your heat at medium (around 325°F) to preserve both the fat’s beneficial properties and your vegetables’ delicate nutrients. High heat can destroy valuable compounds and create harmful oxidation.

Timing matters too. Add heartier vegetables like kale or chard stems first, then introduce tender items like tomatoes or zucchini later. This prevents overcooking while ensuring even coating with your healthy fat. Local farmer Maria Chen discovered this technique transformed her CSA cooking, allowing her to prepare an entire week’s worth of vegetables without nutrient loss. A light sauté with quality fat takes just 5-7 minutes and makes those farm-fresh flavors shine while maximizing nutritional benefits.

Preservation Cooking for Surplus Weeks

When your CSA box overflows with gorgeous greens and abundant vegetables, preservation becomes your best friend for maintaining those farm-fresh nutrients. Fermentation techniques actually boost nutritional value by creating beneficial probiotics while preserving vitamins. Try transforming surplus cabbage, cucumbers, or carrots into tangy sauerkraut and pickles that’ll keep for months in your fridge.

Minimal-heat dehydration is another nutrient-preserving powerhouse, especially for herbs, tomatoes, and leafy greens. Set your dehydrator below 118°F to maintain enzyme activity and vitamin content. Local farmer Maria transformed her overwhelming kale harvests into crispy snacks that her family still enjoys months later, all while retaining their deep green nutrition. These simple methods mean nothing goes to waste, and you’ll enjoy your local organic bounty year-round.

Timing Tricks That Make All the Difference

The first 24 hours after picking up your CSA box are crucial for locking in nutrients. Fresh produce begins losing vitamins the moment it’s harvested, with some vegetables losing up to 50% of their vitamin C within a week. Your game plan? Unpack immediately and sort items by perishability.

Start by identifying your most delicate greens like spinach, arugula, and lettuce. These should hit your dinner plate within the first two days. Next, plan meals around tender items like zucchini, tomatoes, and fresh herbs by midweek. Heartier vegetables like carrots, beets, and winter squash can wait until the weekend while maintaining their nutritional punch.

Sarah, a longtime CSA member from Ontario, transformed her cooking routine using this simple system. “I used to find wilted greens at the bottom of my fridge on Thursdays,” she shares. “Now I plan a big salad night on pickup day and sauté my delicate greens the next evening. Everything gets used, and my family actually enjoys more variety.”

Create a visual meal map on Sunday evenings. Match your most nutrient-dense, perishable items with your busiest cooking nights when you need maximum nutrition for minimal effort. Pair this strategy with proper food storage techniques for anything you can’t use immediately. This rhythm ensures you’re eating produce at peak freshness when nutrients, flavor, and texture are all at their absolute best.

Real CSA Member Success Story

Meet Sarah Chen, a graphic designer and mother of two who joined her local CSA three years ago. Like many new members, she initially felt overwhelmed by the weekly bounty of unfamiliar vegetables arriving at her doorstep. Her family’s diet consisted mainly of convenience foods, and she noticed her kids constantly battling low energy and frequent colds.

Sarah decided to focus on nutrient-preserving cooking techniques rather than complicated recipes. She started with simple changes: steaming broccoli instead of boiling it, which research shows retains up to 90% of vitamin C compared to just 50% with boiling. Within six weeks, her family noticed a significant difference in their energy levels.

Her breakthrough came when she developed a rotating system of seasonal recipes that required minimal prep time. During summer months, she perfected a raw zucchini ribbon salad dressed with lemon and herbs, preserving all the heat-sensitive nutrients. For fall root vegetables, she adopted quick roasting at high temperatures, creating caramelized exteriors while keeping interiors tender and nutrient-rich.

Sarah tracked her family’s health improvements over 18 months. Her children’s sick days dropped by 60%, and her own cholesterol levels improved by 25 points. She credits these changes to eating produce at peak freshness and using cooking methods that preserve nutritional value.

Her advice to new CSA members is straightforward: start with one or two techniques, practice them until they become second nature, then gradually expand your repertoire as confidence grows.

Your Week-by-Week CSA Cooking Action Plan

Managing your CSA box becomes second nature when you match preservation methods to seasonal arrivals. In spring, your box overflows with delicate greens like spinach and lettuce—steam or quick-sauté these within 24 hours to preserve their vitamin C and folate. A light steam takes just 2-3 minutes and locks in nutrients better than boiling.

Summer brings abundant tomatoes, peppers, and zucchini. This is prime blanching season. Blanch summer vegetables for 2-3 minutes, then freeze them in portions for winter meals. The quick heat treatment preserves color, texture, and nutritional content for months. Raw storage in breathable containers keeps tomatoes flavorful on your counter.

Fall root vegetables like carrots, beets, and squash shine with gentle roasting at 375°F. Their natural sugars caramelize while beta-carotene remains stable. Store unwashed roots in your crisper drawer for weeks of steady use.

Winter shares featuring hearty greens and storage crops benefit from blanching before freezing. Developing strong farm-to-table cooking skills helps you confidently adapt techniques as seasons change, ensuring nothing goes to waste while maximizing the nutritional value of every harvest.

How Biodynamic Research is Revolutionizing Food Preservation

Posted by darrell on
0
Culinary and Food Preservation
How Biodynamic Research is Revolutionizing Food Preservation

Biodynamic research revolutionizes traditional food preservation methods by integrating cosmic rhythms with agricultural science. This holistic approach, pioneered by Rudolf Steiner in 1924, has evolved into a sophisticated system that enhances soil fertility, crop vitality, and food nutrient density through natural processes. Recent studies from the Rodale Institute demonstrate that biodynamic practices increase soil organic matter by up to 21% more than conventional farming methods, while improving crop resilience and nutritional value.

Modern biodynamic research combines ancient farming wisdom with cutting-edge soil microbiology, investigating how lunar cycles and specialized preparations influence plant growth and food storage capability. Farmers implementing these methods report longer shelf life for harvested produce, enhanced flavor profiles, and stronger disease resistance in crops – all achieved without synthetic inputs. This research-backed approach offers practical solutions for sustainable agriculture while addressing growing concerns about food security and environmental stewardship.

Working with natural rhythms rather than against them, biodynamic practices create vibrant, self-sustaining farm ecosystems that produce nutrient-dense foods while regenerating the land. For CSA farmers and home gardeners alike, this research opens new possibilities for improving soil health, crop yields, and food preservation naturally.

The Science Behind Biodynamic Preservation

Natural Rhythms and Preservation Timing

Ancient farmers understood what modern research now confirms: the moon’s cycles and seasonal timing play crucial roles in food preservation effectiveness. Just as seasonal harvest patterns influence crop quality, these natural rhythms affect how well foods maintain their nutrients and freshness during storage.

Studies show that preserving foods during the waning moon phase often results in better outcomes. During this period, moisture content in plants naturally decreases, making it an ideal time for drying herbs, fruits, and vegetables. Local farmers report that sauerkraut and other fermented foods prepared during this phase tend to develop deeper flavors and remain stable longer.

The seasonal timing of preservation matters too. For example, root vegetables stored during their natural harvest season (fall) typically maintain their quality longer than those preserved out of season. This aligns with traditional wisdom that working with nature’s cycles enhances food preservation success.

Temperature fluctuations and humidity levels throughout the lunar cycle can impact preservation outcomes. Many biodynamic practitioners schedule their preservation activities around these natural patterns, often recording better results than when timing is ignored. For instance, seeds dried during the waning moon show higher viability rates, while preserves made during the waxing moon may be more prone to spoilage.

Biodynamic lunar calendar surrounded by jars of preserved fruits and vegetables
Lunar calendar showing planting and harvesting cycles with preserved foods arranged in a circular pattern

Soil-to-Storage Connection

Biodynamic farming practices have shown a fascinating connection between soil health and food quality that extends well beyond the harvest. Recent studies indicate that produce grown using biodynamic methods often demonstrates superior storage capabilities compared to conventionally grown crops.

Local farmer Sarah Bennett noticed this phenomenon firsthand at her CSA farm in Ontario. “Our biodynamically grown root vegetables stay crisp and flavorful for months longer in cold storage,” she shares. “We’ve found that carrots harvested in October maintain their sweetness well into March.”

This enhanced storage capability stems from the holistic approach biodynamic farming takes to soil cultivation. The practice of using specialized preparations and following lunar cycles appears to influence cellular structure and natural preservation processes within the produce. Vegetables and fruits grown in balanced, nutrient-rich soil develop stronger cell walls and higher concentrations of beneficial compounds that act as natural preservatives.

For home gardeners and small-scale farmers, this means reduced food waste and extended seasonal eating. Simple storage techniques like root cellaring become more effective with biodynamically grown produce, allowing families to enjoy local, organic food throughout the year. This connection between growing methods and storage life offers a practical solution for those seeking to reduce their environmental impact while maintaining access to nutritious, locally grown food.

Practical Applications in the Kitchen

Fermentation and Living Foods

Biodynamic principles extend naturally into the art of food preservation, particularly through traditional fermentation practices that enhance both nutritional value and shelf life. These methods honor the natural rhythms and living processes that transform raw ingredients into probiotic-rich foods.

In biodynamic fermentation, practitioners pay special attention to lunar cycles and seasonal energetics, believing these cosmic forces influence bacterial activity and fermentation outcomes. For example, many biodynamic farmers initiate their vegetable ferments during the waxing moon, when the natural pull of moisture is believed to enhance the development of beneficial bacteria.

The process begins with carefully selecting produce at peak ripeness, often harvested during optimal planetary alignments. Vegetables are then prepared using time-honored techniques like wild fermentation, which relies on naturally occurring beneficial bacteria rather than commercial starters. This approach maintains the connection between the food and its growing environment.

Common biodynamic ferments include:
– Sauerkraut made from cabbage harvested during root days
– Kimchi prepared with vegetables grown in balanced, living soil
– Naturally fermented pickles using herbs from biodynamic gardens
– Sourdough cultures maintained through seasonal transitions

Research has shown that fermented foods from biodynamic sources often contain more diverse probiotic strains compared to conventional counterparts. This abundance of beneficial microorganisms is attributed to the rich microbial life present in biodynamically managed soils, which transfers to the crops and ultimately to the fermented products.

Farmers practicing biodynamic fermentation report enhanced flavor profiles and extended preservation periods, suggesting that these methods may offer practical benefits beyond their philosophical foundations. Many CSA members have noticed these differences, particularly in the depth of flavor and keeping quality of fermented products made from biodynamic produce.

Various vegetables fermenting in glass jars showing active fermentation process
Active fermentation process showing vegetables in clear glass jars with visible bubbles and brine

Root Cellar Storage Optimization

Root cellars, a cornerstone of traditional food preservation, take on new life when enhanced with biodynamic principles. These underground storage spaces work in harmony with natural energy cycles and lunar rhythms, offering an eco-friendly approach to extending harvest longevity. By implementing proven storage techniques alongside biodynamic methods, farmers have reported remarkable improvements in produce shelf life.

The key to optimizing root cellar storage lies in understanding the relationship between cosmic rhythms and plant vitality. Traditional root cellars already leverage earth’s natural cooling properties, but biodynamic practitioners enhance this by timing their harvest and storage activities according to the moon’s phases. Root vegetables stored during the descending moon, for instance, tend to maintain their freshness longer.

Temperature and humidity control become more intuitive when working with biodynamic principles. Many successful CSA farmers arrange their storage zones based on the elemental qualities of different crops – grouping “root forces” vegetables like carrots and potatoes separately from “leaf forces” produce like cabbage and celery. This arrangement helps maintain optimal storage conditions for each crop type.

Innovative farmers have developed specialized storage containers made from natural materials that complement biodynamic practices. Clay pots, wooden crates lined with straw, and woven baskets allow proper air circulation while maintaining the energetic integrity of stored produce. Some practitioners also incorporate biodynamic preparations into their storage systems, using herbs like yarrow and chamomile to enhance preservation naturally.

Real-world results from CSA farms show that combining root cellar storage with biodynamic timing can extend storage life by up to 30% compared to conventional methods. For example, winter squash stored according to biodynamic principles often maintains its quality well into spring, while root vegetables remain crisp and flavorful for months longer than expected.

These enhanced storage practices not only preserve food quality but also maintain the vital life forces that biodynamic agriculture nurtures throughout the growing season.

Traditional root cellar with organized storage of biodynamic vegetables and fruits
Well-organized root cellar showing biodynamically grown produce stored according to seasonal patterns

Success Stories from CSA Farms

The transformative power of biodynamic farming methods comes alive through the experiences of successful CSA farms across the country. Take the story of Sunflower Valley Farm in Oregon, where Sarah and Mike Thompson transformed 15 acres of conventional farmland into a thriving biodynamic operation over five years. By implementing traditional biodynamic preparations and following the lunar calendar for planting, they’ve seen a 40% increase in crop yield and remarkable improvement in soil fertility.

Another inspiring example is Green Meadows CSA in Vermont, run by the Martinez family. Their implementation of biodynamic composting techniques has eliminated the need for external fertilizers while producing vegetables that customers describe as “incredibly flavorful and long-lasting.” Their root cellar storage methods, combined with biodynamic harvesting timing, have extended their winter storage crop availability by nearly two months.

In California’s central valley, River Oak Farm has become a model for drought-resistant agriculture through biodynamic practices. Owner James Chen attributes their success to the deep understanding of the farm as a living organism. Their innovative water conservation methods, coupled with biodynamic preparations, have reduced water usage by 30% while maintaining optimal crop health.

The success of these farms isn’t just measured in yields and sustainability. Prairie Wind Community Farm in Illinois has built a waiting list of over 200 families for their CSA program. Their commitment to biodynamic principles has created a vibrant ecosystem where beneficial insects thrive, naturally controlling pests without chemical interventions.

These farms share common elements in their success: dedication to the complete biodynamic calendar, careful attention to preparation timing, and strong community engagement. Many report that their produce stays fresh significantly longer than conventional alternatives, with some root vegetables maintaining quality for up to six months in proper storage conditions.

Perhaps most encouraging is the economic viability these farms have achieved. By focusing on quality over quantity and building direct relationships with consumers, they’ve created sustainable business models that support both environmental stewardship and profitable farming operations. Their success stories demonstrate that biodynamic farming isn’t just an idealistic approach but a practical path to agricultural resilience and community food security.

Getting Started with Biodynamic Preservation

Starting your biodynamic preservation journey doesn’t have to be complicated. Begin by selecting fresh, locally grown produce at its peak ripeness – this ensures the highest vital energy in your preserved foods. Create a dedicated preservation workspace that aligns with lunar and celestial calendars, which many biodynamic practitioners use to optimize preservation timing.

Essential tools include clean glass jars, natural preserving agents like sea salt and raw honey, and fermentation weights. Start with simple projects like lacto-fermented vegetables or herb-infused vinegars. These basic preservation methods allow you to understand biodynamic principles while creating nutritious, living foods.

Document your preservation process, noting dates, weather conditions, and lunar phases. This record-keeping helps you identify patterns and refine your techniques. Join local biodynamic farming communities or online forums to share experiences and learn from seasoned practitioners.

Remember to incorporate biodynamic preparations, such as yarrow or chamomile teas, which can enhance the preservation process. Start small, perhaps with a single preservation method, and gradually expand your practice as you gain confidence and understanding of biodynamic principles.

Biodynamic research continues to validate what many farmers have known intuitively – that working in harmony with nature’s rhythms can produce remarkable results. From enhanced soil fertility to increased crop resilience, the evidence supporting biodynamic practices grows stronger each year. Whether you’re a home gardener or professional farmer, implementing even a few biodynamic principles can make a significant difference in your growing success.

Start small by observing natural cycles, creating your own compost, or experimenting with companion planting. As you become more comfortable, gradually incorporate additional practices like planting by lunar cycles or preparing biodynamic sprays. Remember, every step toward more sustainable farming practices helps create a healthier planet and more nutritious food for our communities.

Join the growing movement of biodynamic practitioners who are proving that agriculture can be both productive and regenerative. Your garden or farm can become a living laboratory for these time-tested methods.

Farm-Fresh Cooking Classes: Where NC’s CSA Bounty Meets Culinary Excellence

Posted by darrell on
0
Culinary and Food Preservation
Farm-Fresh Cooking Classes: Where NC’s CSA Bounty Meets Culinary Excellence

Transform your culinary journey at North Carolina’s premier cooking schools, where traditional Southern flavors meet modern farm-to-table cooking skills. From Charlotte’s innovative Culinary Arts Institute to Asheville’s sustainable cooking academies, NC offers diverse programs that combine hands-on training with fresh, local ingredients. Whether you’re pursuing professional certification or expanding your home cooking expertise, these schools uniquely integrate seasonal CSA produce into their curriculum, teaching students to master both classic techniques and creative farm-fresh recipes. Professional chefs and passionate home cooks alike discover how to transform weekly CSA harvests into extraordinary meals while building a strong foundation in culinary fundamentals. Local cooking schools celebrate North Carolina’s rich agricultural heritage while preparing students for modern culinary challenges in professional kitchens or home settings.

Top CSA-Based Cooking Schools in North Carolina

Chef teaching students how to prepare seasonal vegetables in a cooking class
Professional chef demonstrating cooking techniques to students using fresh CSA vegetables

Triangle Region Programs

The Triangle region offers a vibrant mix of culinary education opportunities, with programs catering to both aspiring chefs and home cooks. Durham’s Cooking Connection hosts hands-on workshops focusing on farm-to-table cuisine, teaching participants how to transform local seasonal produce into delicious meals. In Raleigh, the Professional Cooking Institute provides comprehensive professional training programs, including specialized courses in Southern cuisine and modern cooking techniques.

Chapel Hill’s Kitchen Works partners with local farms to offer unique farm-to-kitchen experiences, where students harvest ingredients before learning to prepare them. The Natural Chef Program at Central Carolina Community College in Pittsboro stands out for its holistic approach, combining nutrition education with sustainable cooking practices.

For those seeking flexible learning options, Sur La Table in Durham’s University Hill and Williams-Sonoma at Raleigh’s North Hills offer regular cooking demonstrations and technique-focused classes. These shorter workshops are perfect for busy professionals wanting to enhance their culinary skills while supporting local food systems. Many programs offer weekend intensives and evening classes to accommodate various schedules, making culinary education accessible to everyone in the Triangle area.

Mountain Region Offerings

The mountain region of North Carolina, particularly Asheville and its surroundings, offers a unique blend of farm-to-table cooking experiences and traditional Appalachian culinary education. At the Asheville-Buncombe Technical Community College, students can enroll in professional culinary programs that emphasize local ingredients and mountain cooking traditions. The acclaimed John C. Campbell Folk School in Brasstown provides immersive weekend workshops where participants learn everything from biscuit-making to preserving mountain herbs.

For those seeking a more intimate learning experience, Several local chefs offer private cooking classes in their restaurant kitchens during off-hours. These hands-on sessions often feature foraging excursions for mushrooms and wild edibles, followed by instruction in preparing these mountain delicacies. The Seasonal School of Culinary Arts hosts week-long sessions throughout the year, focusing on seasonal ingredients from local farmers and producers.

Many mountain region cooking schools have also partnered with local organic farms to provide farm-to-table workshops, where students harvest ingredients before learning to prepare them in traditional and contemporary Appalachian styles.

What Makes CSA Cooking Classes Unique

Collection of fresh, colorful seasonal vegetables from North Carolina farms
Diverse array of seasonal NC produce arranged on a rustic wooden table

Seasonal Learning Experience

North Carolina’s cooking schools embrace the rhythm of the seasons, crafting their curriculum around seasonal produce availability to provide students with authentic farm-to-table experiences. Spring classes often focus on tender greens, asparagus, and early herbs, teaching students to create light, refreshing dishes that celebrate new growth. As summer arrives, instruction shifts to handling the abundance of tomatoes, peppers, and summer squash, with preserving techniques taking center stage.

Fall brings lessons in root vegetables, winter squashes, and hearty greens, while winter sessions explore creative ways to work with storage crops and greenhouse-grown produce. Many schools partner with local farms to ensure students learn to cook with what’s currently being harvested, making each class uniquely tied to North Carolina’s agricultural calendar.

This seasonal approach helps students develop a deeper connection with local food systems and enhances their understanding of ingredient selection. Classes often include tips for ingredient substitution and menu planning based on what’s available throughout the year, ensuring graduates can adapt their cooking skills to any season.

Farm-to-Kitchen Skills

North Carolina’s cooking schools emphasize the importance of handling fresh, local ingredients with skill and respect. Students learn essential techniques like proper washing and storage of farm-fresh produce to maximize shelf life and preserve nutrients. Hands-on classes teach the art of selecting ripe vegetables, identifying peak-season produce, and understanding harvest times for different crops.

Instructors demonstrate knife skills specifically tailored to working with fresh ingredients, from precisely cutting delicate herbs to breaking down root vegetables. Students master preservation methods including pickling, fermenting, and canning to make the most of seasonal bounty. Special attention is given to working with lesser-known local varieties and heirloom produce that might not be found in typical grocery stores.

The curriculum often includes farm visits where students learn directly from growers about optimal harvesting techniques and post-harvest handling. Practical sessions cover creating zero-waste menus, utilizing all parts of vegetables, and incorporating freshly harvested herbs and edible flowers into dishes. These skills help students transform their home kitchens into efficient spaces for working with local, seasonal ingredients.

Cooking class participants learning proper knife techniques for fresh produce
Students practicing knife skills with fresh herbs and vegetables

Choosing the Right CSA Cooking Workshop

Experience Levels and Class Types

North Carolina’s cooking schools cater to every skill level, from complete beginners to seasoned home cooks looking to refine their techniques. Many programs offer flexible learning formats, including evening classes, weekend intensives, and extended professional courses. Beginners can start with fundamental knife skills and kitchen safety through community cooking workshops that emphasize hands-on learning with seasonal ingredients. Intermediate students often explore specialized cuisines, advanced techniques, and menu planning, while professional-track programs provide comprehensive training in commercial kitchen operations and food service management.

Class sizes typically range from intimate groups of 8-12 students to larger demonstration-style sessions of up to 30 participants. Some schools offer hybrid learning options, combining online instruction with in-person kitchen practice. Whether you’re interested in casual cooking classes or pursuing a culinary career, North Carolina’s cooking schools provide structured pathways to help you achieve your culinary goals.

Schedule and Location Considerations

Most CSA cooking workshops in North Carolina offer flexible scheduling options to accommodate different lifestyles. Weekly classes typically run in the evenings from 6-9 PM, making them accessible for working professionals. Weekend intensive courses are also available, usually running Saturday mornings from 9 AM to 1 PM, perfect for those who prefer concentrated learning sessions.

Locations vary across the state, with many programs hosted at working farms or dedicated teaching kitchens. Popular venues include the Piedmont region’s sustainable farms and urban cooking spaces in Charlotte, Raleigh, and Asheville. Some programs offer seasonal pop-up workshops that follow harvest schedules, allowing students to work with the freshest local ingredients.

When choosing a program, consider travel time and parking availability. Many schools provide detailed directions and transportation suggestions. Some even offer carpooling networks for students traveling from further distances. Weather considerations are important too, especially for farm-based workshops during summer months.

North Carolina’s cooking schools offer an incredible opportunity to connect with local agriculture while developing valuable culinary skills. Through CSA-focused cooking education, you’ll learn to transform fresh, seasonal produce into delicious meals while supporting local farmers and sustainable practices. These programs provide more than just cooking techniques – they offer a deeper understanding of our food system, seasonal eating, and the importance of community-supported agriculture.

Whether you’re a home cook looking to expand your skills or someone passionate about local food systems, NC’s cooking schools provide the perfect blend of hands-on experience and agricultural education. From mountain to coast, each program brings its own unique perspective while maintaining strong ties to local farms and food producers.

Consider exploring the cooking schools in your area to discover how you can become part of this vibrant culinary community. The skills you’ll gain will last a lifetime, helping you make the most of your CSA shares while contributing to a more sustainable and connected food system in North Carolina.

Transform Your CSA Produce: Ancient Soil Wisdom Meets Modern Fermentation

Posted by darrell on
0
Culinary and Food Preservation
Transform Your CSA Produce: Ancient Soil Wisdom Meets Modern Fermentation

Transform your soil into a thriving ecosystem by embracing regenerative agriculture’s six foundational principles, each amplified through the power of fermentation. As you master vegetable fermentation, you’ll unlock nature’s most potent tools for building resilient, productive farmland.

Beyond organic farming, regenerative practices work in harmony with natural cycles to create abundantly fertile soil, enhance biodiversity, and sequester carbon. These principles don’t just sustain the land—they actively regenerate it, producing nutrient-dense foods while healing our planet.

Whether you’re managing acres of farmland or tending a backyard garden, implementing these six principles will revolutionize your growing practices. By incorporating fermented amendments and probiotic-rich solutions, you’ll accelerate soil healing, boost plant immunity, and cultivate crops that thrive without synthetic inputs.

Get ready to discover how ancient wisdom meets modern science in a system that doesn’t just grow food—it revitalizes entire ecosystems while producing exceptional harvests. Your journey toward regenerative success starts with understanding these crucial principles and their powerful connection to fermentation practices.

Building Living Soil Through Fermented Amendments

Creating Probiotic-Rich Soil Amendments

Creating probiotic-rich soil amendments is like brewing a nutritious smoothie for your garden. By fermenting plant materials, you can develop powerful soil enrichments that boost microbial life and enhance nutrient cycling. Start by collecting green materials like grass clippings, leaves, and food scraps. Mix these with a fermentation starter (like effective microorganisms or natural yogurt) and molasses in a sealed container.

Let the mixture ferment for 2-3 weeks in a dark, room-temperature space. During this time, beneficial microorganisms multiply and break down the organic matter into a form that plants can readily absorb. The final product should have a sweet-sour smell, similar to pickled vegetables.

Local farmer Sarah Martinez shares, “Since I started using fermented amendments, my soil’s structure has improved dramatically. My plants are more resilient, and I’ve noticed fewer pest problems.” Apply the finished amendment by diluting it with water (1:20 ratio) and spraying it directly onto soil or compost piles. This practice not only enriches your soil but also reduces waste by transforming garden “scraps” into valuable resources.

Comparison of depleted and healthy living soil samples showing microbial activity
Split image showing soil samples – one poor soil vs one rich with organic matter and visible microorganisms

Microbial Balance in Healthy Soils

A thriving soil ecosystem depends on the delicate balance of beneficial microorganisms working together. Through sustainable farming practices, we can nurture these microscopic allies using fermented amendments like compost tea and bokashi. These natural preparations introduce diverse bacterial and fungal communities that help break down organic matter, fix nitrogen, and create nutrient-rich humus.

When we add fermented materials to our soil, we’re essentially providing a probiotic boost that strengthens the soil food web. Beneficial microbes help protect plants from pathogens, improve nutrient absorption, and enhance root development. They also play a crucial role in carbon sequestration by transforming plant matter into stable soil organic carbon.

The key is maintaining diversity – different types of fermented amendments support various beneficial organisms. For example, lacto-fermented plant juice provides beneficial bacteria, while indigenous microorganism solutions introduce local, climate-adapted microbes. By regularly applying these amendments, farmers create resilient soil ecosystems that require fewer external inputs while producing healthier, more nutritious crops.

Minimizing Soil Disturbance with Fermented Plant Protection

Protecting your crops while maintaining healthy soil structure doesn’t have to involve harsh chemicals or excessive tilling. Fermented plant preparations offer a natural and soil-friendly alternative that many regenerative farmers swear by. These preparations work with nature rather than against it, preserving the delicate soil ecosystem while defending against pests and diseases.

One popular approach is using fermented plant juices (FPJ), made by fermenting nutrient-rich plants with brown sugar or molasses. These preparations are rich in beneficial microorganisms and natural plant compounds that strengthen crop resistance to pests and diseases. For example, Maria Rodriguez, a California-based regenerative farmer, reports that her tomato yields increased by 30% after implementing FPJ treatments, all while maintaining pristine soil structure.

Indigenous Microorganism (IMO) solutions are another powerful tool in the regenerative farmer’s arsenal. These preparations capture and cultivate native beneficial microbes from your local environment, creating a powerful soil-building force that naturally suppresses harmful organisms. When sprayed directly on crops or soil, they form a protective barrier without disturbing the soil’s physical structure.

Best of all, these fermented preparations can be made right on your farm using local materials. Common ingredients include bamboo shoots, banana stems, and herb varieties like lemongrass and marigold. The fermentation process typically takes 5-7 days, after which the solution can be diluted and applied through regular spraying equipment.

By choosing fermented plant preparations over conventional methods, you’re not just protecting your crops – you’re building a resilient ecosystem that works in harmony with nature’s own defense mechanisms.

Keeping the Soil Covered with Cover Crop Ferments

Cover crop fermentation is a game-changing technique that amplifies the benefits of keeping soil covered while adding an extra layer of soil enrichment. By fermenting cover crops like clover, vetch, or rye, farmers create powerful liquid amendments that help build soil health and boost plant growth.

The process is surprisingly simple: harvest fresh cover crop material, chop it finely, and combine it with water and natural sugar sources like molasses in an anaerobic container. Over 2-3 weeks, beneficial microorganisms break down the plant material, creating a nutrient-rich liquid full of organic compounds and beneficial enzymes.

Local farmer Sarah Martinez shares her success story: “Since I started applying cover crop ferments to my fields, I’ve noticed stronger plant growth and fewer pest issues. The soil stays moist longer, and the earthworm population has exploded!”

These fermented solutions can be applied in several ways:
– As a soil drench to improve soil structure
– As a foliar spray to boost plant immunity
– Mixed with irrigation water for continuous feeding
– Added to compost to accelerate decomposition

The beauty of this method lies in its circular nature – you’re essentially transforming your cover crops into a super-powered version of themselves. The fermentation process makes nutrients more bioavailable while introducing beneficial microorganisms that support soil life.

Pro tip: Start small with a test batch using different cover crop combinations to find what works best for your soil. Keep detailed notes on ratios and fermentation times to refine your process over time.

Maximizing Biodiversity Through Fermentation

Multi-Culture Fermentation

Multi-culture fermentation takes the concept of companion planting to the next level by combining different crops in fermentation projects. This innovative approach enhances nutrient availability and creates diverse, beneficial microbial communities that support soil health. For example, combining cabbage with radishes and carrots in a traditional kimchi recipe not only creates a delicious probiotic-rich food but also generates a powerful liquid fertilizer from the fermentation brine.

Local farmer Sarah Chen shares her success story: “When I started mixing different vegetable scraps in my fermentation bins, I noticed my compost became richer and my soil more alive. The plants responded incredibly well to this diverse microbial input.”

To get started with multi-culture fermentation, try combining seasonal vegetables from your garden with herbs and beneficial weeds. The resulting fermented products can be used both as nutrient-dense foods and as powerful soil amendments. The liquid from these ferments, often called “ferment tea,” contains beneficial microorganisms and nutrients that can be diluted and applied directly to garden soil or used as a foliar spray.

This practice creates a closed-loop system where garden waste becomes a valuable resource for soil building and crop nutrition.

Various fermented vegetables in mason jars displaying different fermentation stages and colors
Collection of colorful fermented vegetables in glass jars showing different stages of fermentation

Seasonal Fermentation Cycles

Harnessing the power of seasonal fermentation cycles allows farmers to maximize the nutritional value and longevity of their crops throughout the year. Each season brings unique opportunities for fermentation, from spring’s tender greens to autumn’s hardy root vegetables.

In spring, focus on fermenting early crops like radishes, spring onions, and young garlic shoots. These quick ferments provide essential probiotics while preserving the vibrant flavors of early harvest. Summer brings abundant vegetables perfect for classic ferments like cucumber pickles, fermented tomatoes, and zucchini preserves.

Fall is ideal for longer-term fermentation projects using heartier vegetables. Cabbage becomes sauerkraut, while root vegetables transform into probiotic-rich kimchi and other traditional preserves. Winter months are perfect for experimenting with stored vegetables and developing complex flavors in existing ferments.

By aligning fermentation practices with natural growing cycles, farmers can reduce waste, extend their harvest’s usefulness, and maintain a steady supply of nutrient-dense foods year-round. This approach also helps build soil health by creating a closed-loop system where fermentation byproducts can be returned to the soil.

Context-Based Fermentation Applications

Fermentation practices in regenerative agriculture aren’t one-size-fits-all solutions. Instead, successful farmers adapt these techniques to work with their local environment, available resources, and specific crop varieties. For example, in humid regions, fermentation periods might need to be shorter to prevent unwanted mold growth, while drier climates may require longer fermentation times to achieve optimal results.

Take Sarah Miller’s farm in Vermont, where she developed a custom fermentation process for her fall vegetables using locally sourced maple leaves and spring water. This context-based approach resulted in pickled vegetables that not only stored well throughout winter but also captured the unique terroir of her region.

Understanding your soil’s microbial composition is crucial when developing fermentation strategies. Different soil types harbor distinct bacterial communities, which directly influence fermentation outcomes. Farmers can work with these natural variations by adjusting salt concentrations, fermentation vessels, and temperature controls to optimize the process.

Seasonal considerations also play a vital role. Summer crops might require different fermentation approaches compared to winter harvests. Many successful farmers maintain detailed fermentation logs, tracking variables like temperature, humidity, and fermentation duration across seasons to refine their techniques over time.

For beginners, starting with simple ferments using local ingredients is recommended. Try fermenting common crops in your area and gradually experiment with different variables. Remember that traditional fermentation practices in your region have likely evolved over generations to suit local conditions – these can provide valuable insights for developing your own context-appropriate techniques.

By adapting fermentation methods to your specific context, you’ll create more resilient preservation systems while honoring the unique characteristics of your land and crops.

Microscopic view of plant root system showing symbiotic relationship with soil microorganisms
Close-up of plant roots with visible mycorrhizal networks and beneficial bacteria colonies

Living Roots and Probiotic Networks

Just as we nurture relationships in our communities, plants cultivate vital connections underground through their root systems and partnerships with soil microorganisms. These living networks are enhanced when we introduce beneficial bacteria cultures through fermented amendments, creating a year-round support system for plant health.

Fermented amendments, like compost tea and bokashi, feed these underground networks by delivering active microorganisms directly to the soil. These additions help create what farmers often call the “soil food web” – a complex system where beneficial fungi and bacteria work together with plant roots to improve nutrient absorption and protect against disease.

Think of it as a underground farmers’ market, where roots trade sugars they produce through photosynthesis in exchange for minerals and nutrients provided by soil microorganisms. Fermented amendments act like welcome guests at this market, bringing new traders and resources to the exchange.

Sarah Chen, a successful CSA farmer in British Columbia, saw dramatic improvements in her crop resilience after implementing regular applications of fermented amendments. “My plants developed stronger root systems, and I noticed they handled drought stress much better,” she shares. “It’s like giving the soil a probiotic boost.”

To maintain these living networks, consider:
– Applying compost tea monthly during growing season
– Using cover crops to keep roots active year-round
– Minimizing soil disturbance to protect fungal networks
– Adding fermented plant material to your compost
– Monitoring soil life through simple observation tests

Remember, healthy roots supported by thriving microbial communities form the foundation of regenerative agriculture success.

The beautiful synergy between regenerative agriculture principles and fermentation practices creates a powerful framework for sustainable farming. When we combine these approaches, each principle becomes enhanced through the natural processes of fermentation. Soil health improves as fermented amendments introduce beneficial microorganisms, while water retention increases through enhanced organic matter content. The biodiversity principle flourishes as fermentation creates new microbial ecosystems both above and below ground.

Local farmers who have embraced these combined practices report stronger, more resilient crops and reduced dependency on external inputs. By incorporating fermented plant juices, bokashi, and other traditional fermentation techniques, they’re building self-sustaining systems that honor both ancient wisdom and modern regenerative principles.

As we face increasing environmental challenges, this integration of regenerative agriculture and fermentation offers hope for a more sustainable future. Whether you’re managing a large farm or tending a backyard garden, these combined practices provide practical tools for building healthy soils, supporting biodiversity, and growing nutrient-dense food while caring for our planet.

Dehydrated Organic Food: Your Secret to Long-Lasting Fresh Flavor

Posted by darrell on
0
Culinary and Food Preservation
Dehydrated Organic Food: Your Secret to Long-Lasting Fresh Flavor

Preserve nature’s bounty while maintaining the full benefits of organic produce through the ancient art of food dehydration. Modern food dehydrators transform fresh organic fruits, vegetables, and herbs into nutrient-dense, shelf-stable ingredients that retain up to 95% of their original nutritional value. This sustainable preservation method eliminates the need for artificial preservatives while reducing food waste and storage space requirements by up to 90%.

Unlike conventional dried foods, dehydrated organic products offer superior flavor concentration and maintain their certification status, making them ideal for year-round access to seasonal organic ingredients. Whether you’re a homesteader looking to preserve your garden’s harvest or an eco-conscious consumer seeking sustainable food storage solutions, dehydration provides a practical bridge between harvest seasons while honoring the integrity of organic farming practices.

From creating nutritious hiking snacks to stocking your pantry with wholesome ingredients, dehydrated organic food represents a perfect fusion of traditional preservation methods and modern sustainable living. This guide explores how to maintain optimal nutritional value while extending the life of your organic investments through proper dehydration techniques.

Why Choose Organic Food Dehydration?

Nutrient Retention in Dehydrated Organic Foods

Dehydrating organic produce stands out among various food preservation methods for its exceptional ability to maintain nutritional value. When done properly, dehydration can retain up to 95% of the food’s original nutrients, making it an excellent choice for preserving organic harvests.

The gentle drying process helps maintain crucial vitamins and minerals while concentrating beneficial compounds. For example, dried organic tomatoes actually contain more lycopene per serving than fresh ones. Similarly, dehydrated organic herbs retain their essential oils and medicinal properties, often becoming more potent in their dried form.

What’s particularly wonderful about dehydration is that it preserves the organic integrity of your produce. Since no chemicals or preservatives are needed, your organic foods stay truly organic. The process simply removes water while leaving beneficial compounds intact, including antioxidants, fiber, and enzymes.

To maximize nutrient retention, it’s important to dehydrate at the right temperature – typically between 95°F and 140°F, depending on the food type. This ensures that heat-sensitive vitamins aren’t destroyed while effectively removing moisture.

Cost-Effective Storage Solution

Dehydrating seasonal organic produce offers a smart way to maximize your food budget while preserving the goodness of peak-season fruits and vegetables. When organic produce is abundant and prices are low, buying in bulk and dehydrating for later use can lead to significant savings. For example, purchasing organic tomatoes during summer harvest can cost 50-60% less than buying them off-season, and dehydrating allows you to enjoy these savings year-round.

The storage efficiency of dehydrated foods also translates to economic benefits. A pound of fresh organic apples reduces to about one-sixth of its original weight when dehydrated, requiring minimal storage space while retaining its nutritional value. This space-saving aspect means you can stock up on organic produce without investing in expensive storage solutions or extra freezer space.

Many home gardeners and small-scale farmers have found success in dehydrating their excess harvest, preventing waste and extending their food supply through leaner months. The initial investment in a quality food dehydrator typically pays for itself within one growing season through preserved organic produce that would otherwise spoil or require costly alternative storage methods.

Best Organic Foods for Dehydration

Collection of dehydrated organic fruits including apples, strawberries, mangoes, and bananas
Assortment of vibrant dehydrated organic fruits arranged artistically, showing different textures and colors

Fruits and Berries

Dehydrating seasonal organic produce is an excellent way to preserve nature’s sweetness year-round. When dehydrating fruits and berries, proper preparation is key to achieving the best results. Start by selecting ripe, unblemished fruit and washing it thoroughly. Most fruits benefit from a quick lemon juice bath to prevent browning during the drying process.

For apples and pears, slice them uniformly (about ¼ inch thick) and remove the cores. Berries like strawberries should be halved or sliced, while smaller berries such as blueberries can be left whole after checking the skin. Stone fruits like peaches and apricots need to be pitted and cut into even pieces.

Arrange your prepared fruit in single layers on dehydrator trays, ensuring pieces don’t overlap. Most fruits dry best at 135°F (57°C), though times vary significantly: berries typically take 10-18 hours, while apple slices might need 6-12 hours. The fruit is ready when it feels leather-like and pliable, with no moisture when squeezed.

For optimal results, rotate your trays every few hours and check progress regularly. Once dried, let your fruits cool completely before storing in airtight containers. Remember that organic fruits often dry differently than conventional ones due to their natural sugar content and lack of preservatives, so monitoring moisture levels is especially important.

Vegetables and Herbs

Dehydrating organic vegetables and herbs is an excellent way to preserve your garden’s bounty while maintaining nutritional value. Start by selecting fresh, unblemished produce at peak ripeness. Wash thoroughly and cut vegetables into uniform pieces about 1/4 inch thick to ensure even drying.

For leafy greens like kale and spinach, remove tough stems and tear into bite-sized pieces. Root vegetables such as carrots and beets should be sliced thinly or cut into small cubes. Tomatoes can be halved or sliced, while mushrooms are best cut into 1/4-inch slices.

Herbs require special attention due to their delicate nature. Remove stems and spread leaves in a single layer. Popular herbs for dehydrating include basil, oregano, thyme, and sage. These can be dried at lower temperatures (95°F to 105°F) to preserve their essential oils and flavors.

Pre-treatment isn’t always necessary for vegetables, but blanching can help maintain color and reduce drying time. For best results, maintain a consistent temperature between 125°F and 135°F for vegetables. Your produce is ready when it’s crisp and brittle – a process that typically takes 6-12 hours depending on the item and humidity levels.

Store your dehydrated vegetables and herbs in airtight containers away from direct sunlight. When properly dried and stored, they can last up to a year while retaining their organic integrity and most of their nutritional benefits.

Essential Equipment and Techniques

Choosing Your Dehydrator

Selecting the right dehydrator is crucial for successfully preserving your organic produce. Start by considering the size you’ll need – a smaller 5-tray model works well for occasional use, while larger 9-12 tray units are perfect for homesteaders processing seasonal harvests. Look for adjustable temperature controls, which allow you to safely dry different types of produce at their optimal temperatures.

For organic food preservation, stainless steel trays are worth the investment over plastic ones. They’re more durable, easier to clean, and won’t leach chemicals into your food. A model with a timer and automatic shut-off can prevent over-drying and save energy.

Consider the airflow system – horizontal flow dehydrators typically provide more even drying than vertical models. Also check the noise level, especially if you’ll be running it in shared living spaces. Many modern dehydrators feature quiet operation without sacrificing performance.

Budget-friendly options start around $50, while premium models can reach $300 or more. Remember that a quality dehydrator is an investment that will help you preserve organic produce for years to come.

Modern food dehydrator with trays of organic fruits and vegetables being dried
Professional food dehydrator displaying multiple trays of colorful organic produce in various stages of dehydration

Natural Sun-Drying Methods

Natural sun-drying is one of humanity’s oldest and most sustainable methods of food preservation. This traditional technique harnesses solar energy and natural airflow to slowly remove moisture from organic produce, helping preserve its nutrients and flavors. The process begins by selecting fully ripe, unblemished organic fruits, vegetables, or herbs.

To sun-dry effectively, choose a location that receives direct sunlight for at least 6-8 hours daily and has good air circulation. Place your prepared produce on drying racks or screens, ideally elevated about 6 inches off the ground. Traditional materials like bamboo or wood work well, though modern food-grade mesh screens are also suitable.

Many Mediterranean cultures still practice sun-drying tomatoes, figs, and herbs on their rooftops or in dedicated drying yards. The key is to cover the produce with breathable mesh to protect it from insects while allowing moisture to escape. Depending on your climate and the type of produce, drying times can range from 2-14 days.

For best results, bring your produce indoors at night to prevent moisture reabsorption, and continue the process the next day until the desired dryness is achieved.

Well-organized storage system for dehydrated organic foods in labeled glass jars
Organized pantry shelf showing properly stored dehydrated organic foods in airtight glass containers with labels

Storage and Usage Tips

Proper storage is crucial for maintaining the quality and shelf life of your dehydrated organic foods. Using proper storage containers like airtight glass jars, food-grade mylar bags, or vacuum-sealed containers will protect your preserved goods from moisture and light exposure.

Store your dehydrated foods in a cool, dark place with temperatures between 50-60°F (10-15°C). A pantry or basement shelf works perfectly, but avoid areas near stoves or heating vents. Consider using oxygen absorbers in your storage containers to prevent oxidation and extend shelf life.

When using dehydrated foods, remember they’re concentrated versions of their fresh counterparts. Start by rehydrating smaller portions to avoid waste. Most items will reconstitute within 30 minutes to 2 hours in warm water. For faster results, use hot (not boiling) water and reduce soaking time by half.

Here’s a helpful tip from our community garden: label each container with the contents and drying date. While properly stored dehydrated organic foods can last 1-2 years, it’s best to rotate your stock and use older items first.

To maintain freshness after opening, ensure container lids are tightly sealed and check periodically for any signs of moisture or mold. If you notice any off-odors or visible mold, discard the affected items immediately. For frequently used items, consider storing smaller portions in separate containers to minimize exposure to air and moisture when accessing your preserved foods.

Dehydrating organic produce offers an excellent way to preserve the bounty of your garden or local farmer’s market while maintaining the nutritional benefits and clean eating principles you value. By removing moisture while keeping vital nutrients intact, you’re creating shelf-stable foods that retain their organic integrity without artificial preservatives or additives.

As we’ve explored throughout this guide, food dehydration is both an art and a science that’s accessible to everyone. Whether you’re starting with simple fruits and vegetables or advancing to more complex recipes, the possibilities are endless. The initial investment in a quality dehydrator and some basic knowledge can lead to significant savings while reducing food waste and maintaining a year-round supply of organic snacks and ingredients.

We encourage you to start your dehydrating journey with easy projects like apple chips or kale crisps. As your confidence grows, experiment with different temperatures, timing, and combinations to create your signature dried treats. Remember that practice makes perfect, and even small batches can yield delicious results. By dehydrating your organic produce, you’re not just preserving food – you’re preserving the essence of sustainable, healthy living.

CSA Farm Cooking: Get Certified in Plant-Based Kitchen Mastery

Posted by darrell on
0
Culinary and Food Preservation
CSA Farm Cooking: Get Certified in Plant-Based Kitchen Mastery

Transform your CSA workshop offerings with professional vegan cooking certification, empowering members to maximize their seasonal produce through expert plant-based cooking classes. Elevate your community’s culinary skills while creating additional revenue streams through structured certification programs that blend hands-on training with sustainable food practices. Master essential techniques from plant-based protein preparation to creative vegetable transformation, ensuring workshop participants gain confidence in crafting nutritious, locally-sourced vegan meals. Build a stronger, more engaged CSA community by offering certified instruction that connects members directly to their food source while developing valuable skills they can share with others. This professional certification opens doors to expanded workshop opportunities, increased member retention, and enhanced value for your CSA program.

Why Vegan Certification Matters for CSA Cooking Workshops

Meeting Community Dietary Needs

Vegan cooking certification equips CSA farmers and workshop leaders with the expertise to serve an increasingly diverse community of members. Through CSA community cooking workshops, certified instructors can confidently create inclusive meal planning solutions that accommodate various dietary preferences and restrictions.

This certification ensures that workshop leaders understand the nuances of plant-based cooking, from proper protein combinations to creative uses of seasonal produce. They learn to transform familiar farm-fresh ingredients into satisfying vegan meals that appeal to both plant-based and omnivorous members. This knowledge helps build stronger connections within the CSA community by ensuring no member feels left out during shared cooking experiences.

Many CSA programs report increased member satisfaction and retention after introducing vegan-certified cooking instruction. Members appreciate learning how to prepare versatile meals that can be easily adapted for different dietary needs, while farmers benefit from improved crop utilization as members learn creative ways to use all available produce. This inclusive approach helps create a more sustainable and supportive local food community.

Professional Credibility

Obtaining vegan cooking certification significantly enhances a workshop leader’s professional standing within the CSA and broader plant-based community. Certified instructors demonstrate a deeper understanding of plant-based nutrition, ingredient substitutions, and specialized cooking techniques, which builds trust with workshop participants.

Many workshop participants specifically seek out certified instructors, viewing certification as a mark of expertise and commitment to professional development. This credential helps distinguish your workshops from informal cooking gatherings, potentially attracting more participants and allowing you to command higher workshop fees.

Certification also provides networking opportunities within the vegan culinary community, connecting you with other professionals and expanding your resource base. These connections often lead to collaborative opportunities and knowledge sharing that benefit your workshop participants.

From a practical standpoint, certification can help secure partnerships with local businesses, wellness centers, and educational institutions. Many organizations prefer working with certified professionals for their programming, viewing it as a form of quality assurance. This credential also adds weight to grant applications and funding requests for community-based cooking initiatives.

Certified vegan chef teaching cooking techniques to workshop participants in a professional kitchen
Professional chef demonstrating vegan cooking techniques to a group in a workshop setting

Popular Vegan Certification Programs

Online vs. In-Person Programs

Both online and in-person vegan cooking certification programs offer unique advantages, allowing you to choose the format that best fits your lifestyle and learning preferences. Online programs provide flexibility, enabling you to learn at your own pace and review materials whenever needed. They often include video demonstrations, interactive quizzes, and virtual cooking assignments that can be completed in your home kitchen.

In-person certification programs offer hands-on experience and immediate feedback from instructors. You’ll benefit from direct interaction with peers, real-time problem-solving, and the opportunity to taste and evaluate dishes together. These programs typically feature intensive workshop sessions where you can master techniques like knife skills, plant-based cheese making, and creative plating under expert supervision.

Some certification programs now offer hybrid models, combining online theoretical coursework with in-person practical sessions. This format provides the best of both worlds: convenient access to learning materials and scheduled hands-on practice sessions.

When choosing between formats, consider factors like your schedule, learning style, and professional goals. Online programs work well for busy professionals or those in remote areas, while in-person training might be preferable for those who thrive on direct interaction and immediate feedback. Both formats can lead to comprehensive certification, with many programs offering the same curriculum and recognition regardless of delivery method.

Cost and Time Investment

The investment required for vegan cooking certification varies depending on the program and level of certification you choose. Most basic certification programs range from $300 to $800, while comprehensive professional certifications can cost between $1,500 and $3,000. These fees typically include course materials, online learning platforms, and certification exams.

Time commitment is another important consideration. Basic certificates can be completed in 2-3 months with 5-10 hours of weekly study. Professional certifications usually require 6-12 months, with 10-15 hours per week dedicated to coursework, practical assignments, and hands-on training.

Many programs offer flexible learning schedules, perfect for busy CSA operators who need to work around harvest seasons. Some certification providers even offer payment plans and early-bird discounts, making the investment more manageable. Additionally, several programs include valuable bonus materials like recipe collections, business planning guides, and marketing resources.

When calculating total costs, consider additional expenses such as ingredients for practice sessions, any required kitchen equipment, and potential travel costs for in-person workshops. However, these investments often pay off through increased workshop attendance, higher participant satisfaction, and the ability to offer premium services to your CSA members.

Remember that certification is an investment in both your personal growth and your CSA’s success. Many graduates report recovering their certification costs within the first year through expanded workshop offerings and increased member engagement.

Implementing Certification in Your CSA Workshops

Seasonal Menu Planning

Effective menu planning is a crucial skill for vegan cooking certification, especially when working with seasonal produce availability through CSA programs. Students learn to create versatile menus that adapt to the changing harvest schedule while maintaining nutritional balance and culinary excitement throughout the year.

The certification program teaches how to analyze weekly CSA boxes and develop flexible recipe frameworks that accommodate varying ingredients. Students master techniques for preserving seasonal abundance through fermentation, dehydration, and freezing, enabling year-round menu diversity. They also learn to create signature dishes that showcase the unique flavors of each season.

Special attention is given to understanding crop rotation patterns and building relationships with local farmers to anticipate upcoming harvests. This knowledge helps in developing advance menu templates that can be easily modified based on available produce. The course covers creative substitution strategies for when certain ingredients are unavailable or in limited supply.

Participants learn to balance nutrition, flavor profiles, and texture combinations while working with seasonal constraints. The program emphasizes teaching others how to appreciate and utilize less common vegetables, turning potential challenges into opportunities for culinary innovation. This comprehensive approach ensures that certified vegan cooking instructors can confidently guide CSA members in making the most of their weekly shares.

Equipment and Infrastructure

A well-equipped vegan cooking workspace requires specific tools and infrastructure to ensure successful certification workshops. Essential equipment includes high-quality stainless steel cookware, food processors, blenders, and specialized tools like nut milk bags and dehydrators. A spacious prep area with multiple workstations allows students to practice techniques comfortably.

Kitchen infrastructure should feature adequate ventilation, proper lighting, and non-slip flooring for safety. Multiple sinks are necessary for washing produce and maintaining hygiene during food preparation. Storage areas must include separate sections for dry goods, fresh produce, and temperature-sensitive ingredients.

Modern appliances like induction cooktops and convection ovens help maintain precise temperature control for plant-based cooking techniques. Dedicated equipment for specific tasks, such as high-powered blenders for smooth nut-based sauces and stand mixers for bread making, ensures professional results.

Workshop spaces should include demonstration areas with good visibility and recording capabilities for remote learning options. Clear labeling systems help maintain organization and prevent cross-contamination. A comprehensive first aid kit and fire safety equipment are mandatory.

Consider sustainable options like energy-efficient appliances and water-saving fixtures. Include composting facilities for food waste and recycling stations to demonstrate environmental responsibility. Digital tools like tablets or screens can display recipes and techniques while reducing paper waste.

Remember to maintain backup equipment and replacement parts to prevent workshop disruptions. Regular maintenance schedules help ensure all tools remain in optimal condition for certification training.

Fresh CSA vegetables and fruits displayed with professional vegan cooking utensils and equipment
Colorful spread of seasonal CSA produce arranged with vegan cooking tools and equipment
Successful CSA workshop leader showcasing their vegan cooking certification in their workspace
Portrait of a smiling certified CSA workshop leader in their teaching kitchen

Success Stories from Certified CSA Coaches

Meet Sarah Chen, a CSA workshop leader from Vancouver who transformed her local farm’s educational programs through vegan cooking certification. “After getting certified, our workshop attendance doubled, and we’ve created lasting connections within our community,” shares Sarah. Her community cooking success stories include launching a popular monthly vegan feast that brings together CSA members to explore creative ways of preparing seasonal produce.

In Ontario, Marcus Rodriguez turned his small CSA operation into a hub for plant-based education after completing his vegan cooking certification. “Our members were increasingly asking for guidance on preparing unfamiliar vegetables. The certification gave me the confidence and skills to help them embrace plant-based cooking,” he explains. Marcus now runs sold-out weekly workshops teaching members how to transform root vegetables and leafy greens into delicious vegan meals.

Emily Watson, a certified vegan coach from Nova Scotia, credits her certification for helping her CSA program retain members year-round. “Winter can be challenging for CSA participation, but our vegan cooking workshops keep members engaged even during the root vegetable season,” she notes. Emily’s innovative approach includes virtual cooking classes and seasonal recipe development that has inspired many members to adopt more plant-based meals into their routines.

These success stories highlight how vegan cooking certification can enhance CSA programs while building stronger communities. Certified coaches report increased member satisfaction, better produce utilization, and stronger connections between farmers and consumers. Many have expanded their offerings to include specialized workshops for families, beginners, and those with dietary restrictions, creating inclusive spaces where everyone can learn and grow together.

Obtaining a vegan cooking certification can significantly enhance your CSA workshop offerings, creating a more inclusive and diverse learning environment for your community members. By incorporating certified vegan cooking skills into your programming, you’ll be able to serve a broader audience while promoting sustainable, plant-based eating habits that align perfectly with the CSA philosophy of environmental stewardship.

The certification process not only validates your expertise but also provides you with valuable tools and knowledge to create engaging, educational workshops that showcase the versatility of your CSA produce. Your certified status can help build trust with participants and potentially attract new members who might have been hesitant to join due to dietary concerns.

Ready to take the next step? Begin by researching accredited vegan cooking certification programs that match your schedule and budget. Consider starting with online courses to build a foundation, then progress to hands-on training if available in your area. Connect with other certified vegan cooking instructors in the CSA community to learn from their experiences and build a supportive network.

Remember that certification is just the beginning – use your new credentials to develop innovative workshop series, create seasonal recipe collections, and foster a welcoming space where all members can learn to prepare delicious, plant-based meals using their CSA shares.

Safe Food Storage Made Simple: These Natural Containers Keep Your Organic Produce Fresh

Posted by darrell on
0
Culinary and Food Preservation
Safe Food Storage Made Simple: These Natural Containers Keep Your Organic Produce Fresh

Transform your kitchen into a toxin-free sanctuary by switching to chemical-free food storage containers made from natural materials like glass, stainless steel, and bamboo. These safer alternatives eliminate harmful BPA, phthalates, and other plastic-derived chemicals that can leach into your organic produce and prepared meals. Recent studies show that traditional plastic containers can release microplastics and endocrine-disrupting compounds into food, especially when exposed to heat or acidic ingredients.

Smart storage choices not only protect your family’s health but also contribute to environmental sustainability. Glass containers with bamboo lids offer airtight storage while allowing you to easily monitor freshness. Stainless steel containers provide unmatched durability and are ideal for transporting meals, while traditional ceramic crocks naturally regulate moisture for root vegetables and fermented foods.

By investing in chemical-free storage solutions, you’re making a conscious choice to preserve both the nutritional integrity of your food and the health of our planet. These containers often last decades, making them a cost-effective choice for the environmentally conscious household.

Why Your Storage Containers Matter for Organic Food

Common Chemicals in Traditional Storage Containers

Traditional food storage containers often contain concerning chemicals that can affect organic food quality and safety. BPA (Bisphenol A), commonly found in hard plastic containers and can linings, has been linked to hormone disruption and other health concerns. Phthalates, used to make plastics more flexible, can leach into food, especially when containers are heated or contain fatty foods.

Other chemicals like PVC, polyvinyl chloride, and antimony are frequently present in conventional storage solutions. These substances may migrate into food over time, particularly when exposed to heat, sunlight, or acidic ingredients. Even BPA-free alternatives often contain BPS or BPF, which research suggests may have similar effects to BPA.

Many traditional containers also contain formaldehyde-based resins and synthetic dyes, which can compromise the purity of stored foods. Understanding these risks helps explain why more people are switching to natural alternatives for food storage.

Various plastic food containers with chemical warning symbols and BPA labels highlighted
Collection of plastic containers showing BPA and chemical warning labels

How These Chemicals Affect Your Food

When chemicals from plastic containers leach into your food, they can significantly impact both the nutritional value and safety of your meals. This process, known as chemical leaching, typically occurs when food containers are exposed to heat, sunlight, or acidic ingredients. Common chemicals like BPA and phthalates can migrate from the container into your food, potentially altering its taste and introducing harmful compounds into your body.

These chemicals may disrupt your body’s natural hormone balance and have been linked to various health concerns. Additionally, they can affect the flavor profile of your carefully prepared organic produce, making fresh ingredients taste slightly synthetic or “plastic-like.” This is particularly noticeable in acidic foods like tomatoes and citrus fruits, which tend to react more strongly with plastic containers.

The good news is that by switching to chemical-free alternatives, you can preserve both the natural taste of your food and protect its nutritional integrity, ensuring your healthy choices stay truly healthy.

Well-organized kitchen pantry displaying glass jars, stainless steel containers, and ceramic vessels storing different foods
Organized pantry featuring various natural storage containers

Best Natural Materials for Food Storage

Glass Storage Solutions

Glass storage containers are the gold standard for chemical-free food storage, offering unmatched purity and durability. Unlike plastic, glass won’t leach harmful substances into your food, even when storing acidic items like tomatoes or citrus. These containers are perfect for both refrigerator and pantry storage, and many are oven-safe for easy reheating.

Mason jars and tempered glass containers with tight-fitting lids excel at keeping dry goods fresh and protecting leftovers. They’re particularly great for storing homemade broths, fermented foods, and meal prep ingredients. The transparent nature of glass also helps you quickly identify contents and monitor freshness.

While slightly heavier than plastic alternatives, glass containers are incredibly cost-effective since they can last for decades with proper care. They’re also environmentally friendly, being both recyclable and free from microplastic contamination. Just remember to choose containers with quality seals for optimal freshness.

Stainless Steel Options

Stainless steel stands out as a top choice for chemical-free food storage, offering exceptional durability and a naturally non-reactive surface. These containers won’t leach harmful substances into your food and can last for decades with proper care. Perfect for both dry goods and prepared meals, stainless steel containers maintain food freshness without absorbing odors or flavors.

They’re particularly great for storing acidic foods like tomatoes and citrus, which might react with other materials. While they’re slightly heavier than plastic alternatives, their versatility makes up for it – you can use them in the freezer, refrigerator, and even for reheating food in the oven. Many sustainable households love that stainless steel containers are 100% recyclable and often come with airtight silicone seals for leak-proof storage.

The initial investment might be higher, but consider it a one-time purchase for years of safe food storage.

Ceramic and Stone Containers

Ceramic and stone containers offer timeless, natural solutions for storing your organic produce and pantry staples. These traditional materials have been used for centuries across cultures, from Mexican ollas to Korean onggi pots. Modern ceramic containers often feature airtight bamboo or cork lids, making them perfect for storing dry goods like grains, beans, and nuts.

Unglazed ceramic containers are particularly beneficial for root vegetables and garlic, as they allow proper air circulation while maintaining ideal humidity levels. For longer-term storage, glazed ceramic canisters protect against moisture and help preserve the freshness of herbs and spices.

Stone containers, particularly those made from soapstone or marble, naturally maintain cool temperatures and are excellent for storing oils, butter, and temperature-sensitive items. These materials are completely inert, ensuring no chemical leaching occurs, while their substantial weight provides stability in your pantry or on countertops.

Natural Fiber and Bamboo Storage

Natural fiber baskets and bamboo containers offer beautiful, sustainable alternatives for storing dry goods like grains, nuts, and legumes. These breathable materials help prevent moisture buildup while keeping food fresh naturally. Handwoven baskets made from water hyacinth, seagrass, or rattan add a rustic charm to your pantry while providing excellent ventilation. Bamboo containers, known for their natural antibacterial properties, come in various sizes and often feature airtight lids perfect for storing flour, sugar, and coffee beans.

Look for containers treated with natural oils or beeswax instead of chemical finishes. Many artisans create these storage solutions using traditional techniques, supporting both environmental sustainability and local craftsmanship. When selecting natural fiber storage, choose items with tight weaves and smooth finishes to prevent food particles from getting trapped in the material.

Practical Storage Tips for Different Food Types

Infographic showing which natural containers work best for different types of food storage
Visual guide showing different foods in appropriate natural containers

Fresh Produce Storage

For fresh produce, glass containers with airtight seals and ventilation options are ideal for maintaining optimal humidity levels. Mason jars work wonderfully for berries and pre-cut vegetables, while larger glass containers with bamboo lids are perfect for leafy greens. Natural fiber produce bags, made from organic cotton or hemp, allow proper airflow while keeping vegetables crisp in the refrigerator.

One of the most effective proven food storage techniques is using ceramic crisper containers with ventilation holes. These regulate moisture naturally and prevent premature spoilage. For root vegetables like carrots and potatoes, consider traditional clay storage containers that maintain cool temperatures and proper humidity.

Bamboo storage boxes are excellent for counter-stored produce like onions and garlic, as they protect from light while allowing necessary air circulation. For longer-term storage, mesh produce bags made from organic materials help fruits and vegetables breathe while protecting them from bruising. Remember to keep ethylene-producing fruits separate from other produce to prevent accelerated ripening.

Dry Goods and Pantry Items

For dry goods storage, glass jars and stainless steel containers reign supreme, offering excellent protection while keeping your pantry items fresh and chemical-free. Mason jars work wonderfully for storing rice, quinoa, and other grains, while larger glass canisters with airtight bamboo lids are perfect for pasta and cereals. Look for containers with silicone gaskets to ensure an airtight seal that keeps moisture and pantry pests out.

Stainless steel containers with clip-lock lids are excellent for storing nuts and seeds, as they protect these sensitive items from light and air exposure that can cause rancidity. For bulk items like flour and sugar, consider using large ceramic crocks with wooden lids – they’re not only practical but add a rustic charm to your kitchen.

Remember to label your containers with the contents and date of storage. Natural chalk labels or washable markers on glass work well for this purpose, eliminating the need for plastic label makers or adhesive stickers.

Refrigerated and Frozen Foods

For refrigerated and frozen foods, glass containers with tight-fitting lids are your best bet. They’re durable, won’t absorb odors, and maintain food freshness without leaching chemicals. Look for tempered glass containers specifically designed for temperature changes, as they’re less likely to crack when moving from freezer to counter.

Stainless steel containers are another excellent choice for cold storage. They’re virtually indestructible and perfect for long-term freezing. Just be sure to leave some headspace for food expansion when freezing liquids or soups.

For ultimate sustainability, consider investing in silicone storage bags or containers. They’re flexible, reusable, and perfectly safe for both refrigerator and freezer use. Plus, they take up minimal space when not in use.

Mason jars work wonderfully for refrigerated items, though use caution when freezing as they can crack. If using mason jars in the freezer, choose wide-mouth varieties and leave plenty of space for expansion.

Making the Switch: Your Chemical-Free Storage Action Plan

Ready to make the switch to chemical-free storage? Start by taking a gradual approach that won’t overwhelm you. Begin with an inventory of your current containers, identifying which ones need immediate replacement. Focus first on containers you use for hot foods or those showing signs of wear and tear.

Next, choose one food category at a time for transition. Start with your everyday items like leftovers and lunch boxes, then move on to pantry staples. As you replace containers, consider combining traditional natural preservation methods with modern glass, stainless steel, or bamboo alternatives.

Create a priority list based on your budget and needs. High-quality containers can be an investment, so plan your purchases over several months. Look for seasonal sales and consider starting with a basic set that you can expand later.

Remember to properly clean and season new containers before use, especially wooden or bamboo items. This helps extend their lifespan and ensures food safety. Keep your old containers for non-food uses like organizing craft supplies or gardening materials – this reduces waste while you transition.

Label your new containers with purchase dates and care instructions. This helps track their age and maintain them properly. Within a few months, you’ll have a fully transformed, chemical-free storage system that keeps your organic produce fresh and your family healthy.

Making the switch to chemical-free food storage containers is a simple yet powerful step toward a healthier, more sustainable lifestyle. By choosing materials like glass, stainless steel, and bamboo, you’re not only protecting your family from harmful chemicals but also contributing to environmental preservation. Remember that different foods may require specific storage solutions, so don’t hesitate to mix and match containers based on your needs.

Start small by replacing one or two plastic containers at a time, and gradually build your collection of natural storage alternatives. The initial investment might be higher, but the long-term benefits to your health and the environment make it worthwhile. With proper care and maintenance, these sustainable containers will serve you well for years to come, helping you maintain the quality and freshness of your organic produce while keeping your kitchen chemical-free and eco-friendly.

How Organic Farms Create Your Seasonal Ingredients (From Soil to Kitchen)

Posted by darrell on
0
Culinary and Food Preservation
How Organic Farms Create Your Seasonal Ingredients (From Soil to Kitchen)

Sustainable organic farming practices revolutionize modern agriculture through time-tested methods that work in harmony with nature. By integrating crop rotation, natural pest management, and soil enrichment techniques, organic farmers create resilient ecosystems that produce nutrient-dense food while protecting environmental health. These methods eschew synthetic pesticides and fertilizers in favor of biological solutions like companion planting, beneficial insects, and composting. From small family farms to large-scale operations, organic producers demonstrate how traditional wisdom combined with innovative approaches can yield abundant harvests while preserving soil fertility for future generations. This sustainable approach not only delivers superior food quality but also supports biodiversity, reduces water pollution, and helps mitigate climate change through improved carbon sequestration in healthy soils.

Soil Management: The Foundation of Organic Flavor

Side-by-side comparison of nutrient-rich organic soil and poor quality soil
Split-frame comparison of rich organic soil with visible compost materials next to depleted soil

Natural Composting and Fertilization

Natural composting and fertilization form the backbone of organic soil management, creating nutrient-rich environments that produce healthier, more flavorful crops. Farmers use a variety of natural materials like kitchen scraps, yard waste, and animal manure to create compost that enriches the soil with essential nutrients. This living compost introduces beneficial microorganisms that help plants absorb nutrients more effectively.

Many organic farmers also implement crop rotation with nitrogen-fixing plants like legumes, which naturally fertilize the soil. Cover crops protect and nourish the soil during off-seasons, while green manure crops are tilled back into the field to add organic matter. These practices create a self-sustaining system that improves soil structure and water retention.

Local farmer Sarah Chen shares, “Since switching to natural composting methods, we’ve seen dramatic improvements in our produce quality. Our tomatoes are more flavorful, and our leafy greens are more nutrient-dense.” This approach not only enhances food quality but also reduces dependency on external inputs while building long-term soil health.

By avoiding synthetic fertilizers, organic farmers maintain soil biodiversity and prevent chemical runoff, creating a healthier ecosystem that produces more nutritious food.

Crop Rotation for Soil Health

Crop rotation stands as a cornerstone of organic farming, where different crops are planted in sequence across growing seasons. This time-tested practice naturally enriches soil health while preventing pest and disease buildup. By alternating between nutrient-demanding crops like tomatoes and soil-building plants like legumes, farmers maintain a natural balance in their fields.

For example, planting nitrogen-fixing beans after heavy-feeding corn helps replenish soil nutrients naturally. Following root crops with leafy greens allows different soil layers to rest and recover. This thoughtful planning directly impacts the seasonal availability of crops throughout the year.

Local farmer Sarah Martinez shares, “Rotating crops isn’t just about soil health – it’s about working with nature’s rhythm. When we follow these cycles, we see healthier plants, better yields, and more resilient soil ecosystem.” This approach also helps reduce dependency on external inputs while supporting beneficial insects and microorganisms that contribute to overall farm health.

Remember, healthy soil produces nutrient-dense food, making crop rotation essential for both environmental sustainability and food quality.

Natural Pest Management in Organic Farming

Beneficial Insects and Companion Planting

Beneficial insects are nature’s pest control experts, and organic farmers actively work to attract and maintain these helpful creatures in their fields. Ladybugs, praying mantises, and parasitic wasps naturally control harmful pests like aphids and caterpillars, reducing the need for interventions. Farmers create inviting habitats by planting flowering borders and maintaining diverse hedgerows that provide shelter and food for these beneficial insects.

Companion planting takes this natural approach further by strategically positioning plants that work together harmoniously. For example, planting marigolds near tomatoes helps repel harmful nematodes, while nasturtiums attract pollinators and act as trap crops for aphids. Herbs like basil and dill not only provide additional crops but also help protect neighboring vegetables from unwanted pests.

Success story: Local farmer Sarah Chen increased her garden’s productivity by 30% after implementing companion planting strategies and creating dedicated insect habitats. Her diverse garden now supports a thriving ecosystem where beneficial insects naturally manage pest problems, eliminating the need for any pest control products.

Beneficial insects naturally controlling pests in an organic garden
Ladybugs and praying mantis hunting harmful insects on vegetable plants

Physical Barriers and Natural Deterrents

Organic farmers rely on clever natural solutions to protect their crops from pests and unwanted wildlife. Physical barriers like row covers, netting, and fencing serve as the first line of defense, creating protective shields around valuable crops. These barriers effectively keep out insects, birds, and larger animals while still allowing sunlight and rain to reach the plants.

Natural deterrents play an equally important role in organic pest management. Companion planting uses aromatic herbs like marigolds, lavender, and mint to naturally repel harmful insects while attracting beneficial ones. Some farmers plant sacrificial crops around field edges to draw pests away from main crops. Others maintain hedgerows and buffer zones that provide habitat for natural predators like birds and beneficial insects.

Traditional techniques like installing owl boxes encourage natural pest control by attracting birds of prey that hunt rodents. Many farmers also use sticky traps, reflective tape, and motion-activated sprinklers as chemical-free ways to deter unwanted visitors. These physical and natural barriers work together as part of an integrated pest management system that protects crops while maintaining ecological balance.

Water Conservation and Management

Water management in organic farming goes beyond simply keeping crops hydrated – it’s about creating a sustainable system that preserves this precious resource while producing healthy, high-quality crops. Successful organic farmers employ smart irrigation techniques that work in harmony with nature’s cycles.

Drip irrigation systems are a cornerstone of water conservation in organic farming, delivering water directly to plant roots with minimal waste. These systems can reduce water usage by up to 60% compared to conventional sprinkler methods, while also preventing leaf diseases that can develop from excess moisture on foliage.

Many organic farmers complement their irrigation systems with mulching practices, using materials like straw, leaves, or compost to retain soil moisture and reduce evaporation. This natural approach not only conserves water but also suppresses weeds and enriches the soil as the mulch breaks down.

Rainwater harvesting has become increasingly popular among organic farmers. By collecting and storing rainwater in tanks or ponds, farms can reduce their reliance on groundwater and maintain a sustainable water supply during dry periods. Some innovative farmers have even designed swales and berms to naturally direct and retain water across their fields.

Soil health plays a crucial role in water management. Organic practices that build soil organic matter, like cover cropping and composting, improve the soil’s water-holding capacity. Healthy soil can retain up to 20 times its weight in water, making crops more resilient during dry spells.

Success story: Local organic farmer Sarah Chen reduced her farm’s water consumption by 40% after implementing a combination of drip irrigation and mulching practices, while maintaining excellent crop quality and yield.

Organic farmer checking tomato ripeness for optimal harvest timing
Farmer examining and harvesting ripe organic tomatoes during peak season

Harvest Timing and Storage Practices

Successful organic farming relies heavily on precise harvest timing and effective storage practices to deliver the highest quality produce to consumers. Farmers carefully monitor crop maturity through various indicators, including color changes, texture, and size, to determine the optimal harvest window. For example, tomatoes are picked when they show the first blush of color, while root vegetables are harvested when their tops begin to die back naturally.

Many organic farmers practice sequential planting and harvesting, allowing them to maintain a steady supply of fresh produce throughout the growing season. This approach also helps reduce storage needs and ensures customers receive the freshest possible products.

To maintain produce freshness, organic farms employ various natural storage methods. Root cellars provide ideal conditions for storing potatoes, carrots, and other root vegetables, maintaining consistent temperature and humidity levels without artificial cooling. Dry storage areas with good air circulation are essential for onions, garlic, and winter squash.

Local organic farmer Sarah Martinez shares, “We time our harvests for early morning when vegetables are at their peak freshness. Everything goes directly into our cooling room, which uses geothermal energy to keep produce at optimal temperatures naturally.”

Some crops, like herbs and leafy greens, require immediate processing and storage in specialized humidity-controlled environments. Many organic farms use natural preservation techniques such as drying, fermenting, and cold storage to extend the life of their harvest while maintaining nutritional value and flavor integrity.

From Farm to Kitchen: Recipe Development

The journey from organic farm to kitchen creates a unique opportunity for recipe development that honors both seasonality and sustainable practices. When working with organic ingredients, chefs and home cooks alike find themselves naturally aligned with nature’s rhythm, crafting dishes based on what’s currently thriving in local fields.

Seasonal organic produce often arrives with superior flavor profiles, encouraging creative cooking approaches that let these natural tastes shine. For instance, heirloom tomatoes grown in organic soil develop deeper, more complex flavors that can transform a simple pasta sauce into something extraordinary. Similarly, organic herbs cultivated without synthetic pesticides offer more intense aromatics, requiring thoughtful portioning in recipes.

Recipe development with organic ingredients often involves working closely with local farmers to understand harvest times and crop availability. This partnership not only ensures the freshest ingredients but also helps cooks plan menus that reflect the natural growing cycle. Many successful farm-to-table restaurants have embraced this approach, building flexible menus that adapt to what organic farmers can sustainably produce throughout the year.

Organic farming practices form the foundation of a sustainable and flavorful food system that benefits both people and the planet. By working in harmony with nature through crop rotation, natural pest management, and soil enrichment techniques, organic farmers create environments where crops can thrive without synthetic inputs. These methods not only produce healthier, more nutritious ingredients but also ensure that seasonal produce reaches its full flavor potential. The dedication of organic farmers to these time-tested practices results in ingredients that chefs and home cooks treasure for their superior taste and quality. As more people recognize the connection between farming methods and food quality, organic agriculture continues to grow, offering an environmentally conscious path to exceptional seasonal ingredients that nourish both our bodies and the earth.

Transform Your CSA Produce: The Magic of Yeast Inoculation in Fermentation

Posted by darrell on
0
Culinary and Food Preservation
Transform Your CSA Produce: The Magic of Yeast Inoculation in Fermentation

Transform your CSA vegetables into living, probiotic-rich foods by mastering the art of yeast inoculation. This ancient preservation technique not only extends shelf life but creates complex, vibrant flavors through controlled fermentation. To master vegetable fermentation, start with clean, fresh produce and precise measurements of salt to create the perfect environment for beneficial yeasts to thrive. Whether you’re fermenting cabbage for sauerkraut or crafting unique vegetable medleys, proper yeast inoculation ensures consistent results while preventing unwanted bacteria growth. By understanding this fundamental process, you’ll unlock endless possibilities for preserving your seasonal harvest while enhancing its nutritional value and developing distinctive flavors that connect you to centuries of food preservation tradition.

Why Yeast Inoculation Matters for Your CSA Produce

Wild vs. Controlled Fermentation

Fermentation can occur naturally or through controlled methods, each offering unique benefits for CSA produce preservation. Wild fermentation relies on naturally occurring yeasts present on fruits and vegetables, creating unique flavors that reflect local microbial environments. This traditional method has been used for generations and can produce complex, region-specific tastes that many food enthusiasts prize.

Controlled fermentation, achieved through yeast inoculation, offers more predictable results and consistent flavors. By introducing specific strains of carefully selected yeasts, farmers can better manage the fermentation process and reduce the risk of spoilage. This method is particularly valuable when preserving large batches of seasonal produce or creating specific flavor profiles.

Many small-scale farmers combine both approaches, using wild fermentation for traditional products while relying on inoculation for more sensitive or valuable crops. The choice often depends on factors like batch size, desired outcome, and risk tolerance.

Side-by-side comparison of wild fermentation versus controlled yeast inoculation in glass jars
Split image comparing wild fermentation (cloudy, irregular bubbles) versus controlled yeast inoculation (clear, uniform fermentation)

Preserving Your CSA Bounty

Yeast inoculation offers an effective way to preserve seasonal produce from your CSA share through controlled fermentation. This natural preservation method not only extends the life of your vegetables but also enhances their nutritional value and creates unique, complex flavors. By introducing specific beneficial yeasts to your produce, you can control the fermentation process and prevent unwanted bacteria from taking hold.

The technique works particularly well for cabbage, cucumbers, and root vegetables – common items in CSA boxes that sometimes arrive in abundance. Start by selecting fresh, clean produce and introducing a carefully measured amount of starter culture. Within days, the beneficial yeasts begin transforming sugars into acids, creating an environment that naturally preserves your vegetables for months.

Local farmer Sarah Jensen shares, “Since implementing yeast inoculation at our farm, we’ve helped our CSA members reduce food waste by 30% during peak harvest seasons. Plus, they love the probiotic benefits!”

Different types of fermentation yeast packets displayed with fresh produce
Various packets of specialized fermentation yeasts with vegetables and fruits in the background

Choosing the Right Yeast for Your Ferments

Vegetable-Specific Strains

Different vegetables require specific yeast strains for optimal fermentation results. For leafy greens like cabbage and kale, Lactobacillus plantarum is the go-to choice, producing a crisp texture and bright, tangy flavor. Root vegetables such as carrots and beets benefit from Saccharomyces cerevisiae, which enhances their natural sweetness while maintaining structural integrity.

When fermenting cruciferous vegetables like broccoli and cauliflower, Leuconostoc mesenteroides works exceptionally well, creating a pleasant tang without excessive sourness. For cucumber pickles, a combination of Lactobacillus brevis and Pediococcus pentosaceus yields consistently crunchy results with balanced flavor profiles.

Success story: Local farmer Sarah Chen discovered that using Lactobacillus sakei for her award-winning kimchi resulted in better flavor development and longer shelf life compared to traditional methods. For those new to vegetable fermentation, starting with universal strains like L. plantarum is recommended, as it’s versatile and forgiving across different vegetable types.

Remember to consider temperature and salt concentration when selecting your yeast strain, as these factors significantly impact fermentation success. Many suppliers now offer specialized vegetable fermentation culture blends, making it easier for home fermenters to achieve professional results.

Fruit Fermentation Yeasts

When fermenting fruits, selecting the right yeast strain is crucial for developing optimal flavors and ensuring successful fermentation. For most fruit-based ferments, wine yeasts like Saccharomyces cerevisiae are ideal due to their ability to handle higher sugar content and produce clean, fruit-forward flavors. The popular Red Star Premier Blanc (formerly Côte des Blancs) works exceptionally well with apples, pears, and stone fruits, preserving delicate aromas while achieving consistent fermentation.

For berries and tropical fruits, consider using Lalvin 71B, which enhances fruit characteristics while reducing malic acid, resulting in a smoother finished product. When fermenting citrus fruits, D-47 yeast is an excellent choice, as it tolerates higher acid levels while producing complex honey and fruity notes.

For those seeking wild fermentation, naturally occurring yeasts present on organic fruit skins can create unique flavor profiles. However, this method requires careful monitoring and carries more risk of inconsistent results. To balance tradition with reliability, many home fermenters use a combination approach – allowing wild yeasts to initiate fermentation before introducing a commercial strain to ensure complete fermentation.

Sequential images demonstrating the stages of yeast inoculation for fermentation
Step-by-step photo collage showing the yeast inoculation process

Step-by-Step Inoculation Process

Preparation and Safety

Before starting the yeast inoculation process, proper preparation and safety measures are essential for successful fermentation. Begin by thoroughly cleaning and sanitizing all equipment, including fermentation vessels, stirring tools, and measurement instruments. Use food-grade sanitizers and rinse thoroughly with clean water to avoid any chemical residue that could affect fermentation.

Temperature control is crucial for yeast health. Ensure your workspace maintains a steady temperature between 68-72°F (20-22°C). Have a reliable thermometer on hand to monitor both the environment and your fermenting mixture throughout the process.

Always wear clean gloves when handling yeast cultures to prevent contamination. If working with dry yeast, avoid direct skin contact and wear a mask to prevent inhalation of yeast particles. Keep your work surface clean and organized, with all necessary materials within easy reach.

Measure ingredients precisely using calibrated scales or measuring tools. Prepare your yeast starter in a separate, sterile container before introducing it to your main mixture. This allows you to verify the yeast’s viability and activity before committing to the full batch.

Store unused yeast cultures properly according to manufacturer guidelines, typically in a cool, dry place. Keep detailed records of each inoculation, including temperatures, measurements, and timing, to help track success and troubleshoot if needed. Having backup cultures on hand is also recommended in case of unexpected issues.

Temperature and Timing

Temperature control and proper timing are crucial elements that can make or break your fermentation success. The ideal temperature range for yeast inoculation typically falls between 68°F and 72°F (20°C to 22°C). At these temperatures, yeast cells maintain optimal activity without becoming stressed or dormant.

For most vegetable ferments, you’ll want to start with a 24-hour period at room temperature before checking the fermentation progress. During this initial phase, the yeast begins to multiply and establish itself in the environment. Keep your fermentation vessel away from direct sunlight and heat sources, as temperatures above 80°F (27°C) can lead to excessive fermentation and off-flavors.

Timing your inoculation right is equally important. Add your yeast starter when your produce and brine are at room temperature – never when they’re hot, as this can kill the beneficial organisms. After inoculation, monitor the fermentation process every 12-24 hours. You’ll notice subtle changes in aroma and the formation of small bubbles, indicating active fermentation.

Local farmer Sarah Chen shares her success story: “I learned the hard way that patience is key. Now I use a simple kitchen thermometer and keep detailed timing notes. My ferments are consistently delicious, and I never lose a batch anymore.”

Remember that cooler temperatures will slow fermentation, while warmer temperatures speed it up. Finding the sweet spot for your specific produce and desired outcome takes practice, but the results are worth the attention to detail.

Common Challenges and Solutions

Problem Prevention

To ensure successful yeast inoculation, proper preparation and monitoring are essential. Start by sanitizing all equipment thoroughly with food-grade sanitizer to prevent unwanted bacterial growth. Maintain consistent temperature control throughout the fermentation process, ideally between 68-72°F (20-22°C), using a reliable thermometer. Just like our ancestors who mastered traditional preservation techniques, paying attention to environmental conditions is crucial.

Monitor pH levels regularly using test strips or a digital meter, aiming for an initial pH between 4.0 and 4.5. Ensure proper oxygen levels during the first stages of fermentation by leaving adequate headspace in your vessels. Keep detailed records of temperature, pH, and visual observations to track progress and identify potential issues early.

Store starter cultures properly, following temperature guidelines, and regularly refresh them to maintain vitality. Consider creating backup cultures as insurance against failed batches, and always use fresh, high-quality produce for optimal results.

Quick Fixes

If your fermentation isn’t starting as expected, try warming the mixture slightly to activate dormant yeast – aim for around 70-75°F (21-24°C). For sluggish fermentation, add a small amount of sugar or honey to feed the yeast, but be careful not to overdo it. If you notice off-putting smells, check your container’s seal and ensure proper sanitization.

When fermentation seems too vigorous, move your container to a cooler spot to slow things down. For overly sour results, reduce fermentation time in future batches and monitor temperature more closely. If you see a white film on top, it’s likely kahm yeast – simply skim it off and continue fermenting.

Remember that successful fermentation takes practice. Keep detailed notes of what works and what doesn’t, and don’t be afraid to adjust your process based on results. Most importantly, trust your senses – if something doesn’t look, smell, or taste right, it’s better to start fresh than risk consuming spoiled produce.

Mastering yeast inoculation is a rewarding journey that can transform your fermentation projects from unpredictable experiments to reliable successes. As we’ve explored throughout this guide, proper yeast inoculation techniques are essential for achieving consistent, high-quality fermented products while maintaining food safety standards.

Remember that temperature control, cleanliness, and precise measurements are your best allies in the inoculation process. Start with simple projects like fruit preserves or vegetable ferments, and gradually work your way up to more complex endeavors as your confidence grows. Don’t be afraid to take detailed notes of your process – this will help you refine your technique and troubleshoot any issues that arise.

The beauty of yeast inoculation lies in its blend of science and artistry. While following proper procedures is crucial, there’s always room for creativity and experimentation with different ingredients and techniques. We encourage you to start your fermentation journey today, applying these principles to preserve and enhance your seasonal produce. With practice and patience, you’ll develop an intuitive understanding of the process and join the growing community of successful home fermenters.

Master Farm-Fresh Cooking: Transform Your CSA Box Into Amazing Meals

Posted by darrell on
0
Culinary and Food Preservation
Master Farm-Fresh Cooking: Transform Your CSA Box Into Amazing Meals

Transform your kitchen skills and confidence in just six weeks through our immersive, hands-on cooking course designed specifically for CSA members and food enthusiasts. Master essential techniques from knife skills to meal planning while crafting delicious meals with your CSA box alongside experienced chefs and fellow food lovers.

Each weekly three-hour session builds upon previous lessons, taking you from basic kitchen fundamentals to advanced cooking methods that celebrate seasonal ingredients. You’ll learn to create restaurant-quality dishes, understand flavor combinations, and develop sustainable cooking practices that reduce food waste and maximize your produce investment.

Whether you’re a complete beginner or looking to refine your culinary skills, this comprehensive course provides the perfect blend of practical instruction and creative exploration. Graduate with a repertoire of go-to recipes, time-saving techniques, and the confidence to tackle any ingredient that arrives in your weekly farm share.

Variety of fresh vegetables and herbs spread out from a CSA box delivery
Organized display of fresh seasonal produce from a typical CSA box including colorful vegetables and herbs

What You’ll Learn in This Hands-On Course

Weekly Course Breakdown

Our carefully structured six-week curriculum takes you on a delightful culinary journey, building your skills progressively while celebrating seasonal ingredients and sustainable cooking practices.

Week 1: Foundations of Farm-to-Table Cooking
Master essential knife skills, learn proper kitchen safety, and understand the basics of meal planning with seasonal produce. You’ll create simple yet delicious salads and learn basic vegetable preparation techniques that preserve nutrients and enhance flavors.

Week 2: Soups, Stocks, and Root Vegetables
Discover the art of making nourishing stocks from scratch and transforming root vegetables into hearty soups. Learn storage techniques for winter vegetables and explore creative ways to use often-overlooked parts of produce to reduce food waste.

Week 3: Grain Bowls and Plant-Based Proteins
Explore various cooking methods for whole grains and legumes. Create balanced, nutritious meals using seasonal vegetables and learn to make flavorful plant-based sauces that complement your dishes perfectly.

Week 4: Quick Pickling and Preservation
Master the basics of quick pickling, fermentation, and other preservation methods to extend the life of your seasonal produce. Learn to make kimchi, sauerkraut, and other fermented vegetables that add probiotic benefits to your meals.

Week 5: One-Pan Wonders and Sheet Pan Dinners
Develop efficient cooking techniques using minimal equipment. Create complete meals using seasonal vegetables, proteins, and herbs while learning time-saving strategies for busy weeknight cooking.

Week 6: Advanced Techniques and Menu Planning
Put everything together by learning to create cohesive menus that celebrate seasonal ingredients. Master more advanced cooking techniques like blanching, braising, and roasting, and learn to adapt recipes based on available produce.

Each week includes hands-on cooking sessions, recipe development workshops, and tips for adapting techniques to different seasonal ingredients throughout the year.

Essential Kitchen Skills for Seasonal Cooking

Knife Skills and Produce Preparation

Master essential knife skills that will transform your cooking experience and help you prepare produce like a professional. Starting with knife safety and proper grip techniques, you’ll learn the fundamental cuts: dicing, julienne, brunoise, and chiffonade. Practice these skills on a variety of seasonal vegetables, from sturdy root vegetables to delicate herbs.

Week by week, advance to more complex techniques like supreme citrus cuts and decorative garnishes. You’ll learn how to break down challenging vegetables like butternut squash and artichokes safely and efficiently. Special attention is given to size consistency and speed while maintaining precision – crucial skills for both home cooking and professional kitchen environments.

The course includes specific techniques for preserving freshness and maximizing yield from your produce. Learn proper storage methods, how to utilize vegetable trimmings for stocks and broths, and quick prep methods that maintain nutritional value. By the end of this module, you’ll have the confidence to tackle any vegetable that comes your way, reducing prep time and elevating your dish presentation.

Professional chef showing correct knife grip and vegetable cutting techniques
Chef demonstrating proper knife techniques for cutting various vegetables

Storage and Preservation Methods

Learn essential food preservation techniques to make the most of your seasonal produce. During this module, you’ll discover methods like blanching and flash-freezing vegetables, water bath canning for jams and pickles, and proper cold storage for root vegetables. We’ll explore traditional fermentation processes for creating probiotic-rich foods like sauerkraut and kimchi, plus modern vacuum-sealing approaches for extending shelf life.

Master the art of herb preservation through drying and oil-based infusions, and learn how to create your own herb-infused vinegars and oils. You’ll get hands-on experience with dehydrating fruits and vegetables, making fruit leather, and creating your own dried herb blends. We’ll also cover proper storage container selection, temperature control basics, and humidity management for different types of produce.

Special attention will be given to seasonal preservation planning, helping you manage abundant harvests throughout the year. You’ll leave with practical knowledge of how to reduce food waste while maintaining optimal nutritional value and flavor in your preserved foods.

Various preserved vegetables in labeled mason jars including pickled, fermented, and canned items
Collection of preserved vegetables in mason jars showing different preservation methods

Cooking with the Seasons

Building Flexible Meal Plans

One of the most valuable skills you’ll develop in this course is creating flexible meal plans that adapt to your weekly CSA box contents. Using our comprehensive seasonal produce guide, you’ll learn to build versatile menus that embrace whatever nature provides. We’ll teach you the art of ingredient substitution, helping you confidently swap items while maintaining the integrity of your recipes.

You’ll master the concept of “anchor dishes” – adaptable recipes that work with multiple vegetable combinations. Through hands-on practice, you’ll discover how to transform a basic stir-fry template into countless variations using different seasonal vegetables. We’ll also explore preservation techniques for managing abundance and creating pantry staples that enhance your cooking year-round.

The course includes practical worksheets for planning weekly menus around your CSA box, plus strategies for incorporating unexpected items into your meal rotation. By the end, you’ll have the confidence to create delicious, waste-free meals no matter what seasonal surprises your box contains.

Beyond the Basics: Advanced Techniques

Once you’ve mastered the basics, it’s time to elevate your CSA cooking game with advanced techniques that maximize every ingredient. Learn professional methods for preserving peak-season produce through fermentation, dehydration, and quick pickling. These skills ensure nothing goes to waste and extend your enjoyment of farm-fresh flavors year-round.

Discover the art of root-to-stem cooking, where you’ll transform carrot tops into vibrant pestos, beet greens into satisfying side dishes, and vegetable scraps into flavorful broths. Master the technique of batch cooking and creative repurposing, turning today’s roasted vegetables into tomorrow’s grain bowls or farm-fresh recipes that your family will love.

You’ll also learn professional knife skills specifically tailored for handling unusual produce shapes and sizes, plus advanced flavor-building techniques like creating compound butters with herbs and developing vegetable-based sauces. These skills help you approach your CSA box with confidence, turning even the most challenging ingredients into delicious, wholesome meals that celebrate the season’s bounty.

By completing this six-week cooking course, you’ll gain more than just culinary skills – you’ll develop a lasting connection with seasonal ingredients and confident cooking habits that will serve you well beyond the program. Graduates consistently report feeling empowered to tackle their weekly CSA boxes with creativity and enthusiasm, turning even unfamiliar vegetables into delicious, nutritious meals. The techniques and recipes you’ll master become part of your cooking DNA, allowing you to adapt to seasonal changes and make the most of fresh, local produce year-round. Plus, the community connections you forge with fellow food enthusiasts and local farmers create a support network that enhances your CSA experience. Whether you’re whipping up a quick weeknight dinner or hosting a harvest celebration, you’ll approach cooking with newfound confidence and joy, making your CSA membership more valuable than ever.