Protect your tomato plants from unwanted pests by leveraging nature’s own defense mechanisms. From companion planting with marigolds and basil to creating barriers with crushed eggshells, learning to protect your vegetable garden naturally ensures a bountiful, chemical-free harvest. Strategic plant spacing, regular inspection of leaves for early signs of infestation, and maintaining healthy soil through organic compost create a robust ecosystem that naturally deters common tomato pests like hornworms and aphids.
Introducing beneficial insects like ladybugs and praying mantises establishes a natural balance in your garden, while simple solutions such as neem oil spray and garlic-based deterrents provide immediate relief without compromising your commitment to organic growing. These time-tested methods not only safeguard your tomatoes but also contribute to a healthier, more sustainable garden ecosystem that produces tastier, more nutritious fruits.
Common Tomato Plant Enemies
Identifying Pest Damage
Learning to identify plant stress signals is crucial for protecting your tomato plants. Here’s what different pest damage typically looks like:
Holes in leaves often indicate tomato hornworms or flea beetles. If you notice irregular, jagged holes with dark droppings nearby, hornworms are likely the culprits. Tiny, shot-like holes suggest flea beetle activity.
Yellowing leaves with silvery trails point to leaf miners, while curled, distorted leaves usually mean aphids have taken up residence. Look for clusters of tiny green, black, or white insects on the undersides of leaves.
Fruits with deep holes or scarring typically indicate tomato fruitworm damage. If you spot small, round holes in green tomatoes that become corky as the fruit ripens, you’re probably dealing with stink bugs.
Wilting plants, despite adequate water, could mean cutworms are active at the base of your plants. Check the soil around the stem for these nocturnal pests.
Early detection is key to managing pest problems organically, so inspect your plants regularly, paying special attention to leaf undersides and new growth.
Split image showing healthy tomato leaves next to pest-damaged leaves with holes and spots
Companion Planting Strategy
Best Companion Plants
Companion planting is one of the most effective organic methods to protect your tomato plants from unwanted pests. Marigolds are your top ally, as their strong scent naturally repels many tomato-loving insects. Plant them in a border around your tomato patch or intersperse them between plants for maximum protection.
Basil not only adds flavor to your tomato dishes but also helps improve tomato growth and naturally deters flies and mosquitoes. Plant basil 10-12 inches from your tomato plants for the best results. Nasturtiums act as a sacrifice plant, drawing aphids away from your tomatoes while adding beautiful edible flowers to your garden.
Other beneficial companions include garlic and onions, which repel spider mites and other small insects. Carrots make excellent neighbors too, as they help break up the soil while their flowers attract predatory wasps that feed on tomato hornworms. Plant your carrots between tomato rows for optimal space utilization.
For the best protection, arrange these companions in a diverse pattern around your tomatoes, creating a natural barrier that supports a healthy ecosystem in your garden.
Garden bed showing tomato plants surrounded by marigolds, basil, and other companion plantsStep-by-step preparation of natural garlic and neem spray solution
DIY Natural Pest Sprays
Application Tips
For best results, apply natural pest control sprays early in the morning or late in the evening when temperatures are cooler and beneficial insects are less active. Always test your spray on a small section of the plant first and wait 24 hours to ensure no adverse reactions. Thoroughly coat both the top and bottom of leaves, as many pests hide underneath.
Reapply treatments every 7-10 days or after rain. For neem oil solutions, spray until the leaves are wet but not dripping. When using garlic or hot pepper sprays, avoid application during flowering to prevent deterring pollinators. Keep a garden journal to track which treatments work best and adjust your approach based on results.
Remember to rotate between different natural solutions to prevent pests from developing resistance. Always spray in calm conditions to ensure even coverage and avoid drift onto other plants.
Preventive Measures
The best defense against tomato pests starts with smart gardening practices. Begin by selecting disease-resistant tomato varieties and planting them in well-draining, nutrient-rich soil. Space your plants properly to ensure good air circulation, which helps prevent fungal issues and makes it harder for pests to move between plants.
Companion planting is a powerful preventive strategy. Plant basil, marigolds, and nasturtiums near your tomatoes – these natural allies help repel common pests while attracting beneficial insects. Maintain a clean garden by removing dead leaves and fallen fruit promptly, as these can harbor pests and diseases.
Installing physical barriers like row covers during the early growing season can protect young plants from flying insects. A layer of organic mulch around your plants helps retain moisture and prevents soil-dwelling pests from reaching your tomatoes. Regular monitoring is crucial – inspect your plants at least twice a week, checking both sides of leaves for early signs of pest activity.
Water your tomatoes at the base early in the day, keeping foliage dry to discourage pest problems. Rotating your crops annually prevents pest populations from establishing in the soil.
Protecting your tomato plants from pests doesn’t have to involve harmful chemicals. By implementing a combination of companion planting, natural predator attraction, and homemade organic sprays, you can maintain a thriving, pest-resistant garden. Remember to regularly inspect your plants, maintain proper spacing for good airflow, and address issues early before they become major problems. The key to successful organic pest control lies in prevention and building a balanced garden ecosystem. With these natural methods, you’ll not only protect your tomatoes but also contribute to a healthier environment for beneficial insects, birds, and other wildlife. Start small, experiment with different organic solutions, and enjoy the satisfaction of growing chemical-free, delicious tomatoes in your garden.
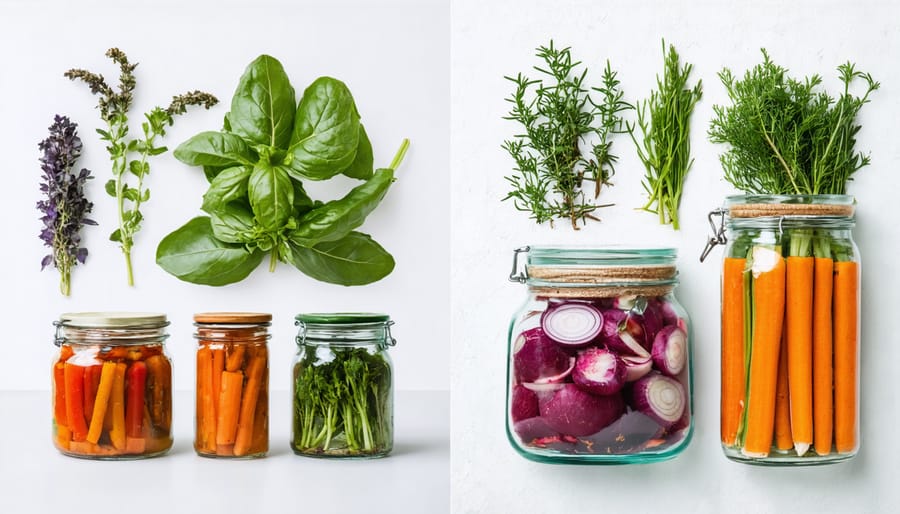
Transform your kitchen into a natural preservation workspace by mastering time-tested food preservation techniques that our ancestors relied upon for generations. Harness the power of fermentation to create probiotic-rich sauerkraut and kimchi, leverage the sun’s energy for dehydrating fruits and herbs, and tap into the ancient art of salt curing to preserve meats and vegetables without artificial additives.
These chemical-free methods not only extend food shelf life but also enhance nutritional value and develop complex, satisfying flavors. From the simple practice of vinegar pickling to the more nuanced process of lacto-fermentation, natural preservation empowers you to reduce food waste while maintaining the integrity of your organic produce. Whether you’re a home gardener with surplus harvest or a conscious consumer seeking independence from commercial preservatives, these time-honored techniques offer sustainable solutions for your food storage needs.
Why Natural Preservation Methods Matter for Organic Food
Split image showing fresh produce alongside naturally preserved versions (dried herbs, fermented vegetables, and root cellar storage)
Environmental Benefits
Natural food preservation techniques offer significant environmental benefits that extend far beyond your kitchen. By adopting these methods, you’ll help reduce the massive energy consumption associated with artificial refrigeration and industrial preservation processes. These traditional techniques require minimal to no electricity, significantly lowering your carbon footprint.
Food waste is a global environmental challenge, with roughly one-third of all food produced going to waste. Natural preservation methods help combat this issue by extending food shelf life without relying on plastic packaging or chemical preservatives. Whether you’re fermenting vegetables, drying fruits, or using salt preservation, these techniques allow you to store seasonal produce for months without artificial cooling.
Additionally, these methods often use reusable containers and natural materials, reducing plastic waste and packaging that typically ends up in landfills. By preserving your own food naturally, you’re also supporting local food systems and reducing the carbon emissions associated with long-distance food transportation and storage.
Health Advantages
Choosing natural preservation methods over artificial preservatives offers significant health advantages for you and your family. Like the well-documented benefits of organic produce, natural preservation techniques help maintain the nutritional integrity of your food while avoiding potentially harmful chemicals. Traditional methods like fermentation can actually enhance the nutritional value of foods by creating beneficial probiotics that support gut health. Drying and dehydration preserve vitamins and minerals without the need for sodium-heavy additives or artificial preservatives that may contribute to health issues like high blood pressure or allergic reactions. Salt-based preservation, when done in moderation, offers a healthier alternative to processed foods while maintaining the authentic flavors of your produce. By choosing natural preservation methods, you’re not just extending shelf life – you’re maintaining the wholesome goodness of your food while protecting your family from unnecessary chemical exposure.
Traditional Drying Techniques
Sun Drying
Sun drying is one of humanity’s oldest and most effective methods of food preservation, requiring nothing more than sunlight, fresh air, and patience. This technique works particularly well for fruits, vegetables, and herbs, transforming them into nutrient-rich preserved foods that can last for months.
To sun dry successfully, choose produce at peak ripeness and wash it thoroughly. Slice fruits and vegetables uniformly – typically 1/4 inch thick – to ensure even drying. For fruits like apples, pears, and apricots, pre-treating with lemon juice helps prevent browning and maintains color.
Set up your drying station on a flat surface that receives direct sunlight throughout the day. Use food-grade drying screens or racks elevated at least 6 inches off the ground to allow proper air circulation. Cover your produce with breathable mesh to protect it from insects while allowing moisture to escape.
Different foods require varying drying times: tomatoes typically take 4-6 days, while herbs might dry in just 2-3 days. The key is to bring moisture content down to about 20% – your produce should feel leathery but not brittle. Success story: Local farmer Sarah Martinez preserved her entire tomato harvest using traditional sun drying techniques, saving over $500 in storage costs.
Remember to bring your produce indoors during evening hours to prevent moisture reabsorption, and only dry on days when humidity is below 60% to ensure proper dehydration.
Traditional wooden drying racks with various fruits and herbs being sun-dried
Air Drying
Air drying is one of the oldest and most effective ways to preserve food naturally. This technique works particularly well for herbs, mushrooms, fruits, and even some vegetables. The key to successful air drying is creating the right environment with proper air circulation and controlled humidity.
To get started, choose a well-ventilated indoor space away from direct sunlight. Your drying area should be clean, dry, and maintain a temperature between 65-70°F (18-21°C). A spare room, attic, or even a dedicated corner in your kitchen can work perfectly.
For herbs, gather them in small bundles and hang them upside down using twine or string. Place a paper bag with holes punched in it around the bundle to catch any falling leaves while still allowing airflow. Most herbs will dry completely within 1-2 weeks.
When drying fruits or vegetables, slice them thinly and evenly to ensure consistent drying. Arrange the pieces on drying racks or screens, making sure they don’t touch each other. For best results, use food-grade mesh screens or stainless-steel racks that allow air to circulate freely.
Remember to check your drying foods regularly for any signs of mold or moisture. Properly dried foods should be brittle or leathery, depending on the item. Once dried, store your preserved foods in airtight containers in a cool, dark place to maintain their quality for months to come.
Fermentation: Nature’s Preservation Magic
Lacto-Fermentation
Lacto-fermentation is a time-tested preservation method that harnesses the power of beneficial bacteria to transform fresh vegetables into tangy, probiotic-rich foods that can last for months. This natural process occurs when vegetables are submerged in a salt brine, creating an environment where good bacteria thrive while harmful bacteria can’t survive.
To get started with lacto-fermentation, you’ll need fresh vegetables, pure salt (without additives), and clean water. Popular choices include cabbage for sauerkraut, cucumbers for pickles, and carrots for a crunchy snack. The process begins by adding 2-3 tablespoons of salt per quart of water to create your brine. Pack your chosen vegetables tightly in clean jars, leaving about an inch of headspace, and cover them completely with the brine.
Success in lacto-fermentation depends on keeping vegetables submerged below the brine level. Many home fermenters use glass weights or even a cabbage leaf to hold everything down. Store your ferments at room temperature (65-75°F) for anywhere from a few days to several weeks, depending on your taste preference and the vegetables used.
You’ll know your ferment is working when you see tiny bubbles forming and smell a pleasantly sour aroma. Once the flavor meets your liking, transfer the jars to the refrigerator to slow down fermentation and enjoy your probiotic-rich preserved vegetables for months to come.
Vinegar-Based Preservation
Vinegar has been a trusted food preservation method for centuries, offering a natural and effective way to extend the shelf life of various foods. The acetic acid in vinegar creates an environment where harmful bacteria can’t thrive, making it perfect for pickling vegetables and preserving fruits.
To get started with vinegar preservation, choose a high-quality vinegar with at least 5% acidity. White vinegar, apple cider vinegar, and rice vinegar are excellent options, each bringing its unique flavor profile to your preserved foods. For basic pickling, combine equal parts vinegar and water, adding salt and sugar to taste. This mixture, called brine, becomes your preservation foundation.
Fresh vegetables like cucumbers, carrots, onions, and peppers work beautifully with vinegar preservation. Before preserving, ensure your vegetables are fresh and clean. Cut them into uniform sizes for even preservation and attractive presentation. Pack them tightly in sterilized jars, add any desired spices or herbs, and pour the hot brine over them until completely covered.
For the best results, store your vinegar-preserved foods in a cool, dark place. Most pickled vegetables will keep for several months when properly prepared and stored. Remember to always use clean utensils when removing food from the jars to prevent contamination. Start with small batches until you perfect your technique, and experiment with different herb and spice combinations to create your signature preserved foods.
Root Cellaring and Cool Storage
Cross-section diagram of a properly constructed root cellar showing temperature zones and storage areas
Creating the Perfect Environment
The success of natural food preservation starts with creating the right environment. Proper storage methods begin with maintaining consistent temperatures between 32-40°F (0-4°C) for most fruits and vegetables. Root cellars naturally maintain these ideal conditions, but you can achieve similar results in a well-insulated basement or garage.
Humidity control is equally crucial, with most produce requiring 85-95% relative humidity to prevent withering. Too much moisture, however, can lead to mold growth. Installing a simple hygrometer helps monitor these levels, while using damp sand or clean burlap can help maintain optimal humidity.
Proper ventilation prevents ethylene gas buildup – a natural compound that speeds up ripening – and helps control moisture. Create air circulation by spacing items properly and using slatted shelves or boxes. For smaller spaces, a small fan on low setting can help maintain airflow.
Remember that different foods have varying environmental needs. For instance, onions and garlic prefer drier conditions, while leafy greens need higher humidity. Group similar items together to create micro-environments that suit each type of produce.
Storage Duration Guidelines
Different fruits and vegetables have varying storage durations when preserved naturally. Root vegetables like carrots, potatoes, and onions can last 4-6 months when stored in a cool, dark place with good air circulation. Properly dried herbs maintain their flavor for up to a year when stored in airtight containers away from direct sunlight.
Fermented vegetables, such as sauerkraut and kimchi, can stay fresh for 4-6 months when refrigerated. Fruit preserves and jams, when properly canned, remain safe to eat for up to 18 months. Dehydrated fruits typically last 6-12 months when stored in moisture-proof containers in a cool, dark place.
For fresh produce storage, apples can last up to 6 months in root cellar conditions, while winter squash varieties keep for 3-6 months. Garlic and onions, when cured properly, stay good for 4-8 months in a well-ventilated space. Fresh berries are more delicate, lasting only 1-2 weeks when refrigerated, but can keep for up to a year when frozen.
Remember that these durations are guidelines – proper storage conditions and initial produce quality significantly impact shelf life. Always check for signs of spoilage before consuming preserved foods.
Natural Preservation Herbs and Spices
For centuries, nature has provided us with powerful preservation allies in the form of herbs and spices. These natural antimicrobial ingredients not only add fantastic flavor to our foods but also help extend produce shelf life through their natural compounds.
Garlic leads the pack with its potent antibacterial properties, thanks to allicin, which helps prevent food spoilage. Adding crushed garlic to pickled vegetables or infusing oils with it creates a natural preservative effect. Thyme and oregano contain thymol and carvacrol, respectively, which fight harmful bacteria while adding Mediterranean flair to your preserved foods.
Turmeric deserves special mention for its curcumin content, which not only preserves food but also adds anti-inflammatory benefits. Try sprinkling it on root vegetables before storage or adding it to pickled preparations. Cinnamon, with its natural antimicrobial properties, works wonderfully in fruit preserves and helps prevent mold growth.
Rosemary extract is particularly effective in preserving oils and fatty foods, while sage helps protect against oxidation. Both can be used fresh or dried, though dried herbs often have more concentrated preservation power. For maximum benefit, combine multiple herbs and spices – think traditional pickling spices or the classic bouquet garni.
When using these natural preservatives, remember that fresh herbs generally need to be used in larger quantities than their dried counterparts. Store your herbs and spices in airtight containers away from direct sunlight to maintain their preservative properties. This way, you’re not just adding flavor – you’re creating a natural defense system for your food storage.
As we’ve explored throughout this article, natural food preservation methods offer sustainable, healthy ways to extend the shelf life of your fresh produce without relying on artificial additives. From the time-tested techniques of fermentation and dehydration to the simplicity of cold storage and salt preservation, these methods not only help reduce food waste but also enhance the nutritional value of your food.
Remember that each preservation technique has its unique benefits and applications. Start with simple methods like vinegar pickling or dehydrating fruits, then gradually experiment with more advanced techniques like lacto-fermentation as you gain confidence. Many of our readers have shared success stories of transforming their summer harvest bounty into winter provisions using these traditional methods.
By embracing these natural preservation techniques, you’re not just saving money and reducing waste – you’re participating in a time-honored tradition of food preservation that connects us to our agricultural heritage. We encourage you to try these methods with your next harvest, starting small and expanding your preservation repertoire as you become more comfortable with each technique. Your journey toward more sustainable food storage practices starts with that first jar of pickled vegetables or batch of dried herbs!
Transform your local farming initiative into a community cornerstone by building thriving CSA partnerships with neighborhood businesses, schools, and organizations. Local partnership programs create powerful connections that boost farm visibility, increase customer reach, and strengthen community ties while ensuring sustainable revenue streams. Partner with restaurants to supply fresh, seasonal produce, collaborate with schools for educational programs, and join forces with local food banks to reduce waste and serve those in need. These strategic alliances not only expand your market presence but also create a resilient local food system that benefits everyone involved – from farmers to consumers. By fostering these meaningful connections, small-scale farmers can build a robust support network that ensures long-term success while contributing to their community’s well-being.
Why Local Partnerships Matter for Your CSA
Building Community Resilience
Local partnership programs serve as catalysts for building stronger, more resilient communities through food-based connections. When farmers collaborate with schools, restaurants, and community organizations, they create a web of support that extends beyond simple transactions. These partnerships foster educational opportunities, create economic stability, and strengthen food security at the neighborhood level.
Success stories like the Green Valley Farm’s partnership with local schools demonstrate how these relationships can transform communities. Students learn about agriculture through hands-on experiences, while farmers secure reliable income streams. Restaurant partnerships have proven equally valuable, with chefs featuring local produce and creating seasonal menus that celebrate regional agriculture.
These collaborations also help communities weather challenges more effectively. During recent supply chain disruptions, areas with established local food partnerships proved more resilient, maintaining steady food access through their interconnected network of producers and consumers. By investing in these relationships, communities build lasting foundations for sustainable food systems that benefit everyone involved.
Economic Benefits for Farmers
Local partnership programs offer substantial financial advantages for farmers through multiple revenue streams and shared resources. By collaborating with community partners, farmers can significantly reduce operational costs while increasing their income potential. Direct sales through CSA memberships provide steady, predictable income, while partnerships with local restaurants and markets create additional revenue opportunities.
These collaborative relationships often lead to cost-sharing benefits, such as shared equipment purchases, bulk ordering of supplies, and combined marketing efforts. Farmers can also benefit from reduced distribution costs through coordinated delivery systems and shared transportation resources.
Many successful partnerships include value-added opportunities, allowing farmers to transform excess produce into profitable products like preserves or dried goods. Additionally, community partnerships often result in increased brand recognition and customer loyalty, leading to higher profit margins and sustainable business growth. The financial stability gained through these programs enables farmers to invest in farm improvements and expand their operations while maintaining focus on sustainable farming practices.
Essential Partners for CSA Success
Farmers shaking hands with local restaurant chef in front of produce display
Local Restaurants and Chefs
Partnering with local restaurants and chefs creates a win-win relationship that benefits both farms and food service professionals. These partnerships often begin with chefs seeking high-quality, fresh ingredients for their menus. By supplying restaurants directly, farms can establish consistent wholesale accounts while providing chefs with peak-season produce that enhances their culinary creations.
Many successful partnerships include regular farm visits by chefs, collaborative menu planning based on seasonal harvests, and special farm-to-table events that showcase local ingredients. Some restaurants even feature farmer profiles on their menus, helping to tell the story behind the food while building customer appreciation for local agriculture.
To initiate these relationships, consider hosting chef tours of your farm, offering sample products, and developing a reliable delivery schedule that aligns with restaurant needs. Remember to maintain open communication about crop availability and pricing throughout the growing season.
Schools and Educational Institutions
Schools and educational institutions play a vital role in local partnership programs by connecting students with fresh, nutritious food and agricultural knowledge. Many CSA farms collaborate with schools to establish farm education programs that bring hands-on learning experiences to students. These partnerships often include school garden projects, cooking demonstrations, and nutrition education workshops. By participating in harvest activities and learning about sustainable farming practices, students develop a deeper understanding of food systems and healthy eating habits. Some farms also work with school cafeterias to supply fresh produce, creating farm-to-school lunch programs that benefit both the educational community and local agriculture.
Elementary school children learning about vegetables in a farm education program
Farmers Markets and Food Co-ops
Partnering with farmers markets and food co-ops can significantly expand your local food distribution network. These collaborations create win-win situations where farmers markets provide additional venues to showcase your produce, while food co-ops offer reliable year-round distribution channels. Many successful CSA programs coordinate pickup locations at farmers markets, attracting new members and creating a vibrant community hub. Food co-ops often welcome partnerships with local farms, offering shelf space for excess produce and helping to reduce waste during peak harvest seasons. Consider cross-promotional opportunities, such as featured farmer days at co-ops or special market events where CSA members can sample additional local products. These partnerships strengthen the local food ecosystem and provide valuable networking opportunities with other sustainable agriculture advocates.
Community Organizations
Local partnership programs thrive through collaboration with various community organizations that share a commitment to sustainable food systems. Non-profit organizations often bring valuable resources and volunteer networks to support farming initiatives, while local food banks help distribute surplus produce to those in need. Environmental groups contribute expertise in sustainable practices and often assist with educational workshops.
Community centers and schools make excellent partners, offering spaces for farmers’ markets and educational programs. These partnerships help introduce younger generations to local agriculture through hands-on learning experiences. Religious organizations and civic groups frequently participate by organizing community events, fundraisers, and volunteer days at partner farms.
Working with these organizations creates a robust support network that strengthens local food systems and builds lasting community connections. Successful partnerships often start with identifying shared values and establishing clear communication channels to ensure mutual benefits for all involved parties.
Infographic showing interconnected web of local food system partnerships
Creating Successful Partnership Programs
Starting the Conversation
Initiating a conversation with potential partners doesn’t have to be intimidating. Start by preparing a clear, one-page overview of your program that highlights mutual benefits and opportunities. Reach out through a friendly email or phone call, introducing yourself and your farm’s mission. Local businesses, restaurants, and community organizations are often receptive to collaboration ideas that support local agriculture.
When meeting in person, bring samples of your produce and share your passion for sustainable farming. Listen actively to their needs and concerns, and be ready to discuss flexible partnership options. Remember that successful partnerships often start with small steps – perhaps a trial period or seasonal collaboration before expanding into a longer-term arrangement.
Focus on building genuine relationships rather than just business transactions. Share your vision for community impact and be open to creative suggestions from potential partners. Many successful partnerships have started with a simple conversation at a farmers’ market or community event.
Structuring Win-Win Agreements
Creating successful partnerships hinges on developing agreements that benefit all parties involved. Start by clearly defining expectations, responsibilities, and rewards for each partner. For farmers, this means outlining delivery schedules, produce quality standards, and pricing structures. For community partners, specify promotional commitments, distribution support, or facility usage terms.
Consider incorporating flexible payment options, such as sliding scale fees or work-trade arrangements, to accommodate different partner capabilities. Include clear communication channels and regular check-in schedules to address concerns promptly and maintain strong relationships.
Document everything in writing, but keep agreements straightforward and easy to understand. Include provisions for modifying terms as the partnership evolves, and establish fair conflict resolution procedures. Success stories from our network show that the most enduring partnerships often start with small, manageable commitments that grow naturally over time.
Remember to celebrate shared successes and recognize partner contributions publicly. This builds community goodwill and encourages long-term commitment to the program. Regular partnership reviews help identify opportunities for growth and ensure continued mutual benefit.
Maintaining Long-term Relationships
Maintaining successful long-term partnerships requires consistent effort and dedication. Regular communication is key – schedule monthly check-ins with your partners to discuss progress, address concerns, and share successes. Be transparent about challenges and changes in your operation, as this builds trust and allows for collaborative problem-solving.
Show appreciation for your partners through simple gestures like thank-you notes, special harvest events, or exclusive partner appreciation days. Consider creating a newsletter to keep partners informed about farm activities and upcoming opportunities. Document your shared achievements and celebrate milestones together.
Flexibility is crucial in long-term relationships. Be open to adjusting agreements as needs change, and always honor your commitments. Create opportunities for partners to provide feedback and actively implement their suggestions when feasible.
Remember to invest in relationship-building beyond business transactions. Organize social events, workshops, or farm tours that bring partners together and strengthen community bonds. Consider establishing a partner advisory board to ensure continued engagement and maintain a strong foundation for future growth.
Most importantly, stay true to your shared values and mission, as these form the backbone of lasting partnerships.
Real Success Stories
The transformative power of local partnerships is best illustrated through successful CSA partnership stories from across the country. Take Green Meadows Farm in Vermont, which partnered with three local schools to provide fresh produce for their cafeterias. This collaboration not only secured a steady revenue stream but also introduced thousands of students to locally grown vegetables, resulting in a 40% increase in CSA memberships from participating families.
Another inspiring example is Sun Valley Organics in California, which joined forces with a local restaurant chain. The partnership allowed the farm to supply premium ingredients while the restaurants offered CSA pickup locations and hosted cooking demonstrations using seasonal produce. This symbiotic relationship led to a 65% growth in their CSA program within just one year.
In Michigan, Rolling Hills Farm found success by partnering with local healthcare providers. Their innovative “Prescription Produce” program, where doctors could prescribe fresh vegetables to patients, helped the farm expand their reach while promoting community health. The initiative doubled their membership base and created a model that other farms are now replicating.
These partnerships demonstrate how creative collaboration can strengthen both farms and communities, proving that success in local agriculture often comes through working together rather than going it alone.
Local partnership programs represent a powerful way to strengthen communities while promoting sustainable agriculture and food security. By connecting farmers, consumers, and local businesses, these initiatives create lasting relationships that benefit everyone involved. Whether you’re a farmer looking to expand your reach or a community member eager to support local agriculture, now is the perfect time to get involved. Take the first step by reaching out to local farms, attending community meetings, or joining existing programs in your area. Remember, successful partnerships start with small actions and grow through dedication and mutual support. Together, we can build a more resilient and sustainable local food system that nourishes both our communities and the environment for generations to come.
Transform your local food purchasing experience with the innovative 4 Cs Credit system, a flexible payment model revolutionizing how CSA payments support local farmers while ensuring sustainable food access for communities. This credit-based approach allows members to pre-purchase “credits” worth various amounts of produce, creating a win-win scenario where farmers receive reliable upfront funding and consumers enjoy the freedom to customize their weekly harvest selections. Unlike traditional CSA models with fixed boxes, the 4 Cs system (Choose, Collect, Credit, Connect) empowers members to control their food choices while maintaining the direct farmer-to-consumer relationship that makes local agriculture thrive. Whether you’re a seasoned CSA participant or new to supporting local farms, this innovative payment structure offers the perfect blend of flexibility and commitment to sustainable food systems.
Understanding the 4 Cs Credit System
How Credit Points Work
Credit points in CSA programs offer a flexible way for members to manage their farm share payments. Each credit point typically represents a dollar value that can be used towards purchasing produce throughout the season. Members can load their accounts with points at the beginning of the season or opt for regular top-ups using modern payment solutions.
When selecting produce, members simply deduct points based on current market values. For example, a basket of tomatoes might cost 10 points, while a bunch of herbs could be 5 points. This system allows members to customize their selections while helping farmers track inventory and plan harvests more effectively.
Unused points usually roll over to the next week or month, depending on the farm’s policy. Some CSAs offer bonus points for early-season commitments or bulk purchases, creating additional value for members who support their local farmers.
Infographic showing credit point system with vegetables and fruit icons connected to point values
Flexibility and Benefits
The 4 Cs credit system offers remarkable flexibility for both members and farmers throughout the growing season. Unlike traditional CSA models, members can choose exactly what produce they want each week, ensuring they get items their families will actually use and enjoy. This credit-based approach allows you to skip weeks when you’re on vacation without losing value, and you can even purchase extra items when hosting special events or planning to preserve the harvest.
For families with changing schedules or dietary preferences, the ability to customize weekly selections is invaluable. You might opt for extra tomatoes during canning season or load up on winter squash for holiday cooking. Some farms even allow credits to roll over to the following season, providing added value and peace of mind. Many members appreciate being able to share credits with friends or family when they have excess, creating a more sustainable and community-oriented food system.
Implementing 4 Cs Credit in Your CSA Membership
Happy family selecting fresh produce at a CSA pickup point while farmer checks their credit balance on a tablet
Managing Your Credits
Keeping track of your CSA credits doesn’t have to be complicated. Start by creating a simple spreadsheet or using a dedicated mobile app to monitor your credit balance throughout the season. Many CSA members find it helpful to set weekly reminders to check their balance and plan their pickups accordingly.
Make the most of your credits by staying informed about seasonal availability. When certain crops are abundant, consider using extra credits to stock up for preservation through freezing or canning. If you’re running low on credits, prioritize high-value items like specialty vegetables or fruits that tend to be more expensive at regular markets.
Some helpful strategies include sharing credits with a neighbor when you’re away, requesting credit rollover options during slower weeks, and communicating with your farmer about upcoming harvest schedules. Many CSA programs offer online portals where you can view your balance and upcoming harvests, making it easier to plan your credit usage.
Remember to document any special arrangements or credit adjustments made with your farmer for future reference. This helps prevent misunderstandings and ensures you’re maximizing the value of your CSA investment.
Seasonal Planning
Effective seasonal planning is crucial for maximizing the value of your 4 Cs credit throughout the growing season. Start by mapping out your farm’s production schedule, identifying peak harvest periods and potential gaps in produce availability. This foresight allows members to strategically use their credits when abundance is highest, often leading to better value for their investment.
Consider implementing a weighted credit system where certain items or seasons offer bonus value. For example, during the height of tomato season, members might get a 10% credit bonus when purchasing bulk quantities for preservation. This approach has proven successful in maintaining long-term CSA membership while helping farms manage surplus effectively.
Many successful farms also offer early-season planning sessions where members can work with farmers to align their credit usage with personal needs and seasonal availability. This collaborative approach helps members maximize their credit value while ensuring farms can plan their growing seasons more effectively, creating a win-win situation for everyone involved.
Success Stories and Real-World Examples
Meet Sarah from Green Valley Farm, who transformed her small family operation using the 4 Cs credit system. Within just two growing seasons, she built a loyal community of 75 members who appreciated the flexibility of credits. “Our members love being able to skip weeks when they’re on vacation and double up on produce when hosting family gatherings,” Sarah shares.
The Thompson family, long-time CSA members, found the credit system perfect for their busy lifestyle. “With three kids in sports, some weeks we needed more vegetables than others. The credit system lets us adjust our pickups to match our schedule,” explains Lisa Thompson.
Rising Sun Farm in Colorado implemented the credit system after members requested more flexibility. Owner Mike Chen reports a 40% increase in member retention and a 25% growth in new sign-ups. Their innovative approach allows members to use credits for both regular produce boxes and special items like honey and eggs.
Another success story comes from Urban Roots Community Farm, which serves a diverse metropolitan area. They’ve used the credit system to accommodate varying household sizes and dietary preferences. “Some members save credits for preservation-ready bulk purchases in late summer, while others maintain steady weekly pickups,” notes farm manager Diana Rodriguez.
These real-world examples demonstrate how the 4 Cs credit system benefits both farmers and members, creating sustainable relationships that support local agriculture while meeting modern families’ needs for flexibility and choice.
The 4 Cs credit system offers a win-win solution for both farmers and CSA members, providing flexibility, financial stability, and a stronger sense of community connection. By adopting this innovative payment model, farms can better manage their cash flow while members enjoy greater choice in how they participate in their local food system. Success stories from farms across the country demonstrate how this system has helped build more resilient and sustainable agricultural communities.
Whether you’re a farmer looking to modernize your CSA program or a member seeking more flexible payment options, the 4 Cs credit approach offers a practical solution that adapts to modern needs while preserving the core values of community-supported agriculture. Consider implementing this system to strengthen your farm-community relationships and create a more sustainable future for local agriculture. The combination of choice, convenience, and community support makes the 4 Cs credit system a valuable tool for evolving CSA programs.
Transform your backyard into a thriving ecosystem while growing nutrient-rich produce through organic gardening. This time-tested approach eliminates harmful pesticides and synthetic fertilizers, creating a sustainable cycle where healthy soil nurtures robust plants, which in turn support beneficial insects and local wildlife. Beyond producing chemical-free fruits and vegetables, organic gardening builds resilient food systems that regenerate the earth rather than depleting it. As more families and communities embrace these natural methods, they’re discovering that organic gardens don’t just yield better-tasting food – they create opportunities for connecting with nature, sharing knowledge, and fostering environmental stewardship for future generations. Whether you’re a seasoned gardener or just starting out, the principles of organic growing offer a practical path to healthier food, stronger communities, and a more sustainable planet.
Environmental Benefits That Extend Beyond Your Garden
Natural Pest Control Through Biodiversity
One of the most remarkable benefits of community gardens is their ability to create self-regulating ecosystems that naturally manage pest problems. By implementing diverse natural pest control methods, organic gardens become havens for beneficial insects and wildlife. When you plant a variety of crops, herbs, and flowers together, you create a balanced environment where predatory insects like ladybugs and praying mantises naturally control harmful pests.
Companion planting plays a crucial role in this ecosystem. For example, marigolds deter numerous garden pests while attracting pollinators, and herbs like basil and mint help repel unwanted insects while enhancing the garden’s biodiversity. Birds and beneficial insects are drawn to these diverse plantings, creating a natural defense system that eliminates the need for harmful pesticides.
This balanced approach not only protects your crops but also supports local wildlife, contributing to a healthier environment for the entire community. As gardens mature, these natural systems become more efficient, requiring less intervention while producing healthier, more resilient plants.
Soil Health and Water Conservation
Organic gardening practices play a vital role in maintaining and improving soil health while promoting effective water management. By avoiding synthetic pesticides and fertilizers, organic gardens naturally enhance soil structure and biodiversity. This creates a living ecosystem where beneficial microorganisms thrive, improving nutrient cycling and water retention capabilities.
The enhanced soil structure in organic gardens acts like a sponge, holding moisture more effectively and reducing water runoff. Implementing smart water conservation techniques such as mulching, companion planting, and choosing drought-resistant varieties helps maintain optimal soil moisture levels while minimizing water waste.
Healthy organic soil also supports natural filtration processes, preventing harmful chemicals from entering local waterways. This creates a positive ripple effect throughout the ecosystem, protecting groundwater quality and supporting local wildlife. Additionally, organic matter-rich soil helps combat erosion, ensuring valuable topsoil stays where it belongs – in your garden.
Split image showing healthy soil with earthworms and beneficial insects next to a water-efficient drip irrigation system
Social and Economic Advantages
Shared Knowledge and Resources
One of the most rewarding aspects of organic gardening is the strong sense of community it creates through shared knowledge and resources. Experienced gardeners often mentor newcomers, passing down time-tested techniques and local growing wisdom that might otherwise take years to discover. This collaborative approach helps everyone succeed while reducing individual learning curves and mistakes.
Community seed libraries and tool-sharing programs make organic gardening more accessible and affordable. Instead of each gardener purchasing every tool they might need, sharing resources allows everyone to access quality equipment at a fraction of the cost. Seed exchanges not only save money but also help preserve heritage varieties and adapt plants to local growing conditions.
Many organic gardeners participate in community workshops and garden tours, creating opportunities to learn from others’ successes and challenges. Social media groups and local gardening clubs provide platforms for quick problem-solving, seasonal advice, and harvest sharing tips. These networks often extend beyond gardening to include food preservation techniques, composting methods, and natural pest control solutions.
The collective knowledge base grows stronger with each growing season, as gardeners document their experiences and share their innovations, making organic gardening more sustainable and successful for everyone involved.
Diverse group of people working together in a community garden, planting vegetables and sharing tools
Building Stronger Community Bonds
Organic gardening does more than just produce healthy food – it cultivates thriving communities. When neighbors come together to share gardening knowledge, exchange homegrown produce, and collaborate on community garden projects, lasting friendships naturally bloom. Many organic gardeners report that their gardens become neighborhood gathering spots, where people stop to chat, exchange tips, and admire the growing bounty.
These garden-centered connections often spark wider community initiatives. Gardeners frequently organize seed swaps, harvest festivals, and educational workshops, bringing diverse groups of people together around a shared interest. Children particularly benefit from these community gardens, learning valuable lessons about food production while developing social skills through collaborative activities.
The impact extends beyond immediate social circles. Organic gardens beautify neighborhoods, increasing property values and civic pride. Many gardeners donate excess produce to local food banks, strengthening community food security. Some neighborhoods have even transformed vacant lots into productive community gardens, reducing crime rates and creating safe spaces for residents to gather.
Through organic gardening, people discover that growing food sustainably isn’t just about the harvest – it’s about nurturing the social fabric that makes communities strong and resilient.
Health and Wellness Benefits
Fresh, Chemical-Free Produce
One of the most compelling reasons to start an organic garden is the access to fresh, nutrient-rich produce free from synthetic pesticides and chemicals. When you grow your own organic fruits and vegetables, you have complete control over what goes into your soil and onto your plants. Research shows that organically grown produce often contains higher levels of beneficial compounds like antioxidants and vitamins compared to conventionally grown alternatives.
By harvesting vegetables right from your garden, you maximize their nutritional value since produce begins losing nutrients shortly after being picked. Your homegrown organic tomatoes, leafy greens, and herbs will not only taste better but also retain more of their natural goodness. Plus, you’ll have peace of mind knowing exactly how your food was grown.
For families with children, organic gardening provides an excellent opportunity to teach healthy eating habits while demonstrating where food comes from. There’s nothing quite like watching a child’s excitement as they pull their first carrot from the ground or pick a sun-ripened strawberry they grew themselves.
Fresh harvested organic vegetables arranged in baskets at a community garden sharing event
Physical and Mental Well-being
Engaging in organic gardening offers remarkable benefits for both physical and mental well-being. The physical activity involved in planting, weeding, and harvesting provides a full-body workout that improves strength, flexibility, and cardiovascular health. Just 30 minutes of gardening can burn up to 150 calories while building muscle and improving bone density through weight-bearing movements.
Beyond the physical benefits, tending to an organic garden acts as a natural stress reliever. The combination of fresh air, sunshine, and connecting with nature triggers the release of endorphins, promoting relaxation and reducing anxiety. Many gardeners report improved sleep patterns and enhanced mood after spending time in their gardens.
Working with soil also exposes you to beneficial microorganisms that can boost your immune system. Plus, the satisfaction of growing your own chemical-free produce encourages healthier eating habits. Studies show that gardeners typically consume more fruits and vegetables than non-gardeners, leading to better overall nutrition and wellness.
The mindful nature of gardening tasks provides a form of meditation, helping to clear the mind and increase focus. This therapeutic aspect makes organic gardening particularly beneficial for mental health and emotional balance.
Getting Started in Your Community
Getting involved in community organic gardening is easier than you might think, and it’s a fantastic way to learn from experienced gardeners while contributing to local food sustainability. If you’re new to gardening, don’t worry – there are plenty of gardening tips for beginners to help you get started.
Begin by researching existing community gardens in your area through local community centers, social media groups, or municipal websites. Many neighborhoods have established gardens that welcome new members and often provide shared tools and resources. If you can’t find an existing garden, consider starting one by connecting with like-minded individuals through local environmental groups or neighborhood associations.
Reach out to your local agricultural extension office or organic farming organizations for guidance and resources. These organizations often offer workshops, seedling exchanges, and educational programs perfect for newcomers. They can also help you understand local regulations and obtain necessary permits if you’re starting a new community garden.
Once you’ve found or started a garden group, participate actively in communal activities. Volunteer for work parties, attend planning meetings, and share your skills or learn from others. Many successful community gardens operate on a shared responsibility model, where members contribute time and resources while sharing in the harvest.
Consider organizing special events like seed-sharing parties, harvest celebrations, or educational workshops to strengthen community bonds. These gatherings not only make gardening more enjoyable but also help spread knowledge about organic practices throughout your neighborhood.
Remember that success in community gardening comes from both giving and receiving. Be open to learning from experienced gardeners, sharing your own discoveries, and celebrating collective achievements. Start small, perhaps with a single plot or shared bed, and gradually expand your involvement as you gain confidence and experience.
Organic gardening offers a powerful way to make a positive impact on both our personal well-being and the environment. From nurturing nutrient-rich soil and growing chemical-free produce to supporting local biodiversity and reducing our carbon footprint, the benefits extend far beyond our garden beds. By embracing organic methods, we create healthier food systems, protect vital pollinators, and build stronger communities through shared knowledge and resources. Whether you’re a seasoned gardener or just starting out, taking the first step toward organic gardening is an investment in our collective future. Start small, connect with local gardening groups, and discover the joy of growing your own organic produce. Together, we can cultivate a more sustainable and healthier world, one garden at a time.
Transform your farm’s productivity and sustainability with the four-crop rotation system – a time-tested method that revolutionizes soil health while maximizing yields. By strategically cycling through grains, legumes, leaf crops, and root vegetables, this systematic approach naturally breaks pest cycles, enriches soil nutrients, and reduces dependency on external inputs. Small-scale farmers and CSA operators particularly benefit from this rotation pattern, as it ensures year-round crop diversity while maintaining consistent harvests for members. Modern adaptations of this centuries-old practice have proven especially effective for organic farmers, delivering up to 40% higher yields compared to continuous monoculture systems while building long-term soil resilience. Whether you’re managing a small market garden or a larger CSA operation, implementing a four-crop rotation system offers a practical pathway to sustainable, profitable farming that nourishes both the land and your community.
Why the 4-Crop Rotation System Works Magic in CSA Farms
The Science Behind Soil Recovery
The magic of soil health through rotation lies in how different plant families interact with the soil ecosystem. Legumes, like peas and beans, work with beneficial bacteria to fix nitrogen from the air into the soil. Following these with heavy feeders like corn or cabbage maximizes this natural fertilization process. Root crops, such as carrots and beets, help break up compacted soil with their deep-growing roots, improving soil structure and water penetration. Leafy greens, with their shallow root systems, help prevent erosion and suppress weed growth while adding organic matter when tilled under.
Each plant family also has unique relationships with soil microorganisms. Some crops release compounds that suppress harmful nematodes, while others foster beneficial fungi networks. By rotating these families strategically, you create a dynamic soil ecosystem that becomes more resilient and fertile with each passing season. This natural approach reduces dependency on external inputs while building long-term soil vitality.
Split photo showing soil samples from the same plot taken in year 1 versus year 4 of rotation
Natural Pest Management Benefits
Crop rotation serves as one of the most effective natural pest control methods available to farmers. By changing crop locations each season, you break the life cycles of pests that target specific plant families. For example, when corn is moved to a new location, corn rootworms can’t find their preferred host plants the following year. This simple yet powerful strategy also reduces soil-borne diseases, as pathogenic organisms lose their food source when crops are rotated. Many farmers report significant reductions in pest problems after implementing a four-crop rotation system, often reducing or eliminating the need for pesticides. Additionally, beneficial insects establish more stable populations when diverse crops are rotated, creating a natural balance in your farm ecosystem.
Infographic showing the four-year cycle with representative crops for each year arranged in a circular diagram
Your Season-by-Season Rotation Blueprint
First Year: Leafy Greens
Begin your first rotation year with leafy greens, which are heavy feeders requiring nutrient-rich soil. Plant crops like lettuce, spinach, kale, and Swiss chard in well-composted beds. These vegetables thrive in the fertile conditions and will make the most of your soil’s nutrients. Consider succession planting throughout the season to ensure continuous harvests, especially if you’re running a CSA program.
Mix in fast-growing varieties like arugula and mustard greens alongside slower-maturing crops. This approach maximizes your growing space while providing diverse options for your harvest basket. Remember to keep detailed records of what you plant and where, as this information will guide your rotation planning for the following years.
To support these hungry plants, incorporate plenty of composted manure or organic matter into the soil before planting. Your leafy greens will reward you with abundant, nutritious harvests that please CSA members and market customers alike.
Second Year: Fruiting Crops
In the second year, your garden transitions to fruiting crops, which are heavy feeders that thrive in the nutrient-rich soil left by legumes. This group includes tomatoes, peppers, eggplants, cucumbers, and squash. These vegetables benefit from the nitrogen fixed by the previous year’s crops, producing abundant harvests of colorful, flavorful fruits.
Plant your fruiting crops with adequate spacing to ensure good airflow and prevent disease. Consider using trellises or cages for vining plants like tomatoes and cucumbers to maximize space and improve fruit quality. Add a layer of organic mulch around the plants to retain moisture and suppress weeds.
Regular feeding with compost tea or organic fertilizers helps support the heavy nutrient demands of these productive plants. Monitor for pests like hornworms and squash bugs, using companion planting with marigolds and nasturtiums as natural deterrents.
Third Year: Root Vegetables
The third year focuses on root vegetables like carrots, parsnips, beets, and turnips. These crops dig deep into the soil, making excellent use of the nutrients that have moved lower in the profile during previous rotations. Root vegetables thrive in the loose, fertile soil created by previous legume plantings and benefit from reduced weed pressure. Keep the soil well-drained and avoid fresh manure applications, which can cause forking in root crops. Consider companion planting with shallow-rooted herbs like dill or cilantro to maximize space usage while preventing soil compaction. This rotation stage helps break pest and disease cycles while improving soil structure through the natural tillage action of growing roots.
Fourth Year: Soil Builders
The fourth year focuses on replenishing soil nutrients through nitrogen-fixing crops and green manures. Legumes like clover, peas, and alfalfa naturally enrich the soil by converting atmospheric nitrogen into a form plants can use. These crops not only improve organic soil management but also provide valuable cover that prevents erosion and suppresses weeds. Many farmers also incorporate dynamic accumulators like comfrey or buckwheat, which draw minerals from deep in the soil and make them available to future crops. This restorative year is crucial for maintaining long-term soil health and ensuring robust yields in the following rotation cycle. Consider mixing multiple soil-building varieties to maximize benefits and create diverse underground ecosystems.
Making It Work for Your CSA Members
Planning Your CSA Boxes
Planning a successful CSA box requires balancing crop rotation principles with member satisfaction. Start by surveying your members about their vegetable preferences and creating a seasonal calendar that maps out when different crops will be ready for harvest. Consider including a mix of reliable staples like lettuce, tomatoes, and carrots alongside more unique varieties to keep boxes interesting.
To maintain healthy soil while meeting member expectations, group crops by family and plan successive plantings. For example, follow spring brassicas (like broccoli and cabbage) with summer nightshades (tomatoes and peppers), then fall legumes, and winter roots. This approach ensures continuous harvests while honoring rotation principles.
Keep detailed records of which crops perform well in different fields and adjust your planning accordingly. Many successful CSA farmers plant 20-30% more than needed to account for crop failures and ensure consistent box quality. Consider offering “choice boxes” where members can select some items, giving you flexibility to work within rotation constraints while keeping customers happy.
Remember to communicate with your members about the importance of crop rotation in maintaining soil health and producing nutritious vegetables. Most CSA members appreciate understanding the farming practices that bring food to their table.
Photo of diverse CSA harvest boxes showing variety achieved through rotation
Communication Tips
Effective communication is key to helping your CSA members understand and appreciate the benefits of a 4-crop rotation system. Start by creating a seasonal newsletter that explains how rotation improves soil health and naturally controls pests. Include colorful photos of your fields in different stages and share simple infographics showing how crops move through your fields each year.
Host farm tours during transition periods between seasons to let members see the rotation in action. This hands-on experience helps them understand why certain crops aren’t available year-round and builds appreciation for your sustainable practices. Consider creating a “crop calendar” that members can reference to track what’s growing when and why.
Share success stories about improved soil quality and increased yields. Use social media to post weekly updates about field preparations and crop transitions. Remember to keep explanations simple and relatable – compare soil health to human health, and explain how crop rotation is like giving the soil a balanced diet and proper rest. When members understand the “why” behind your practices, they’re more likely to remain committed supporters of your farm.
Common Challenges and Solutions
While a 4-crop rotation system offers many benefits, farmers often encounter several challenges when implementing it. One common hurdle is timing and seasonal coordination – ensuring each crop is planted and harvested at the right time to maintain the rotation schedule. This can be especially tricky in regions with shorter growing seasons or unpredictable weather patterns.
Space management presents another challenge, particularly for smaller farms. Each crop requires different amounts of space, and balancing these needs while maintaining profitable yields takes careful planning. Some farmers solve this by using intensive planting methods or incorporating high tunnels to extend growing seasons.
Market demand can also complicate rotation plans. CSA members might want certain crops year-round, which can tempt farmers to break their rotation schedule. Successful farmers address this by educating their members about seasonal eating and offering exciting alternatives during different seasons.
Soil fertility management across different crop needs can be complex. Some crops are heavy feeders while others are light feeders, requiring careful attention to soil amendments and green manuring practices. Many farmers overcome this by incorporating cover crops between main crops and using comprehensive soil testing to track nutrient levels.
Labor and resource allocation can strain farm operations, especially during transition periods between crops. Smart solutions include staggered planting dates, efficient irrigation systems, and investing in appropriate equipment for different crop types. Remember, successful rotation often requires a learning period – start small, keep good records, and adjust your plan based on what works best for your specific situation.
The 4-crop rotation system stands as a time-tested method for creating healthier, more productive gardens and farms. By cycling through different plant families, this approach naturally enhances soil fertility, reduces pest and disease pressure, and promotes sustainable land management. Whether you’re tending a small backyard garden or managing acres of farmland, implementing this rotation system can lead to impressive results.
Success stories from farmers across the country demonstrate how crop rotation has helped them reduce chemical inputs while increasing yields. Many report stronger plant resistance to common problems and noticeably improved soil structure after just a few seasons. The beauty of this system lies in its flexibility – you can adapt it to your specific growing conditions and crop preferences while maintaining its core benefits.
Ready to get started? Remember that even a small plot can benefit from proper rotation planning. Begin with careful documentation of your plantings, and don’t be afraid to adjust your rotation schedule as you learn what works best in your situation. Your soil – and your future harvests – will thank you for making this investment in sustainable growing practices.
Transform your passion for community building into meaningful career experience through a community development internship – where hands-on learning meets social impact. These intensive programs combine sustainable living practices with grassroots community engagement, offering aspiring change-makers real-world experience in building resilient local food systems and strengthening neighborhood connections.
Working alongside experienced community leaders and farmers, interns develop essential skills in project management, stakeholder engagement, and sustainable agriculture while contributing to tangible community improvements. Whether coordinating local food initiatives, organizing educational workshops, or implementing neighborhood improvement projects, these internships provide the perfect blend of professional development and social responsibility.
From urban farming projects to rural agricultural programs, community development internships serve as launching pads for careers in sustainable agriculture, nonprofit management, and social entrepreneurship. These opportunities don’t just build resumes – they build tomorrow’s community leaders.
What Makes CSA Farm Internships Unique
Direct Community Engagement
Interns in CSA programs gain invaluable experience through direct interaction with community members during weekly harvest distributions, farm events, and educational workshops. They learn to build meaningful relationships with shareholders while explaining seasonal produce varieties, sharing cooking tips, and addressing questions about farming practices. This hands-on engagement helps interns understand the crucial connection between sustainable agriculture and community support.
Through organizing farm tours, harvest celebrations, and cooking demonstrations, interns develop essential communication and leadership skills. They participate in member surveys, feedback sessions, and community meetings, gaining insights into the needs and preferences of CSA participants. This direct involvement allows interns to witness firsthand how community-based agriculture strengthens local food systems and creates lasting connections between farmers and consumers.
Many interns also contribute to the CSA newsletter, social media updates, and educational materials, helping to keep members informed and engaged throughout the growing season. These interactions foster a deeper understanding of food justice, sustainable agriculture, and the importance of building resilient local food communities.
Seasonal Learning Cycles
The internship program follows nature’s rhythm through a full growing season, typically spanning spring through fall. Interns experience the complete cycle of agricultural operations, from early spring seed starting and soil preparation to late fall harvest and winter preparation. During spring, you’ll learn about greenhouse management, seedling care, and field preparation. Summer brings intensive learning about crop maintenance, pest management, and successive planting strategies, while managing weekly CSA distributions.
As autumn approaches, focus shifts to harvest management, food preservation techniques, and preparing fields for winter. This cyclical learning approach ensures interns understand how each season connects to the next, building a comprehensive understanding of year-round farm operations. You’ll also gain insight into CSA planning, member communications, and seasonal crop scheduling – essential skills for future farming endeavors. The program’s timeline allows you to witness and participate in the complete transformation of seeds to harvest, creating a solid foundation in sustainable agriculture practices.
Essential Skills You’ll Develop
Diverse group of interns working together in a CSA field, harvesting vegetables
Sustainable Farming Practices
Interns gain invaluable hands-on experience with organic growing methods that prioritize soil health and ecosystem balance. You’ll learn to manage diverse crops through natural pest control, companion planting, and proper crop rotation techniques. Working alongside experienced farmers, you’ll discover how to create and maintain compost systems, implement water conservation strategies, and select appropriate cover crops for soil improvement.
The program emphasizes practical skills in seed starting, transplanting, and season extension methods using greenhouses and row covers. You’ll master sustainable harvesting techniques that maximize crop yields while maintaining plant health. Through daily field work, you’ll develop an understanding of soil testing, natural fertilization methods, and irrigation systems that support chemical-free farming.
Interns also learn about biodiversity preservation through heritage seed saving and native plant integration. This hands-on experience provides a solid foundation in sustainable agriculture practices that you can apply to future farming ventures or community garden projects.
Business and Distribution
Interns gain hands-on experience in managing the business side of a Community Supported Agriculture program, learning essential skills for running a successful CSA operation. Through direct involvement in member communications and subscription management, interns understand how to build and maintain strong relationships with CSA members while ensuring smooth program operations.
The distribution aspect involves coordinating weekly harvest schedules, organizing produce boxes, and managing pickup locations. Interns learn to create efficient systems for sorting and packaging fresh produce, maintaining quality control, and implementing food safety protocols. They also gain experience in tracking inventory, managing seasonal fluctuations, and adjusting share contents based on crop availability.
Additionally, interns explore various CSA business models, from traditional seasonal shares to flexible market-style systems. They learn about pricing strategies, marketing techniques, and member retention practices that contribute to a sustainable business. This comprehensive exposure helps interns develop the entrepreneurial skills needed to potentially start their own CSA programs in the future.
Intern explaining CSA share contents to community members at a pickup station
Community Leadership
Community leadership forms a vital component of CSA internship programs, offering hands-on experience in building and nurturing relationships within local food communities. Interns learn to organize and lead member education workshops, covering topics from seasonal cooking to food preservation techniques. They gain valuable experience planning and executing farm events, including harvest festivals, farm-to-table dinners, and family-friendly activities that strengthen community bonds.
Outreach responsibilities typically include managing social media accounts, writing newsletters, and representing the farm at local markets and food events. Interns develop skills in effective communication, learning to explain farming practices and share the importance of sustainable agriculture with diverse audiences. They also participate in collaborative projects with local schools, food banks, and community organizations, creating lasting connections between the farm and its neighbors.
These leadership opportunities prepare interns for future roles in community-based agriculture, whether as farm managers, educators, or advocates for sustainable food systems.
Finding the Right CSA Internship
What to Look For
When evaluating community development internship opportunities, focus on programs that offer hands-on experience in sustainable agriculture and community engagement. Look for internships that provide a structured learning curriculum alongside practical fieldwork. The program should include clear educational objectives, regular mentorship, and opportunities to interact with diverse community members.
Pay attention to the range of responsibilities offered. Strong programs typically include experience in crop planning, sustainable farming techniques, and community outreach activities. You’ll want to ensure the internship provides exposure to both the agricultural and social aspects of community development.
Consider the duration and time commitment required. Most quality programs run for at least one growing season (3-6 months) to provide comprehensive experience. Check if housing, meals, or stipends are included, as these can significantly impact your ability to participate.
Finally, research the host organization’s reputation and values. Look for testimonials from past interns, evidence of community impact, and alignment with sustainable farming practices. The best programs demonstrate a clear commitment to both agricultural education and community building.
Application Tips
When applying for community development internships, start by crafting a compelling resume that highlights your volunteer experience, leadership roles, and passion for community engagement. Include specific examples of projects you’ve been involved with, even if they were small-scale or informal initiatives.
Your cover letter should tell a story about why you’re drawn to community development work. Share personal experiences that sparked your interest and demonstrate your understanding of sustainable community practices. Be specific about how you hope to contribute to and learn from the organization.
During interviews, prepare thoughtful questions about the organization’s approach to community engagement and their long-term impact goals. Share examples of times you’ve worked collaboratively or solved problems in group settings. Remember to emphasize your willingness to learn and adapt, as many internships value enthusiasm and potential over extensive experience.
Keep your application materials organized and submit them well before deadlines. Follow up professionally after submitting your application, and always send thank-you notes after interviews. This attention to detail shows your commitment and professionalism.
Former CSA intern now running their own successful small farm
Success Stories from the Field
Meet Sarah Chen, who started as an intern at Rolling Hills CSA in 2018. After completing her three-month internship, she launched her own successful micro-greens operation that now supplies five local restaurants. “The hands-on experience was invaluable,” Sarah shares. “I learned not just farming techniques, but also how to build meaningful connections with the community.”
Another inspiring story comes from Marcus Rodriguez, a former tech professional who traded his desk job for farm life. His internship at Sunflower Valley Farm equipped him with the skills to start a vertical farming initiative that’s now transforming local communities in urban food deserts.
Emma Thompson parlayed her internship experience into a full-time position as an agricultural educator. After interning at Green Meadows CSA, she now leads workshops teaching sustainable farming practices to new generations of aspiring farmers. Her program has trained over 50 individuals who have gone on to start their own agricultural ventures.
Perhaps most remarkable is the journey of David Park, who began as an intern with no prior farming experience. Today, he manages a 15-acre organic farm that serves 200 CSA members. “The internship showed me that sustainable agriculture isn’t just about growing food,” David explains. “It’s about growing community relationships and environmental stewardship.”
These success stories demonstrate how community development internships serve as launching pads for meaningful careers in sustainable agriculture, creating ripple effects that benefit entire communities.
A community development internship through a CSA program offers an invaluable stepping stone into sustainable agriculture and community building. These hands-on experiences provide essential skills in organic farming, business management, and community engagement that can’t be replicated in a classroom setting. Whether you’re dreaming of starting your own farm, seeking a career in sustainable agriculture, or simply wanting to deepen your connection to local food systems, a CSA internship can be transformative.
Ready to take the next step? Start by researching CSA farms in your area and reaching out to learn about their internship opportunities. Many programs begin accepting applications in winter for the following growing season. Connect with previous interns, attend farm tours, and don’t hesitate to ask questions about living arrangements, stipends, and educational components. Remember that while the work is challenging, the rewards of contributing to sustainable food systems and building stronger communities are immeasurable.
Join the growing movement of individuals making a difference through sustainable agriculture – your journey in community-supported farming starts here.
Environmental sustainability in agriculture stands at the crossroads of food security and planetary health. Today’s farmers are pioneering sustainable farming practices that not only protect our soil, water, and air but also ensure robust crop yields for generations to come. Through innovative techniques like precision irrigation, crop rotation, and integrated pest management, modern agriculture is transforming into a powerful force for environmental stewardship. Small-scale organic farms and large agricultural operations alike are discovering that ecological responsibility and profitable farming aren’t just compatible—they’re inseparable. As climate change intensifies and natural resources become increasingly precious, the adoption of sustainable agricultural methods has evolved from an idealistic goal to an urgent necessity. These practices don’t just preserve our environment; they enhance soil fertility, reduce water consumption, and create resilient food systems that can withstand environmental challenges while nourishing growing populations.
Why CSA Farms Lead the Way in Sustainable Agriculture
Aerial view of a diverse CSA farm showing multiple crop sections, greenhouses, and short distance to local community
The Local Food Advantage
When you choose locally grown produce through community supported agriculture and farmers’ markets, you’re not just getting fresher food – you’re actively reducing your carbon footprint. Local food travels significantly shorter distances from farm to table, often just 50 miles or less, compared to conventional produce that typically travels over 1,500 miles to reach grocery stores.
This shorter journey means less fuel consumption and fewer greenhouse gas emissions from transportation. Fresh produce also maintains more nutrients when it doesn’t spend days in transit, providing better nutritional value for consumers. Local farmers can harvest crops at peak ripeness rather than picking them early to accommodate long-distance shipping.
Many local farmers also implement sustainable packaging practices, using reusable containers and minimal plastic wrap. This creates a ripple effect of environmental benefits, from reduced packaging waste to lower energy consumption for refrigeration during transport. Supporting local food systems helps build a more resilient and environmentally friendly agricultural future while keeping your food dollars in your community.
Season-Aligned Growing Practices
CSA farms excel at working in harmony with nature’s seasonal rhythms, significantly reducing their environmental footprint. By planting and harvesting crops according to natural growing seasons, these farms minimize the need for artificial heating, cooling, and lighting systems that consume excessive energy.
In spring, farmers focus on cold-hardy crops like peas, lettuce, and radishes that thrive in cooler temperatures. Summer brings heat-loving vegetables such as tomatoes, peppers, and cucumbers, while fall transitions to squash, root vegetables, and hardy greens. This natural progression allows farms to operate without energy-intensive greenhouses during off-seasons.
Local farmer Sarah Chen of Green Valley CSA shares, “Working with the seasons means we’re not fighting nature. We use significantly fewer resources than year-round production of out-of-season crops would require.” This approach also enhances soil health through crop rotation and natural rest periods, while reducing water consumption as rainfall patterns typically align with growing seasons.
Many CSAs extend their growing season naturally using simple solutions like row covers and cold frames, rather than relying on artificial climate control. This season-aligned approach creates a more sustainable and resilient food system that benefits both the environment and local communities.
Sustainable Practices That Set CSA Farms Apart
Soil Health Management
Healthy soil is the foundation of sustainable agriculture, and farmers who prioritize soil health employ several effective practices to maintain it. Cover cropping stands out as a powerful technique where farmers plant specific crops like clover, rye, or buckwheat during off-seasons to protect and nourish the soil. These cover crops prevent erosion, suppress weeds, and add vital organic matter when they decompose.
Crop rotation is another essential practice where farmers change what they grow in each field from season to season. This natural approach prevents soil depletion, breaks pest cycles, and helps maintain balanced nutrient levels. For example, following nitrogen-hungry corn with nitrogen-fixing legumes helps restore soil fertility naturally.
Natural fertilization methods complement these practices perfectly. Farmers use compost, which transforms food scraps and yard waste into nutrient-rich soil amendments. Animal manure, when properly composted, provides excellent fertilization while reducing waste. Green manure – the practice of turning cover crops directly into the soil – offers another natural way to boost soil fertility.
Many farmers also introduce beneficial microorganisms through compost teas and natural amendments like kelp or rock dust. These additions help create a living soil ecosystem that supports plant health naturally. Together, these practices build soil that’s rich in organic matter, teeming with beneficial organisms, and capable of producing nutritious crops year after year.
Close-up of rich soil with cover crops and visible earthworms demonstrating healthy soil biology
Water Conservation Techniques
Water conservation is at the heart of sustainable farming, and modern agricultural practices offer numerous ways to use this precious resource wisely. Drip irrigation systems lead the way in water-efficient technology, delivering moisture directly to plant roots while minimizing evaporation and runoff. These systems can reduce water usage by up to 60% compared to traditional sprinkler methods.
Smart irrigation controllers and soil moisture sensors help farmers make data-driven decisions about when and how much to water their crops. These tools monitor soil conditions in real-time, ensuring plants receive exactly what they need – no more, no less. Many farmers also implement rainwater harvesting systems, collecting precipitation in storage tanks for use during drier periods.
Mulching plays a crucial role in water conservation by reducing evaporation and maintaining soil moisture. Natural materials like straw, wood chips, or composted leaves create a protective layer that keeps the soil cool and moist. Cover cropping between growing seasons helps improve soil structure and water retention while preventing erosion.
Success Story: Sarah Martinez, a CSA farmer in California, reduced her water consumption by 40% after implementing a combination of drip irrigation and moisture sensors. “The investment paid for itself within two seasons,” she shares, “and my crop yields actually improved because plants were getting water more consistently.”
These water-saving techniques not only conserve resources but also lead to healthier plants and reduced operating costs, making them essential tools for sustainable agriculture.
Biodiversity Protection
Sustainable agriculture plays a vital role in promoting biodiversity and protecting local ecosystems. By creating diverse habitats within farm boundaries, farmers support beneficial insects, birds, and other wildlife that contribute to natural pest control and pollination.
Smart planting strategies, like incorporating native flowering plants and maintaining hedgerows, provide food and shelter for pollinators such as bees, butterflies, and beneficial predatory insects. These natural allies help control pest populations without the need for chemical pesticides, creating a balanced and self-regulating ecosystem.
Many CSA farmers maintain uncultivated areas around their fields, including wildflower meadows, pond edges, and wooded areas. These buffer zones serve as wildlife corridors and safe havens for local species. Some farmers also integrate agroforestry practices, combining trees and shrubs with crops to create multi-layered habitats that support diverse wildlife communities.
Cover cropping between growing seasons helps protect soil life and provides additional habitat for beneficial organisms. By avoiding tillage when possible and maintaining year-round ground cover, farmers create stable environments for soil microorganisms, earthworms, and other underground helpers that contribute to soil health and plant vitality.
These biodiversity-friendly practices not only benefit local ecosystems but also enhance farm productivity through improved pollination, natural pest management, and increased soil fertility.
Real Success Stories from CSA Farmers
Green Valley CSA’s Solar-Powered Innovation
Green Valley CSA’s journey toward sustainability took a remarkable turn in 2019 when they installed a comprehensive solar power system across their 15-acre farm. The transformation began with a careful energy audit that revealed significant power consumption from their irrigation systems, cold storage facilities, and processing equipment.
The farm’s owner, Sarah Martinez, worked with local renewable energy experts to design a solution that would meet their needs while minimizing environmental impact. The resulting system includes 48 solar panels strategically placed on south-facing barn roofs and a series of ground-mounted arrays in previously unused areas.
The results have been impressive: Green Valley CSA now generates 95% of its electrical needs through solar power, saving over $12,000 annually on energy costs. The system produces enough electricity to power their main barn, greenhouse climate control systems, and cold storage units, with excess energy being fed back into the local power grid during peak production periods.
Beyond the financial benefits, the solar installation has become an educational tool for the community. The farm hosts monthly workshops where visitors can learn about renewable energy in agriculture. They’ve also installed real-time energy monitoring displays in their farm store, allowing CSA members to see exactly how much solar power is being generated and used at any given moment.
The success of Green Valley’s solar initiative has inspired several neighboring farms to explore similar sustainable energy solutions.
Solar panels installed on a barn roof with productive farm fields in the background
River Ridge Farm’s Water-Wise Revolution
In the heart of California’s Central Valley, River Ridge Farm has transformed from a traditional water-intensive operation into a model of drought-resistant agriculture. Owner Sarah Martinez implemented innovative water conservation techniques that reduced the farm’s water consumption by 60% while maintaining crop yields.
The farm’s success stems from a combination of smart technology and ancient wisdom. Martinez installed a state-of-the-art drip irrigation system that delivers water directly to plant roots, eliminating waste through evaporation. She also incorporated moisture sensors throughout the fields that provide real-time data about soil conditions, allowing for precise water management.
But perhaps the most remarkable aspect of River Ridge’s transformation is its diverse crop selection. Martinez replaced water-hungry crops with drought-resistant varieties, including heritage grains and native vegetables that naturally thrive in arid conditions. She also introduced permaculture techniques, creating swales and berms that capture rainwater and reduce runoff.
The farm’s water-wise practices extend beyond the fields. Rainwater harvesting systems collect thousands of gallons during wet seasons, while greywater recycling helps maintain the farm’s educational garden. Today, River Ridge hosts monthly workshops, sharing their sustainable practices with other farmers and home gardeners.
The results speak for themselves: River Ridge maintains profitable operations even during severe drought conditions, proving that sustainable water management can coexist with productive farming.
Community Supported Agriculture (CSA) farming stands as a beacon of hope for environmental sustainability in our food system. Through practices like crop rotation, composting, and natural pest management, CSA farms significantly reduce their carbon footprint while building healthier soil ecosystems. These methods not only protect our environment but also produce nutritious, chemical-free food that benefits both consumers and the planet.
The positive impact on local communities extends far beyond just environmental benefits. By supporting CSA farms, you’re participating in a movement that preserves biodiversity, reduces food miles, and helps combat climate change. Each share purchased strengthens sustainable farming practices and encourages more farmers to adopt earth-friendly methods.
You can be part of this positive change. Consider joining a local CSA, starting a small garden using sustainable practices, or sharing your knowledge about environmental farming with others. Every step toward sustainable agriculture, no matter how small, contributes to a healthier planet for future generations. Together, we can create a more sustainable food system that nourishes both people and the environment while preserving our precious natural resources for years to come.
Start your garden with proven winners like lettuce, radishes, and bush beans – quick-growing vegetables that deliver early success and build confidence. Position these hardy plants in well-draining soil with 6-8 hours of direct sunlight, giving each seedling enough space to thrive without competition. Add a layer of organic mulch to retain moisture and suppress weeds, making maintenance manageable for first-time gardeners.
Choose container-friendly varieties if space is limited – cherry tomatoes, herbs, and compact peppers flourish in pots while providing fresh harvests throughout the season. Focus on just 3-4 different plant types initially, mastering their basic care requirements before expanding your garden’s diversity.
Monitor your plants daily, watching for signs of stress or pest damage. Early detection means simpler solutions, turning potential problems into valuable learning experiences. This hands-on approach builds the foundation for long-term gardening success while providing fresh, homegrown produce within weeks of planting.
Easy-Growing Leafy Greens for Quick Success
Colorful collection of fresh lettuce and spinach varieties growing in a raised garden bed
Lettuce and Spinach
Lettuce and spinach are perfect starter crops that can provide you with fresh salad greens throughout the growing season. These leafy vegetables thrive in cool weather and can be planted as soon as the soil can be worked in spring. For best results, sow your seeds about 1/4 inch deep in rows 12-18 inches apart, keeping the soil consistently moist but not waterlogged.
Both plants prefer rich, well-draining soil and partial shade, especially in warmer climates. You can start harvesting outer leaves when they’re about 4 inches tall, allowing the inner leaves to continue growing. This “cut and come again” method extends your harvest significantly.
For a continuous supply, plant new seeds every two weeks during the growing season. Most varieties will be ready to harvest in 30-45 days from planting. Watch out for slugs and snails, which can be deterred by spreading coffee grounds or eggshells around your plants.
Pro tip: Try growing these greens in containers on a patio or balcony if you’re short on garden space. Whether you’re renting a condo in Toronto or living in another city apartment, container gardening keeps fresh harvests within easy reach.
Swiss Chard and Kale
Swiss chard and kale are excellent choices for beginner gardeners, offering both beauty and bounty in your garden. These leafy greens are incredibly resilient and can withstand various weather conditions, making them perfect confidence-builders for new gardeners.
Swiss chard, with its rainbow-colored stems and dark green leaves, grows quickly and can be harvested continuously throughout the season. Simply cut the outer leaves about 2 inches from the base, and new ones will keep growing from the center. Plant seeds directly in your garden about 2-3 weeks before the last frost date, spacing them 12 inches apart.
Kale is equally forgiving and becomes even sweeter after a light frost. It’s a true garden warrior that produces from spring through fall, and in milder climates, even into winter. Like Swiss chard, kale can be harvested leaf by leaf, allowing for months of fresh, nutritious greens. Plant kale seeds 1/4 inch deep and 18 inches apart, keeping soil consistently moist but not waterlogged.
Both plants thrive in full sun but can tolerate partial shade, and they’re packed with nutrients that make them as healthy as they are easy to grow.
Foolproof Herbs for Your First Garden
Potted herb garden showing thriving basil, mint, parsley, and chives with plant labels
Basil and Mint
Basil and mint are two of the most rewarding herbs for beginner gardeners, offering quick results and endless culinary possibilities. Both thrive in containers or garden beds, making them perfect for any growing space.
Start basil from seeds or small plants in spring after the last frost. Place them in well-draining soil where they’ll receive 6-8 hours of sunlight daily. Keep the soil consistently moist but not waterlogged. Regular harvesting encourages bushier growth – simply pinch off leaves from the top of the plant, leaving at least two sets of leaves on each stem.
Mint is incredibly vigorous and best grown in containers to prevent it from spreading throughout your garden. It tolerates partial shade and thrives in rich, moist soil. Plant in spring using small plants or root cuttings. Water regularly and harvest stems from the top to promote fuller growth.
Both herbs are perfect for cooking, teas, and garnishes. Fresh basil elevates tomato dishes and pesto, while mint adds refreshing flavor to drinks and Mediterranean cuisine. Dry excess leaves for year-round use by hanging stems upside down in a warm, dry place.
Parsley and Chives
Parsley and chives are fantastic starter herbs that come back year after year, making them excellent value for your garden. Both herbs thrive in well-draining soil and prefer sunny spots, though they can tolerate partial shade. Plant them in spring once the soil has warmed, spacing chives about 4-6 inches apart and parsley 6-8 inches apart.
Chives are incredibly low-maintenance and will produce flavorful leaves throughout the growing season. Simply snip what you need about 2 inches above the soil, and they’ll keep growing. Their pretty purple flowers are edible too! In late fall, cut them back to about an inch above ground level, and they’ll return stronger next spring.
Parsley needs consistent moisture but isn’t fussy otherwise. Both flat-leaf and curly varieties are easy to grow, though flat-leaf tends to have more robust flavor. Harvest outer leaves regularly to encourage bushier growth. While technically biennial, most gardeners treat parsley as an annual, but it often self-seeds readily.
These herbs are natural companions in the garden and the kitchen, adding fresh flavor to your meals year-round.
Fresh harvest display of cherry tomatoes, bush beans, zucchini, and radishes in a garden basket
Reliable Vegetables for Beginner Success
Bush Beans and Cherry Tomatoes
Bush beans and cherry tomatoes are perfect starter plants that reward beginners with bountiful harvests. Both thrive in full sun and well-draining soil, making them ideal companions in your garden.
For bush beans, plant seeds directly in the ground about 1-2 inches deep and 4-6 inches apart after the last frost. These self-supporting plants don’t require staking and will produce tender pods within 50-60 days. Water consistently but avoid getting the leaves wet to prevent disease. Harvest pods when they’re young and crisp, about the thickness of a pencil, and pick regularly to encourage continued production.
Cherry tomatoes are best started from nursery seedlings rather than seeds for your first season. Plant them 24-36 inches apart in rich soil amended with compost. Unlike bush beans, these plants need support – a simple tomato cage or strong stakes work well. Prune off the lower leaves and any suckers (small shoots between branches) to improve air circulation. Water deeply at the base of the plant, and feed with organic fertilizer every few weeks once fruits begin forming.
Both plants are relatively pest-resistant and provide steady harvests throughout the summer. For the best results, mulch around both crops to retain moisture and suppress weeds. You’ll know you’re doing things right when your kitchen counter starts overflowing with fresh produce!
Zucchini and Radishes
For beginning gardeners, zucchini and radishes are perfect confidence builders that deliver quick, satisfying results. Zucchini plants are incredibly generous producers – in fact, you’ll likely find yourself sharing your harvest with neighbors! Plant them in full sun with rich, well-draining soil, giving each plant about 3 feet of space. Once established, they’ll grow rapidly and produce tender squash within 50-70 days.
Radishes are even quicker, ready to harvest in just 20-30 days. These spicy, crunchy vegetables are perfect for impatient gardeners and children who want to see fast results. Sow radish seeds directly in the garden about ½ inch deep and 1 inch apart, then thin to 2 inches once they sprout. They prefer cool weather, making them ideal for early spring or fall planting.
Both vegetables are relatively low-maintenance but have a few key needs. Zucchini requires consistent watering and benefits from mulching to retain moisture. Watch for powdery mildew on the leaves, which you can prevent by watering at soil level rather than overhead. For radishes, keep the soil consistently moist but not waterlogged, and harvest them promptly when ready – leaving them too long can result in woody, bitter roots.
Start with just a few plants of each; you’ll be amazed at how much food you can grow in a small space!
Simple Care Tips for Garden Success
Success in your garden starts with consistent care and attention. While our beginner gardening tips will help you get started, these essential maintenance practices will keep your plants thriving throughout the growing season.
Water deeply but less frequently to encourage strong root growth. Most vegetables need about 1-1.5 inches of water per week. Check soil moisture by sticking your finger about 2 inches deep – if it feels dry, it’s time to water. Morning watering is best to prevent fungal issues.
Mulching is your secret weapon for a healthy garden. Apply a 2-3 inch layer of organic mulch (straw, leaves, or grass clippings) around your plants to retain moisture, suppress weeds, and regulate soil temperature. Keep mulch slightly away from plant stems to prevent rot.
Regular weeding is crucial – aim to spend 10-15 minutes every few days pulling unwanted plants while they’re small. This prevents them from competing with your vegetables for nutrients and water.
Feed your plants monthly with organic compost or fertilizer. Young plants are hungry and need consistent nutrients to produce well. Watch for yellowing leaves or stunted growth, which often indicate nutrient deficiencies.
Monitor your garden daily to protect your garden from pests and catch problems early. Remove damaged or diseased leaves promptly, and harvest vegetables regularly to encourage continued production.
Remember, gardens thrive on routine attention. Even just 15 minutes of daily care can make the difference between a struggling garden and an abundant harvest.
Starting your first garden is an exciting journey that doesn’t have to be overwhelming. By focusing on easy-to-grow vegetables like lettuce, tomatoes, and herbs, you’ll build confidence while enjoying fresh, homegrown produce. Remember to start small, choose a sunny spot, and maintain consistent watering habits. The key to success lies in selecting plants that match your growing zone and available space. Don’t be afraid to experiment and learn from both successes and challenges – every gardener started as a beginner. With these foundation plants and basic care principles in mind, you’re well-equipped to begin your gardening adventure. Get your hands dirty, stay patient, and watch as your garden transforms from seeds to harvest. Happy growing!
Transform your farm’s productivity and soil health with a strategic 5-year crop rotation plan that maximizes yields while minimizing pest and disease pressures. Thoughtful CSA planning through rotation creates resilient, sustainable growing spaces that naturally suppress weeds and build organic matter. By rotating plant families through distinct growing zones, your soil becomes richer each season, supporting stronger crops and more abundant harvests.
This comprehensive guide breaks down the essential components of a 5-year rotation system, designed specifically for market gardeners and small-scale farmers looking to optimize their land use. Whether you’re managing a quarter-acre or twenty acres, these time-tested rotation principles help balance soil nutrients, break pest cycles, and maintain consistent production throughout the growing season. Learn how to group compatible crops, schedule successions, and plan cover crop windows that keep your soil working year-round while meeting your CSA members’ diverse produce needs.
The Foundation of Successful CSA Crop Rotation
Plant Family Groups
To effectively plan your crop rotation, start by grouping your vegetables according to their botanical families. The main plant families include Solanaceae (nightshades like tomatoes, peppers, and potatoes), Brassicaceae (cabbage family including broccoli, kale, and radishes), Fabaceae (legumes such as peas and beans), Cucurbitaceae (squash family including cucumbers and melons), and Amaryllidaceae (onion family).
These family groupings are crucial because related plants often share similar nutrient needs and are susceptible to the same pests and diseases. For example, all nightshades are heavy feeders and vulnerable to similar soil-borne diseases, while legumes help fix nitrogen in the soil.
Create a simple chart with these family groups, listing all the crops you plan to grow under their respective families. This organization makes it easier to move entire groups through your rotation schedule, ensuring that related crops don’t return to the same plot for several years. When planning, remember that some families, like brassicas, need more space than others, so factor this into your rotation blocks.
Color-coded diagram showing major plant families grouped in rotating circles
Nutrient Needs Assessment
Different crops have varying nutrient requirements and impact soil health in distinct ways. Understanding these needs is crucial for implementing effective sustainable farming practices through crop rotation. Heavy feeders like tomatoes and corn deplete significant nitrogen from the soil, while legumes like peas and beans actually enrich the soil by fixing nitrogen from the air.
Root vegetables typically need more phosphorus and potassium, while leafy greens require abundant nitrogen. By alternating these different types of crops, you maintain a natural balance in your soil’s nutrient profile. For example, following heavy feeders with nitrogen-fixing legumes helps restore soil fertility naturally.
Consider conducting annual soil tests to track nutrient levels and adjust your rotation plan accordingly. Pay attention to signs your plants give you – yellowing leaves might indicate nitrogen deficiency, while purple-tinged foliage could suggest phosphorus depletion. This knowledge helps you make informed decisions about which crops to plant where and when, ensuring long-term soil health and abundant harvests.
Infographic showing the 5-year rotation cycle with representative crops for each year
Your Year-by-Year Rotation Plan
Year 1: Heavy Feeders
The first year of your crop rotation cycle focuses on heavy feeders – those nutrient-hungry plants that thrive in rich, fertile soil. These crops form the foundation of many successful market gardens and typically include favorites like tomatoes, peppers, corn, and brassicas (cabbage family). Start by preparing your soil with plenty of compost and well-rotted manure in early spring.
Tomatoes and peppers should take center stage, as they’re not only heavy feeders but also high-value crops that CSA members love. Plant these alongside eggplants and potatoes, grouping your nightshade family together. Dedicate another section to sweet corn, which benefits from being planted in blocks for better pollination. Reserve space for Brussels sprouts, cabbage, and broccoli, timing them for fall harvest.
Remember to mulch heavily around these demanding crops to retain moisture and suppress weeds. Consider interplanting with companion flowers like marigolds and nasturtiums to attract beneficial insects and add visual appeal to your garden beds. By focusing on these heavy feeders in year one, you’re setting up a strong foundation for your rotation cycle while maximizing soil nutrients from your initial fertility investments.
Year 2: Light Feeders
After the heavy feeders have enriched your soil in year one, it’s time to transition to crops that require fewer nutrients. Light feeders are perfect for this second-year phase, helping maintain soil balance while still producing bountiful harvests. These crops typically include root vegetables like carrots, beets, and turnips, as well as aromatic herbs such as sage, thyme, and oregano.
During this phase, focus on crops that thrive in slightly less fertile soil conditions. Onions, garlic, and leeks are excellent choices, as they help naturally suppress soil-borne diseases while requiring minimal nutrients. Consider adding flowers like marigolds or nasturtiums, which not only beautify your plot but also serve as natural pest deterrents.
Light feeders are generally easier to maintain than heavy feeders, requiring less frequent fertilization and maintenance. This gives your soil a chance to recover while still producing valuable crops. Many CSA farmers find this year particularly rewarding, as these crops often store well and provide variety in weekly shares throughout the season.
To maximize success, maintain regular but light compost applications and consider using mulch to retain moisture and suppress weeds. This approach helps preserve soil structure while preparing for the next rotation phase.
Year 3: Soil Builders
Year three focuses on soil-building powerhouses that naturally enrich your garden’s fertility. Cover crops like clover, vetch, and alfalfa take center stage during this phase, working their magic below ground. These nitrogen-fixing champions pull nutrients from the air and convert them into food for future plantings.
Buckwheat serves as an excellent summer cover crop, with its deep roots breaking up compacted soil while attracting beneficial pollinators. Consider adding dynamic accumulators like comfrey and yarrow, which pull minerals from deep in the soil and make them available to other plants.
To maximize soil improvement, try interplanting these cover crops with soil-building vegetables like fava beans and field peas. When these crops finish their cycle, chop and drop them directly onto the soil as green manure, creating a nutrient-rich foundation for next year’s heavy feeders.
Many CSA farmers report that dedicating a full year to soil building initially feels counterintuitive, but the long-term benefits in reduced fertilizer costs and improved crop health make it worthwhile. One Vermont farmer noted her tomato yields doubled after implementing this strategy in her rotation plan.
Year 4: Root Crops
Year four focuses on your root vegetables, which are heavy feeders that benefit from the soil-building work of previous years. Plant potatoes, carrots, beets, parsnips, turnips, and other root crops in this section of your rotation. These vegetables thrive in the loose, nutrient-rich soil that’s been cultivated through previous seasons of cover crops and leaf vegetables.
Root vegetables require deep, well-draining soil to develop properly. Before planting, double-dig the beds to create loose soil that allows roots to grow straight and strong. Adding aged compost will provide the nutrients these hungry crops need while maintaining good soil structure.
Consider companion planting herbs like dill and fennel alongside your root crops – their shallow root systems won’t compete with the deeper-growing vegetables, and they help deter some common pests. Onions and garlic can also be included in this year’s rotation, as they share similar soil requirements.
For optimal harvests, maintain consistent soil moisture and avoid over-fertilizing with nitrogen, which can cause forking in root vegetables. Many root crops can be succession planted throughout the season, providing a continuous harvest for your CSA members.
Year 5: Legumes
The final year of the rotation cycle brings us to the nitrogen-fixing powerhouses: legumes. These crops work as natural soil enrichers, forming a symbiotic relationship with beneficial bacteria to capture nitrogen from the air and store it in the soil. Popular choices include peas, beans, and cover crops like clover or alfalfa.
This year serves a dual purpose: you’ll harvest nutritious legumes while naturally preparing the soil for the next rotation cycle. Bush beans and pole beans are excellent options for CSA shares, providing a steady harvest throughout the season. Consider succession planting every two weeks to maintain consistent production for your members.
For maximum soil benefits, plant a mix of different legumes. Sugar snap peas can start the season, followed by green beans in summer, and finishing with dry beans for fall harvest. After the main harvest, plant a winter cover crop of crimson clover or hairy vetch to continue building soil fertility through the cold months.
Remember to save some dry beans for seed saving – it’s a great way to develop varieties perfectly adapted to your farm’s conditions while reducing input costs for next season.
Adapting Your Rotation Plan
Side-by-side comparison of healthy rotated soil vs depleted non-rotated soil
Climate Considerations
Local weather patterns play a crucial role in the success of your crop rotation plan. Understanding and adapting to your region’s climate helps build climate resilience while maximizing yields throughout your five-year rotation cycle.
Start by tracking your area’s frost dates, rainfall patterns, and growing season length. These factors will influence when you plant and harvest specific crops. For instance, in regions with shorter growing seasons, you might need to adjust your rotation to prioritize cold-hardy crops during challenging periods.
Consider creating micro-climate zones within your farm by using natural features or implementing structures like windbreaks. This strategy allows you to expand your growing options and protect sensitive crops during extreme weather events.
Pay attention to seasonal transitions and be prepared to shift planting dates as needed. Many farmers find success by maintaining a flexible approach – having backup plans for both early and late plantings. Keep detailed records of weather patterns and crop performance to fine-tune your rotation schedule over time.
Remember that soil moisture retention varies by season. Plan moisture-loving crops during naturally wet periods and drought-resistant varieties during drier months. This approach helps reduce irrigation needs while maintaining healthy crop development throughout your rotation cycle.
Market Demand Integration
Creating a successful crop rotation plan means striking a delicate balance between soil health and member satisfaction. By implementing collaborative CSA planning strategies, you can ensure your rotation meets both agricultural and market demands.
Start by surveying your CSA members about their produce preferences and consumption patterns. This valuable feedback helps shape your rotation while maintaining crop diversity. For example, if your members show strong interest in heirloom tomatoes and leafy greens, allocate appropriate space within each rotation year while ensuring these crops move through different fields to maintain soil health.
Consider creating themed rotation blocks that align with member interests. A “salad garden” rotation might include lettuce, cucumbers, and radishes, while a “soup garden” rotation could feature root vegetables, alliums, and herbs. This approach makes it easier to market your shares while maintaining proper plant family succession.
Remember to factor in storage crops that members value throughout the winter months. Root vegetables, winter squash, and storage onions can be strategically placed within your rotation to provide year-round value. Keep some flexibility in your plan to adjust for changing member preferences and market trends while staying true to sound rotation principles.
Many successful CSA farmers maintain a small test plot outside their main rotation to trial new varieties and crops that members express interest in. This allows for experimentation without disrupting the established rotation sequence.
Troubleshooting Common Rotation Challenges
Even the most carefully planned rotation systems can face challenges, but most common issues have straightforward solutions. If you notice decreased yields in certain plots, consider conducting a soil test to identify potential nutrient deficiencies. Many farmers find success by incorporating cover crops or adding organic amendments to restore soil health.
Space constraints can create rotation difficulties, especially in smaller gardens. Combat this by using intensive planting methods or implementing vertical growing techniques for compatible crops. Some farmers split larger crop families across different rotation blocks when space is limited.
Timing misalignments often occur when transitioning between seasons. Create a detailed planting calendar and include buffer periods to account for weather variations and harvest windows. Having a flexible backup plan for each rotation block helps manage unexpected delays or crop failures.
Disease persistence in soil can disrupt rotation plans. If you encounter this issue, consider extending the rotation period for affected plant families or introducing disease-resistant varieties. Some farmers successfully incorporate “cleaning crops” like marigolds or mustard greens to help suppress soil-borne pathogens.
Remember that rotation plans may need adjustment based on your specific climate and soil conditions. Keep detailed records of what works and what doesn’t, and don’t hesitate to modify your rotation schedule while maintaining the basic principles of crop family separation and soil health management. Many successful farmers report that their current rotation systems evolved through years of trial and error.
A well-planned 5-year crop rotation system is your gateway to healthier soil, reduced pest problems, and more abundant harvests. By following the principles we’ve discussed, you’ll be better equipped to create a sustainable and productive growing space that works in harmony with nature. Remember that while this rotation plan serves as an excellent framework, don’t be afraid to adapt it to your specific needs and local conditions. Start small if needed, keep detailed records of your successes and challenges, and learn from each growing season. Whether you’re managing a small garden or a larger farm, implementing crop rotation is one of the most powerful tools you have for long-term agricultural success. Take that first step today – your soil, your crops, and future harvests will thank you for it.