Yearly Archives

134 Articles

Your CSA Pickup Day Shouldn’t Feel This Chaotic (Here’s How to Fix It)

Posted by darrell on
0
Operations and Logistics
Your CSA Pickup Day Shouldn’t Feel This Chaotic (Here’s How to Fix It)

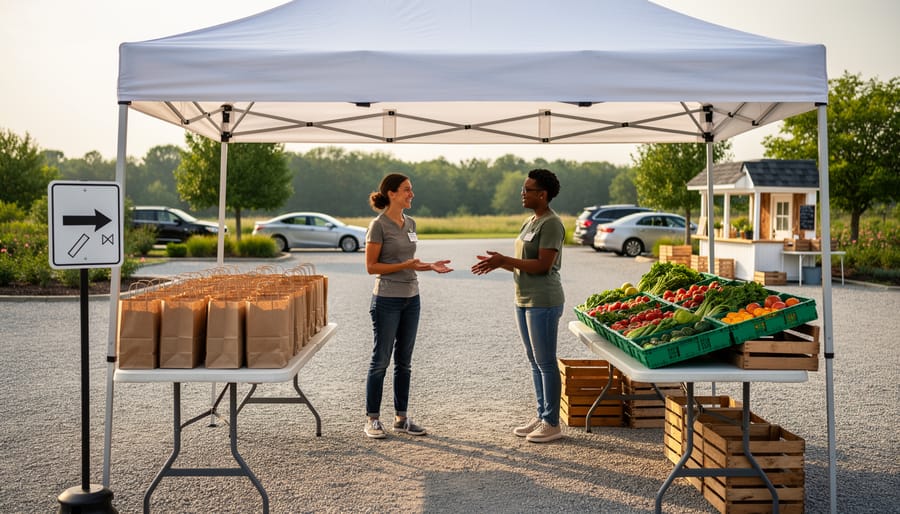
Position your CSA pickup station near adequate parking with clear signage directing members to the exact location—this single change can cut pickup time by 30% and eliminate the most common member complaint. Designate separate tables or zones for different share sizes, with pre-packed bags labeled with member names or numbers arranged alphabetically to prevent bottlenecks during peak hours. Create a simple checkout system where members initial a pickup list or scan a QR code, giving you instant data on who collected their shares and who needs reminder calls about unclaimed produce. Establish a consistent weekly pickup window of at least 2-3 hours to accommodate varying schedules, and station a friendly volunteer or staff member during the first 30 minutes to answer questions and troubleshoot issues before they escalate.

The difference between a chaotic CSA pickup that frustrates members and a smooth operation that builds community loyalty often comes down to intentional design choices made before the season even starts. Whether you’re launching your first CSA or refining an existing program, your pickup system directly impacts member retention, food waste, and your own stress levels throughout the growing season. Small farms across the country have transformed their pickup operations from weekly headaches into efficient systems that members actually look forward to—and the strategies that work have little to do with farm size and everything to do with thoughtful planning.

Why Your Pickup Site Setup Matters More Than You Think

Your CSA pickup site is more than just a distribution point—it’s the weekly touchpoint that shapes how members experience your farm. A chaotic, disorganized pickup can turn enthusiastic supporters into frustrated former members, while a smooth, welcoming setup builds loyalty that lasts for seasons.

Think about it: your members might never visit your actual farm, but they’ll judge your entire operation based on those few minutes each week at pickup. When boxes are clearly labeled, the space flows logically, and volunteers are helpful, members leave feeling good about their investment. They’re more likely to renew their membership, recommend your CSA to friends, and become advocates for local agriculture.

The numbers back this up too. Farmers who prioritize organized pickup sites report significantly higher retention rates—some seeing renewals jump by 20-30% after improving their systems. That’s because a well-run pickup signals professionalism and respect for members’ time.

On the operational side, efficient pickup sites save you precious hours each week. When everything has its place and volunteers know their roles, you’re not scrambling to solve problems or fielding frustrated texts. Instead, you’re focusing on what matters most: growing exceptional produce.

Consider Sarah, a Vermont farmer who transformed her cramped garage pickup into a streamlined outdoor setup with clear signage and designated parking. Member complaints dropped to zero, and her renewal rate climbed to 85%. Small changes to your pickup setup can create ripple effects throughout your entire CSA operation.

Organized CSA pickup station with vegetable boxes arranged on tables under canopy tent
A well-organized CSA pickup site with clearly arranged produce boxes creates a welcoming and efficient experience for members.

Choosing the Perfect Pickup Location

Essential Features of a Great Pickup Spot

Creating a successful CSA pickup spot requires careful attention to several key features that keep both your members happy and your produce in top condition.

Parking accessibility should be your first priority. Choose a location with ample parking spaces and easy entry and exit points. Your members will appreciate a spot where they can quickly pull in, grab their share, and head home without circling the block or walking long distances with heavy bags. Consider peak pickup times and ensure there’s room for multiple vehicles.

Weather protection makes a tremendous difference in member experience. Whether it’s a covered porch, tent, or indoor space, providing shelter from rain, snow, and intense sun creates a more pleasant pickup environment. This protection is equally important for keeping produce fresh during distribution hours, especially on hot summer days when leafy greens and delicate items can wilt quickly.

Refrigeration access becomes essential during warmer months. Even a few coolers with ice packs can help maintain quality between deliveries and pickups. If you’re fortunate enough to secure a location with refrigerator or walk-in cooler access, your produce quality will noticeably improve.

Space requirements depend on your CSA size, but plan for more room than you think you’ll need. You’ll need areas for organized share staging, a check-in table, optional add-ons display, and comfortable member flow. A cramped space creates confusion and slows down the pickup process, while adequate room allows for a smooth, enjoyable experience.

Central vs. Multiple Pickup Sites: What Works Best

Choosing between a central pickup location or multiple sites depends on your member base and your capacity. A single central site simplifies logistics dramatically—you make one trip, organize one setup, and build community in one place. Maple Ridge Farm in Vermont found their downtown farmers market location fostered incredible member connections and reduced their distribution time by three hours weekly.

However, multiple pickup sites can expand your reach and boost member retention. Green Valley CSA serves three neighborhoods across a 20-mile radius, which owner Sarah Chen credits with reducing member dropouts by 40%. The trade-off? More driving and coordination time. She recommends starting with one site, then adding locations only when you have 15-20 members requesting a specific area.

Consider optimizing delivery logistics by clustering members geographically before committing to new sites. Many successful farms use a hybrid approach: one main farm pickup with two strategic satellite locations at community centers or partner businesses. Survey your members annually about their preferred locations—their feedback reveals whether expansion makes sense or if consolidation would actually improve everyone’s experience.

Setting Up Your Pickup Site for Success

The Layout That Makes Pickup Flow Smoothly

Creating an efficient layout transforms pickup day from chaos into a smooth, enjoyable experience for everyone involved. Think of your pickup space as a natural flow from entry to exit, guiding members through their journey seamlessly.

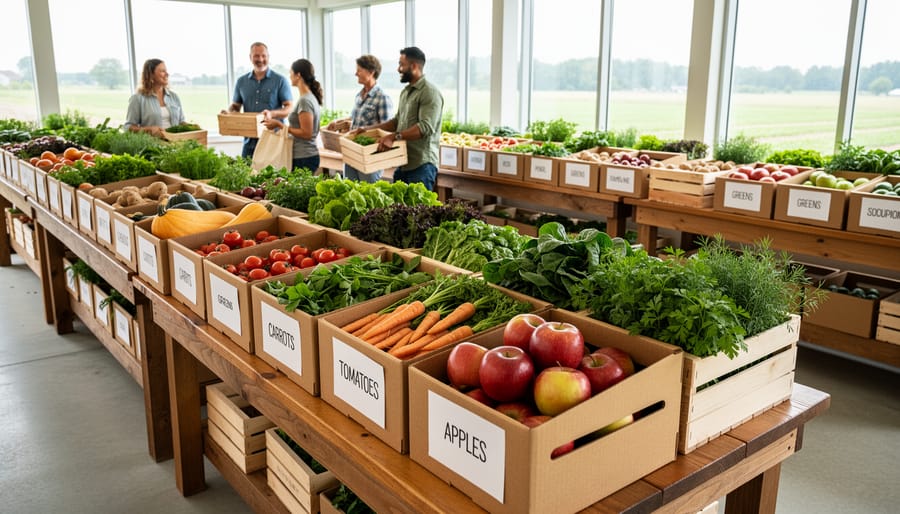
Start by positioning your pickup table at least six feet from the entrance, giving members room to queue without blocking the doorway. Arrange produce boxes alphabetically by member name in clearly visible rows, using large letter signs (A-F, G-M, N-Z works well for most operations) that members can spot from several feet away. This simple system prevents bottlenecks as people search for their shares.

Place frequently swapped items like greens or herbs near the end of the pickup flow, where members can easily exchange without disrupting others. If you offer add-ons or extras, create a separate station away from the main pickup area to keep traffic moving smoothly.

Tables should be positioned at comfortable standing height, allowing members to inspect their boxes without bending awkwardly. Leave at least three feet of space between parallel tables so two people can pass comfortably with full boxes.

Consider the success story of Riverside Valley Farm, where owner Maria redesigned her barn layout after watching members navigate tight corners with overflowing boxes. By simply widening pathways and adding directional floor arrows, she cut average pickup time from eight minutes to under four.

Don’t forget adequate lighting in all areas and weatherproof signage visible from your parking area, directing members exactly where to go before they even leave their cars.

Essential Equipment and Supplies You’ll Need

Setting up an efficient CSA pickup starts with having the right supplies on hand. You’ll need reusable bins and crates for organizing shares, which are more sustainable and cost-effective than cardboard over time. If you’re working with a tight budget, consider starting with sturdy plastic totes from discount retailers.

Coolers or insulated containers are essential for maintaining freshness, especially during warm weather months. Add ice packs for items like leafy greens and herbs. For record-keeping, simple clipboards with member checklists work beautifully, though a tablet can streamline the process if you prefer digital tracking.

Don’t forget signage to direct members and display farm updates. Basic materials like markers, labels, and tape help keep everything organized. A folding table provides a convenient check-in station, and proper storage systems at your staging area ensure produce stays fresh before pickup.

Many successful farmers start small and gradually upgrade their equipment as membership grows, proving you don’t need a large investment to create a welcoming, organized pickup experience.

Creating Clear Signage and Instructions

Clear signage transforms pickup day from confusing to effortless. Start with a large welcome sign at your entrance directing members to the designated area. Use color-coded cards or labels to organize shares by member name or pickup time slot, making it easy for everyone to spot their box quickly.

Create visual instructions for first-time members showing the pickup process step-by-step. Include simple graphics demonstrating where to check in, how to identify their share, and where to return empty bins or bags. Post allergy alerts and handling tips near produce displays if you offer choice items.

Consider laminated signs highlighting what’s in the week’s harvest with brief storage suggestions. This reduces repetitive questions and helps members appreciate their vegetables. Many successful CSA farmers also post a large whiteboard with weekly announcements, recipe ideas, or upcoming farm events to build community connection. Keep text minimal and fonts large enough to read from several feet away, ensuring accessibility for all members regardless of age or vision capabilities.

CSA member receiving vegetables from farmer at pickup location with clipboard check-in
The member handoff process is an opportunity to build relationships while ensuring smooth and accurate share distribution.

Mastering the Member Handoff Process

Check-In Systems That Actually Work

A smooth check-in system keeps your CSA pickup moving and members happy. The good news? You have several options that can work beautifully depending on your farm’s size and style.

The classic paper checklist remains popular for smaller CSAs. Members simply find their name and check it off when they arrive. It’s low-tech, requires no electricity, and feels personal. The downside? Paper gets soggy in rain, and tracking no-shows requires manual record-keeping later.

Digital sign-in apps offer real-time tracking and automatic member notifications. Systems like Harvie or Local Food Marketplace let members check in via smartphone, instantly updating your database. These platforms shine for farms with 50-plus members or multiple pickup locations. The learning curve and monthly fees might feel daunting initially, but many farmers report saving hours each week once established.

A hybrid approach works well for mid-sized operations. Use a tablet at pickup with a simple spreadsheet where members tap their name. It’s more weather-resistant than paper and easier to manage than full farm software.

Whatever system you choose, test it during your first few pickups. Green Acres Farm in Vermont switched from paper to tablets after their second season, cutting check-in time by half. The key is finding what feels manageable for your volunteers while keeping the process quick for members grabbing produce after work.

Handling Substitutions, Absences, and Special Requests

Life happens, and your CSA members will occasionally need flexibility. Establishing clear policies upfront prevents confusion and keeps operations running smoothly.

Create a simple system for share pickups when members can’t attend their scheduled time. Many successful CSAs allow members to send friends or family as proxies—just require advance notice via email or text with the substitute’s name. Some farms offer a 24-hour pickup window or an alternate day each week specifically for missed pickups.

Consider implementing a share-swap board, either physical or digital, where members can coordinate trades or offer their boxes to others when they’re traveling. This reduces waste and builds community connections. One Vermont farmer shared how their member-managed swap system increased satisfaction while decreasing her administrative load.

For extended absences like vacations, offer options like donating shares to food banks, splitting them among remaining members, or crediting the value toward next season. Clear communication is essential—send reminder emails before pickup days and respond promptly to special requests.

Keep detailed records of substitutions and absences to track patterns. If certain members consistently miss pickups, reach out personally to understand their challenges and find solutions. Remember, flexible policies that respect members’ busy lives while maintaining farm efficiency create lasting loyalty and positive word-of-mouth for your CSA program.

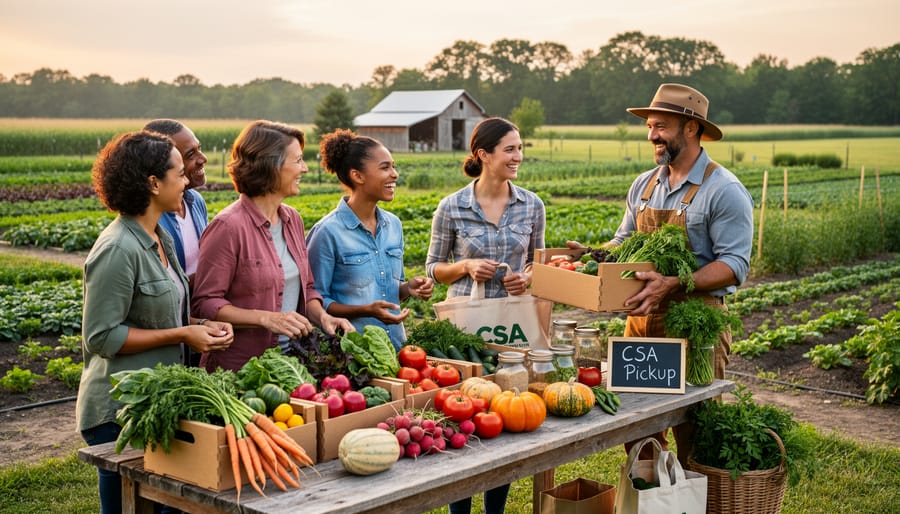
Building Community During Pickup Time

Pickup time offers a golden opportunity to transform routine transactions into meaningful connections. Create a welcoming atmosphere with farm tours, recipe cards featuring the week’s harvest, or simple conversations about what’s growing in the fields. Consider hosting occasional meet-and-greet events where members can interact with farmers and each other, fostering a genuine community spirit. Share brief growing tips or seasonal updates during pickup to educate members about your farming practices. One successful Pennsylvania farmer found that dedicating just five extra minutes per pickup to answer questions increased member retention by 40 percent. These personal touches help members feel invested in your farm’s success while building lasting relationships that extend far beyond the weekly vegetable box exchange.

Solving Common CSA Pickup Problems

When Members Don’t Show Up

No-shows happen, and having a clear policy protects both you and your members. Most CSAs implement a 24-hour donation policy where unclaimed shares automatically go to local food banks, shelters, or community kitchens by the next morning. This prevents waste while serving your community.

Communicate your policy clearly during signup and include reminders in weekly newsletters. Some farmers send text alerts an hour before pickup closes, which significantly reduces forgotten shares.

Consider offering flexible solutions like designating pickup buddies where members authorize trusted friends to collect their box, or allowing one-time pickup location swaps when members face emergencies. Documentation is essential—use a simple sign-in sheet or digital check-in system to track patterns.

When members repeatedly miss pickups, reach out personally before assuming they’ve lost interest. Life gets busy, and a friendly conversation often reveals simple scheduling conflicts you can accommodate. One Colorado farmer found that switching Tuesday pickups to Wednesdays reduced no-shows by forty percent, simply because members had more predictable schedules midweek. Clear communication and compassionate flexibility create loyal, engaged members who value their farm connection.

Managing Peak-Time Crowding

Peak-time crowding can turn pickup day into a stressful bottleneck for everyone involved. The good news? A few smart strategies can transform this challenge into a smooth operation.

Consider extending your pickup window by an extra hour or two. This simple adjustment spreads arrivals more evenly throughout the day. Many successful farms have found that offering a four-hour window instead of two reduces congestion by nearly half.

Staggered pickup slots work wonders for larger CSAs. Assign members specific 30-minute time blocks based on their last name or membership number. Member retention actually improved at Green Valley Farm after implementing this system, as people appreciated the predictability and shorter wait times.

If space allows, create multiple pickup stations with dedicated volunteers at each. Think of it like grocery store checkout lanes – having three stations can triple your throughput capacity.

For tech-savvy operations, send reminder texts or emails the day before pickup, encouraging members to come during typically slower periods. You might even offer small incentives like bonus eggs or herbs for off-peak arrivals.

Real Stories from CSA Farmers Who Transformed Their Pickups

Meet Sarah Chen from Green Valley Farm in Vermont, who turned her chaotic Friday pickups into a smooth operation. When she started her CSA three years ago, members often waited 20 minutes while she searched through coolers. Her breakthrough came when she switched to pre-bagged shares organized alphabetically by member name. She also designated a clear pickup window from 4-7 PM instead of all afternoon. The result? Wait times dropped to under three minutes, and member retention increased by 40 percent.

Over at Harvest Moon Farm in Oregon, Jake Martinez faced a different challenge. His remote pickup location at a community center meant coordinating with another organization’s schedule. After members complained about conflicts, Jake implemented a flexible system with three different pickup spots around town on staggered days. He invested in insulated coolers that members could access with codes, allowing 24-hour pickup windows. Though it required more logistics upfront, Jake reduced no-shows by 60 percent and attracted busy professionals who couldn’t make traditional pickup times.

The biggest lesson from Emma Rodriguez at Sunrise Acres in North Carolina? Communication prevents confusion. She struggled with members forgetting pickup days until she created a simple text reminder system and posted weekly farm updates with photos of what was in shares. This personal touch transformed her CSA experience. Members felt more connected to the farm, started attending volunteer days, and even helped new members navigate the pickup process.

These farmers prove that small, thoughtful changes create significant improvements. Whether you’re dealing with long lines, scheduling conflicts, or member engagement issues, solutions exist that work for your unique situation.

Group of CSA members socializing and holding produce at community pickup location
CSA pickup times create valuable opportunities for members to connect with each other and strengthen the farm community.

A well-organized CSA pickup system creates a win-win situation for everyone involved. When farmers streamline their pickup operations, they reduce their own stress and free up precious time to focus on what they do best—growing exceptional food. Meanwhile, members enjoy a smooth, pleasant experience that reinforces their decision to support local agriculture and keeps them coming back season after season.

The beauty of improving your pickup system is that you don’t need to overhaul everything at once. Start small by implementing just one or two changes that address your biggest pain points. Perhaps it’s creating clearer signage, setting up a simple check-in table, or sending a weekly reminder email with pickup details. These modest adjustments can yield surprisingly significant results.

Remember, every CSA is unique, and what works brilliantly for one farm might need tweaking for another. Pay attention to feedback from your members, observe what’s working and what isn’t, and don’t be afraid to experiment. The farmers we’ve heard from consistently say that investing time in pickup logistics pays dividends in member retention, positive word-of-mouth, and their own peace of mind. Your pickup day can transform from a hectic scramble into a welcoming community gathering that celebrates the connection between grower and eater.

Keep Your CSA Livestock Thriving Without Complicated Veterinary Bills

Posted by darrell on
0
Livestock & Grazing
Keep Your CSA Livestock Thriving Without Complicated Veterinary Bills

Observe your animals daily for changes in behavior, appetite, or physical appearance—early detection prevents minor issues from becoming costly emergencies. A sheep standing apart from the flock or a chicken with ruffled feathers signals trouble before visible symptoms appear.

Establish a quarantine area of at least 30 feet from your main herd or flock before introducing new animals. Keep newcomers separated for 14-30 days while monitoring for respiratory issues, parasites, or unusual discharge that could spread disease throughout your entire operation.

Create a preventive health calendar that schedules deworming, hoof trimming, and vaccinations based on your region and species. Spring and fall rotations work for most small farms, helping you stay ahead of parasite loads rather than reacting to infestations.

Maintain clean water sources and rotate pastures every 2-4 weeks to break parasite life cycles naturally. Fresh water containers cleaned weekly and strategic grazing patterns reduce medication needs while improving soil health—a win for both animal welfare and sustainable farm management.

Partner with a livestock veterinarian before emergencies arise. Having established care relationships means faster response times and personalized prevention plans suited to your farm’s unique conditions, whether you’re raising three goats or thirty chickens. Healthy animals form the foundation of any successful small-scale farming operation, and prevention always costs less than treatment.

Why Livestock Health Matters for Your CSA Success

Your CSA’s success hinges on more than just growing great vegetables. When you incorporate animals into your farm, their health becomes a cornerstone of your entire operation. Healthy livestock translate directly into thriving business outcomes and satisfied members.

Member confidence forms the foundation of any successful CSA. When your chickens are vibrant, your goats are energetic, and your sheep have glossy coats, members immediately recognize your commitment to quality care. They trust that the eggs, meat, and dairy products they receive come from animals raised with integrity. This trust keeps membership renewals high and generates positive word-of-mouth that attracts new subscribers.

Product quality speaks for itself. Healthy animals produce nutrient-dense eggs with rich, golden yolks, flavorful meat, and creamy milk. These premium products become signature items that distinguish your CSA from grocery store alternatives. Members notice the difference at their dinner tables, reinforcing the value of their investment in your farm.

Today’s CSA members expect more than convenience. They join community-supported agriculture because they care about animal welfare, environmental stewardship, and transparent food systems. By prioritizing livestock health, you’re fulfilling an ethical commitment that resonates deeply with your subscriber base. Many members specifically seek farms where animals receive attentive, humane care.

Beyond individual animal welfare, livestock health impacts your entire farm ecosystem. Healthy animals contribute quality manure for composting, provide natural pest control, and support soil fertility. When mixing livestock species, you create beneficial relationships where different animals complement each other’s grazing patterns and nutrient contributions. This integrated approach strengthens your farm’s resilience while reducing external inputs, making your operation more sustainable and profitable long-term.

The Foundation: Understanding Basic Livestock Wellness

What Healthy Animals Look and Act Like

Knowing what a healthy animal looks like makes spotting problems early much easier. Healthy chickens are alert and active, with bright eyes and glossy feathers that lay smooth against their bodies. They should scratch, peck, and vocalize regularly. Their combs and wattles appear vibrant red (in most breeds), and they move freely without limping. A healthy chicken’s vent area stays clean and dry.

For goats and sheep, look for animals that stand squarely on all four legs, move purposefully, and show curiosity about their surroundings. Their eyes should be clear and bright, not dull or sunken. Healthy small ruminants have shiny coats without bald patches, and they chew their cud peacefully when resting. Body condition matters too—you should feel ribs with light pressure but not see them prominently. These animals should eagerly approach feeding time and maintain steady appetites.

Pigs display health through consistent eating habits, smooth skin (though some wrinkling is normal), and energetic rooting behavior. They should respond to sounds and movement, showing interest in their environment. Healthy pigs breathe quietly without coughing or wheezing, and their manure appears firm and well-formed.

Across all species, watch for consistent daily routines. Animals that suddenly isolate themselves, refuse food, or act lethargic deserve immediate attention. One CSA farmer shares her simple approach: “I spend ten minutes each morning just watching my animals. You’d be amazed what you notice when you’re not rushing through chores—that’s when you catch issues before they become emergencies.”

Healthy chickens, goats, and sheep in clean pasture showing alert and active behavior
Healthy livestock display clear eyes, alert posture, and active social behavior—key indicators every CSA farmer should recognize.

Red Flags Every Farmer Should Recognize

Catching health issues early can mean the difference between a quick recovery and a serious problem. The good news? Your daily observations are your most powerful diagnostic tool, and you don’t need fancy equipment to spot trouble.

Start each morning with a simple walkthrough of your livestock areas. Healthy animals typically greet feeding time with enthusiasm, so the first red flag is often a lack of interest in food or water. One small-scale farmer I know prevented a major outbreak simply by noticing that two goats hung back at feeding time, acting on it immediately.

Pay attention to how your animals move and stand. Lameness, hunched posture, or reluctance to rise can signal pain or illness. Healthy livestock have bright, alert eyes and smooth, glossy coats. Dull eyes, drooping ears, rough hair, or discharge from eyes or nose deserve immediate attention.

Changes in manure consistency matter more than you might think. Diarrhea or unusually hard droppings can indicate digestive issues or parasites. Similarly, labored breathing, coughing, or nasal discharge often signals respiratory problems, which can spread quickly in close quarters.

Watch social dynamics too. Animals that isolate themselves from the herd or flock are often feeling unwell, since healthy livestock are naturally social. Aggressive behavior changes can also indicate discomfort or illness.

Create a simple daily checklist covering appetite, movement, appearance, breathing, and social behavior. Keeping brief notes helps you spot patterns over time. Remember, you know your animals best. Trust your instincts when something seems off. Early intervention is almost always easier and more affordable than treating advanced illness, making these daily observations one of the most valuable investments in your sustainable farming practice.

Prevention Strategies That Actually Work on Small Farms

Nutrition and Clean Water: The Non-Negotiables

Think of nutrition and clean water as the foundation of your entire livestock health program—get these right, and you’re already ahead of the game. Quality feed isn’t just about filling bellies; it’s about providing the specific nutrients each species needs to thrive. Chickens require different protein levels than goats, and dairy animals have vastly different nutritional demands than meat producers. When sourcing feed, look for options free from mold, excessive dust, or rancid smells, which can trigger everything from respiratory issues to digestive problems.

Many successful small-scale farmers find that supplementing commercial feeds with pasture grazing and garden scraps creates healthier animals while reducing costs. One CSA farmer I know significantly improved her flock’s egg quality by adding mineral supplements and ensuring constant access to grit—simple changes that made a real difference.

Water systems deserve equal attention. Stagnant, dirty water is a breeding ground for bacteria and parasites that can devastate your herd quickly. Check waterers daily, scrubbing them weekly with a diluted bleach solution to prevent biofilm buildup. During winter, ensure water doesn’t freeze; dehydration stresses immune systems and opens the door to illness. Position water sources away from manure accumulation areas, and consider automatic waterers for larger operations to maintain consistency.

Remember, preventing nutritional deficiencies and waterborne illnesses costs far less than treating sick animals. These non-negotiables truly set the stage for everything else in your livestock health journey.

Farmer providing fresh water to chickens in clean metal trough
Clean, fresh water access is a non-negotiable foundation for preventing disease and maintaining livestock health on small farms.

Housing and Space That Promotes Wellness

Your animals’ living space directly impacts their health and happiness. Think of their shelter as their sanctuary—a place where they can rest, stay dry, and feel secure from predators and harsh weather.

Start with adequate space. Overcrowding creates stress and allows diseases to spread rapidly between animals. Research species-specific space requirements, but generally, more room is better. Animals need enough space to express natural behaviors like dust bathing, stretching, and establishing comfortable social distances.

Ventilation is your secret weapon against respiratory problems. Poor air quality from ammonia buildup and moisture leads to countless health issues. Design shelters with adjustable openings that allow fresh air circulation without creating drafts. In winter, many new farmers seal buildings too tightly, trapping harmful gases and moisture inside.

Bedding management deserves daily attention. Clean, dry bedding prevents hoof problems, reduces parasite loads, and keeps animals comfortable. Wood shavings, straw, or other absorbent materials should be spot-cleaned regularly and completely refreshed as needed. The “deep litter method” can work well when managed properly, creating beneficial composting action that reduces odors.

Consider how your animals move throughout their day. Systems like rotational grazing and silvopasture systems naturally reduce disease transmission by moving animals to fresh ground regularly.

Sarah, a CSA farmer in Ontario, reduced her flock’s respiratory issues by 80% simply by adding roof vents and improving airflow. Sometimes the simplest changes make the biggest difference in keeping your animals thriving.

Well-ventilated livestock shelter interior with clean bedding and natural light
Proper shelter with good ventilation and clean bedding reduces stress and prevents disease transmission in CSA livestock operations.

Building a Simple Vaccination and Parasite Control Plan

Creating an effective vaccination and parasite control plan doesn’t need to be complicated or expensive. Start by scheduling a consultation with a local veterinarian who understands small-scale farming. They’ll help you identify the essential vaccinations for your specific animals and region, typically focusing on core diseases that pose the greatest risk.

Most livestock benefit from annual vaccinations against common threats like clostridial diseases in sheep and goats, or respiratory infections in cattle. Your vet can create a calendar that spreads costs throughout the year rather than hitting your budget all at once.

For parasite control, the key is strategic deworming rather than automatic monthly treatments. Work with your vet to establish a fecal testing schedule, which identifies actual parasite loads before treating. This targeted approach saves money, reduces medication resistance, and keeps your animals healthier.

Sarah, a CSA farmer in Vermont, reduced her livestock health costs by 40 percent after implementing a vet-guided prevention plan. She rotates pastures regularly, tests fecal samples quarterly, and vaccinates only for documented regional risks. Remember, prevention through good nutrition, clean water, and proper shelter often matters more than medication.

Biosecurity Basics Without the Overwhelm

Simple Steps to Keep Disease From Entering Your Farm

Preventing disease is far easier and less expensive than treating it, and you don’t need fancy equipment to protect your livestock. Start with a simple quarantine system for any new animals before introducing them to your existing herd or flock. A separate pen or paddock at least 30 feet away from your main animals works perfectly. Keep newcomers isolated for at least two weeks, watching for signs of illness like coughing, discharge from eyes or nose, lethargy, or unusual behavior.

Create basic visitor guidelines that protect your animals without being unwelcoming. Ask visitors to avoid stepping in animal areas if they’ve been around other livestock that day. A simple boot-washing station with a tub of soapy water near your barn entrance makes sanitation effortless. Many successful small-scale farmers keep a pair of dedicated farm boots at the gate for regular helpers.

Equipment sanitation doesn’t require specialized products. Regular cleaning of shared tools like hoof trimmers, halters, and feeding buckets with hot soapy water prevents most disease transmission. For items that touch multiple animals, a diluted bleach solution (one tablespoon per gallon of water) provides extra protection after cleaning.

One inspiring farmer shared how her simple quarantine practice caught a respiratory infection in a new goat before it spread to her established herd, saving thousands in veterinary bills and potential losses. These straightforward practices become second nature quickly and form the foundation of excellent livestock care on any scale farm.

When and How to Isolate Sick Animals

Recognizing when an animal needs isolation is your first line of defense against disease spread in your small farm operation. The moment you notice symptoms like lethargy, loss of appetite, discharge from eyes or nose, coughing, diarrhea, or unusual behavior, it’s time to act quickly. Think of isolation as creating a protective bubble around your healthy animals while giving the sick one the focused care it needs.

Setting up an effective isolation area doesn’t require a massive investment. Choose a space at least 30 feet away from your main herd or flock, ideally with separate ventilation and drainage to prevent airborne or water-based disease transmission. This could be a spare stall, a corner of your barn with temporary fencing, or even a simple shelter with tarps if weather permits. The key is ensuring the sick animal can’t have nose-to-nose contact with healthy ones.

Before moving any animal, gather your isolation supplies: separate feeding and watering equipment, dedicated tools, disposable gloves, and a footbath with disinfectant solution. These items stay in the isolation area to prevent cross-contamination. Sarah Chen, who runs a diversified farm in Vermont, keeps a “quarantine kit” ready at all times, which saved her flock when she spotted early respiratory symptoms in one sheep.

Handle isolated animals last during your daily routine, always after caring for healthy stock. Change boots or use dedicated footwear for the isolation area, and wash hands thoroughly between animal groups. Keep detailed notes about symptoms, eating patterns, and behavior changes to share with your veterinarian if needed. Most importantly, don’t rush reintegration. Wait until the animal shows no symptoms for at least 48 hours and your vet gives the all-clear before reuniting them with the group.

Farmer observing and documenting isolated goat in quarantine pen
Simple isolation areas and careful observation allow CSA farmers to manage sick animals while protecting herd health without expensive infrastructure.

Building Your Farm’s Health Support System

Finding the Right Veterinarian for Your CSA

Finding the right veterinarian is one of the best investments you can make for your CSA livestock operation. Start by asking fellow small-scale farmers in your area for recommendations, as many large animal vets have experience levels that vary widely with sustainable farming practices. Look specifically for veterinarians who work with pastured animals and understand rotational grazing systems, as they’ll be more aligned with your management style.

When interviewing potential vets, ask about their approach to preventive care and whether they’re comfortable coaching you through minor issues over the phone. Many farm vets appreciate clients who want to learn hands-on skills, which can save you emergency call-out fees down the road. Discuss their availability for routine visits versus emergencies, and be upfront about your budget constraints.

Consider establishing a relationship before you desperately need one. A spring wellness check or consultation about your biosecurity plan gives you both a chance to connect without pressure. Some vets offer herd health plans or discounted rates for preventive visits, which work perfectly for CSA operations focused on keeping animals healthy rather than treating problems after they arise.

Record-Keeping That Saves You Time and Money

Good record-keeping doesn’t need to be complicated. A simple notebook, spreadsheet, or farm app can transform how you manage your animals’ health. Start by recording basic daily observations: who’s eating normally, any changes in behavior, unusual droppings, or signs of distress. When you do treat an animal, note the date, symptoms, what you used, and the outcome.

These records become invaluable over time. You’ll start spotting patterns—maybe your chickens always seem stressed during certain weather, or parasites flare up seasonally. One small-scale farmer discovered through her logs that respiratory issues appeared every spring, leading her to adjust barn ventilation before problems started.

Your records also save money at vet visits. Instead of saying “they’ve been sick for a while,” you can show exactly when symptoms began and what you’ve already tried. This helps your vet diagnose faster and more accurately. Plus, detailed records are essential if you sell products like eggs, as egg safety regulations often require health documentation.

Keep it simple: date, animal ID, observation, action taken. Review monthly to catch trends early and make smarter management decisions.

Real Stories: How CSA Farmers Maintain Healthy Flocks and Herds

Meeting farmers who’ve successfully navigated the learning curve of livestock health offers invaluable insights for those just starting out. These real-world stories demonstrate that maintaining healthy animals doesn’t require a veterinary degree or massive investment.

Take Sarah Chen, who runs Green Valley CSA in Ontario. When she first introduced chickens to her vegetable operation three years ago, she struggled with recurring respiratory issues. “I was panicking every few weeks,” she recalls. Her breakthrough came when she realized her coop ventilation was inadequate. After installing simple ridge vents and adjusting her bedding management routine, respiratory problems virtually disappeared. Sarah now credits this early challenge with teaching her that prevention through proper housing beats treatment every time. She also learned to quarantine new birds for two weeks, a practice that’s saved her flock from potential disease introductions.

Meanwhile, Tom and Linda Rivera at Riverside Farm faced a different challenge when integrating multiple species on their small acreage. Their sheep developed parasites during their first summer, and dewormer costs were mounting. Rather than continuing the treatment cycle, they implemented rotational grazing, moving animals to fresh pasture every five days. They also added a small goat herd, whose different grazing patterns naturally disrupted the parasite lifecycle. Within one season, their parasite load dropped dramatically, and their medication costs fell by 70 percent.

The Riveras emphasize one crucial lesson: observe your animals daily. “We spend fifteen minutes each morning just watching,” Linda explains. “You notice subtle changes in behavior, appetite, or posture that signal problems early.” This simple habit allowed them to catch a sheep with early-stage foot rot before it spread through the flock.

These farmers share common themes in their success: they started small, learned from mistakes without giving up, built relationships with livestock-savvy veterinarians, and joined local farming networks for peer support. Perhaps most importantly, they discovered that consistent daily routines and attention to basic needs like clean water, proper nutrition, and adequate shelter prevent most health issues before they start. Their message to newcomers? Don’t let fear of the unknown stop you from raising animals. Start with one species, master the basics, and grow your confidence from there.

Maintaining healthy livestock doesn’t require expensive equipment or veterinary school knowledge. The practices we’ve covered—clean water, proper nutrition, adequate shelter, and basic observation—are all within reach for small-scale farmers and CSA operators. Start small and build your confidence gradually. Perhaps begin with improving your water system this month, then focus on parasite management next season. Even one or two improvements can make a noticeable difference in your animals’ wellbeing.

Remember, healthy animals are central to sustainable farming. When your livestock thrive, they contribute better to soil health through quality manure, require fewer interventions, and align with the ethical standards your CSA members value. Take inspiration from farmers like Sarah, who transformed her flock’s health simply by implementing a rotational grazing schedule and keeping detailed health records.

Your journey toward better livestock health starts with a single step. Choose one area to improve this week, observe the results, and build from there. Your animals—and your CSA community—will thank you for the commitment to their welfare.

Turn Wild Plants Into Restaurant-Worthy Meals (Without Poisoning Yourself)

Posted by darrell on
0
Culinary and Food Preservation
Turn Wild Plants Into Restaurant-Worthy Meals (Without Poisoning Yourself)

Learn to distinguish edible wild plants from toxic look-alikes by examining three key features: leaf arrangement, stem characteristics, and root structure. Start with easily identifiable species like dandelions, chickweed, and wild garlic that have no poisonous twins in your region.

Harvest during morning hours after dew has dried but before midday heat sets in, which preserves flavor compounds and nutritional value. Take only what you’ll use within 24 hours, leaving at least two-thirds of any plant population to ensure regeneration for future foragers and local wildlife.

Wash wild foods thoroughly in cold water three times to remove soil, insects, and potential contaminants, then blanch leafy greens for 30 seconds to reduce bitterness and neutralize mild toxins present in some edible species.

The connection between foraging and sustainable living runs deeper than simply finding free food. When you gather wild ingredients, you’re participating in a food system that requires zero pesticides, no transportation emissions, and minimal environmental impact. You develop the same seasonal awareness that guides organic farmers and CSA members, understanding which foods appear in spring versus fall and how weather patterns affect availability.

This guide bridges the gap between plant identification and actual cooking, offering you tested techniques for transforming foraged ingredients into memorable meals. You’ll discover how to balance wild flavors with cultivated produce, preserve your harvest through proper storage methods, and develop confidence in safely expanding your edible plant repertoire throughout the seasons.

Safety First: The Non-Negotiable Rules of Wild Foraging

Before you venture into the woods with your basket, let’s talk about the most important aspect of foraging: keeping yourself safe. The golden rule here is simple but absolutely non-negotiable: you must be 100% certain of your identification before consuming any wild plant. If there’s even the slightest doubt, leave it alone. Unlike store-bought produce, there’s no safety net with wild foods, and some toxic plants can cause serious harm or worse.

Start by foraging with experienced local experts who know your region’s plants intimately. Consider joining foraging groups, taking guided walks, or working with master gardeners who often have deep knowledge of native species. These connections prove invaluable, especially when you’re learning to distinguish edible plants from their dangerous look-alikes. For instance, wild carrot closely resembles poison hemlock, and only subtle differences separate them.

Location matters tremendously. Avoid foraging near roadsides where plants absorb heavy metals and exhaust pollutants, or areas that might have been treated with pesticides or herbicides. Stay clear of industrial sites, railroad tracks, and conventional farmland borders. Instead, seek out pristine forests, your own chemical-free garden spaces, or properties where you have permission and know the land management history.

Invest in quality field guides specific to your region and use multiple resources to confirm identifications. Cross-reference plant characteristics across seasons, as appearance changes dramatically from spring to fall. Take clear photos from various angles and document the habitat where you found each species.

Here’s something many new foragers don’t realize: even correctly identified edible plants can cause reactions in some individuals. Just like conventional foods, wild edibles can trigger allergies or digestive sensitivities. Always try new wild foods in small amounts first, and introduce only one new species at a time so you can identify any adverse reactions. Think of it like introducing solid foods to a baby – slow and methodical wins the day.

Wicker basket filled with foraged wild greens, mushrooms and herbs on wooden table
A well-organized foraging basket showcases the variety of wild edibles available during peak season.

Building Your Forager’s Toolkit

Field Equipment Essentials

Having the right equipment makes foraging safer, more efficient, and more enjoyable. Start with breathable mesh baskets or paper bags rather than plastic, which can trap moisture and cause delicate finds like mushrooms to deteriorate quickly. I learned this lesson the hard way when my first chanterelle haul turned soggy!

Keep sturdy gardening gloves handy for handling prickly plants like nettles or working around thorny brambles. A good folding knife helps harvest cleanly without damaging the parent plant, ensuring it returns next season.

For identification, carry a reliable regional field guide specific to your area. While smartphone apps like iNaturalist and Picture This offer convenient digital identification with photo-recognition features, they shouldn’t replace your judgment. Use them as helpful companions alongside traditional guides, not sole authorities.

Consider investing in a small magnifying glass for examining key identification features like leaf patterns or spore prints. Many experienced foragers also pack a small notebook to record locations, dates, and growing conditions of successful finds. This builds your personal foraging map over time, turning each outing into valuable knowledge for future harvests. Remember, proper equipment supports both your safety and the long-term health of wild food sources.

Overhead view of foraging tools and equipment arranged on forest floor
Essential foraging equipment includes proper identification guides, collection bags, and protective gear for safe harvesting.

Kitchen Prep Tools for Wild Ingredients

Once you’ve gathered your wild treasures, having the right kitchen tools makes processing and preserving your foraged bounty much easier and more enjoyable. A quality salad spinner tops the list for anyone bringing home wild greens like chickweed, lamb’s quarters, or wood sorrel. These leafy finds often harbor tiny insects and forest debris, so multiple rinse-and-spin cycles ensure you’re serving clean, crisp greens to your family.

A food dehydrator becomes invaluable for extending your harvest throughout the year. Wild mushrooms, berries, and herbs dry beautifully, concentrating their flavors and preventing waste. Look for models with adjustable temperature settings to handle delicate greens versus heartier mushrooms. If you’re just starting out, even a basic four-tray dehydrator opens up tremendous preservation possibilities.

Proper storage containers protect your hard work from spoilage. Glass jars with airtight seals work wonderfully for dried goods like rose hips, elderberries, and mushroom powders. For fresh foraged items, breathable produce bags or containers with ventilation holes help wild greens stay fresh longer than plastic bags, which trap moisture and accelerate decay.

Consider adding a mortar and pestle for grinding dried ingredients into seasonings and teas. Many foragers also swear by their mesh strainers in various sizes for cleaning small berries and removing stems. These simple tools bridge the gap between forest and table, helping you safely prepare wild foods while honoring the time you spent gathering them. With proper equipment, processing foraged ingredients becomes a rewarding extension of your sustainable living journey.

Seasonal Foraging Calendar: What to Find When

Spring Awakening: Tender Greens and Early Shoots

Spring brings a burst of tender, nutrient-dense wild greens that are perfect for kitchen newcomers to foraging. Dandelions are everywhere and entirely edible—harvest young leaves before flowers appear for the mildest flavor, excellent in salads or sautéed with garlic. The crowns, dug carefully with a dandelion fork, can be roasted until crispy.

Ramps, those prized wild leeks, grow in shaded woodlands and offer both edible leaves and bulbs. Sustainable harvesting is crucial here: take only one leaf per plant or harvest just 10 percent of any patch, allowing populations to regenerate. Their garlicky flavor enhances pastas, eggs, and compound butters.

Fiddleheads, the coiled fronds of ostrich ferns, require proper preparation. Always cook them thoroughly by boiling for 10-15 minutes or steaming for 10-12 minutes to eliminate natural toxins. Never eat them raw. Their asparagus-like taste pairs beautifully with lemon butter.

Wild garlic carpets forest floors with its distinctive aroma. Snip leaves with scissors rather than pulling entire plants. Use them fresh in pesto, soups, or as garnish.

Spring preparation tip: Bring a damp cloth to wrap delicate greens immediately after harvesting, keeping them fresh until you reach your kitchen.

Summer Abundance: Berries, Flowers, and Herbs

Summer transforms the foraging landscape into a generous buffet of flavors and colors. This is prime time for wild berries – look for juicy blackberries trailing along woodland edges, tart wild strawberries hiding in meadows, and blueberries dotting hillsides. When harvesting, pick only fully ripe berries and leave plenty for wildlife and regeneration.

Elderflowers bloom in creamy clusters throughout June and July, perfect for crafting delicate cordials or fritters. Harvest flower heads on dry mornings when their fragrance peaks, and shake gently to remove any insects before use.

Don’t overlook purslane, a succulent groundcover often dismissed as a weed. This omega-3 rich green thrives in gardens and disturbed soil, offering a lemony crunch for salads and stir-fries. Snip tender stems and leaves regularly to encourage continuous growth.

Summer’s abundance means frequent harvesting opportunities, but respect grows slowly. Take only what you’ll use immediately, and rotate your foraging spots to allow plants time to recover. Early morning collection ensures peak freshness and flavor for your kitchen creations.

Fall Harvest: Nuts, Mushrooms, and Root Vegetables

As temperatures drop, autumn reveals hidden treasures beneath fallen leaves and forest floors. Acorns become abundant under oak trees—while they require leaching to remove bitter tannins, they transform into nutritious flour perfect for baking. Look for plump, brown acorns without holes or cracks, then shell and soak them in changing water until the bitterness disappears.

Wild mushrooms like hen-of-the-woods and oyster mushrooms thrive on decaying hardwoods during fall rains. Always consult expert guides and never consume mushrooms without absolute certainty of identification. When in doubt, photograph and verify with local mycological societies before harvesting.

Jerusalem artichokes grow wild along roadsides and field edges, their knobby tubers hiding underground. Dig carefully around stems to harvest these nutty-tasting roots that roast beautifully or add crunch to salads.

Preserving your fall bounty extends enjoyment through winter months. Dehydrate mushrooms and acorn flour, pickle root vegetables, or explore various food storage techniques to maximize your harvest. Remember, sustainable foraging means taking only what you need while leaving plenty for wildlife and regeneration.

Cleaning and Preparing Wild Ingredients

The Triple-Wash Method for Greens

Wild greens carry more than just dirt from the forest floor. They can harbor tiny insects, grit, and debris that won’t wash away with a simple rinse. Here’s how to clean them properly using the triple-wash method, a technique I learned from experienced foragers who know that thorough cleaning makes all the difference.

Start by filling a large bowl or clean sink with cool water. Submerge your greens completely and gently agitate them with your hands, allowing any debris to settle at the bottom. This first wash removes the bulk of visible dirt and any insects seeking shelter in the leaves.

Lift the greens out rather than draining the water, which would just redistribute the sediment. Discard the dirty water and refill your basin. Repeat the gentle swishing process for your second wash. You’ll likely notice the water is cleaner but still shows some cloudiness.

For the third and final wash, use fresh cool water one more time. The water should now run clear when you agitate the greens. This confirms your wild harvest is ready for cooking.

Pat the greens dry with clean towels or use a salad spinner. This final step ensures better texture when cooking and helps seasonings adhere properly to the leaves.

Hands washing wild foraged greens under running water in kitchen bowl
Proper washing techniques remove dirt and insects from foraged greens while preserving their delicate leaves.

Dealing with Bitterness and Strong Flavors

Wild foods often pack powerful flavors that can surprise your palate. Many foraged greens like dandelion leaves, burdock, and wild mustards contain compounds that create bitter or astringent tastes as natural defense mechanisms. The good news? A few simple preparation techniques can transform these intense flavors into delicious, palatable dishes.

Blanching is your first line of defense against bitterness. Drop your wild greens into boiling water for 30-60 seconds, then immediately plunge them into ice water. This quick heat treatment breaks down some of the bitter compounds while preserving the vegetable’s vibrant color and nutrients. For particularly stubborn specimens, try a double blanch using fresh water each time.

Soaking works wonders for roots and tubers with strong flavors. Slice your foraged finds thinly and submerge them in cold water for several hours or overnight, changing the water two to three times. This gentle process draws out water-soluble compounds responsible for harsh tastes. I’ve watched beginning foragers completely change their opinion of wild foods after learning this technique.

Multiple water changes during cooking help too. When boiling wild vegetables, drain and refresh the cooking water once or twice during the process. Each change removes more of those challenging flavors. Think of it as rinsing away what you don’t want while keeping the nutritious goodness intact.

Remember, some bitterness adds character to dishes. Start with these techniques and adjust based on your taste preferences and the specific plants you’re preparing.

Essential Cooking Techniques for Wild Foods

Blanching and Shocking: Taming Wild Greens

Blanching and shocking is a game-changer when you’re working with assertive wild greens like dandelion, mustard, or dock. This simple two-step technique mellows out intense bitterness while keeping those gorgeous greens looking vibrant on your plate. Here’s how it works: bring a large pot of salted water to a rolling boil, then drop in your cleaned greens for just 1-3 minutes. The hot water softens the plant fibers and leaches out some of those bitter compounds. Immediately transfer the greens to a bowl of ice water to halt the cooking process. This ice bath locks in that brilliant green color and preserves heat-sensitive nutrients like vitamin C.

The beauty of this method is its flexibility. Younger greens need less time, while tougher, more mature leaves benefit from the full three minutes. After shocking, squeeze out excess moisture and use your greens in sautés, pasta dishes, or grain bowls. You’ll find that blanching transforms even the most challenging foraged finds into delicious, approachable ingredients that rival anything from the farmers market.

Sautéing Wild Mushrooms and Vegetables

Sautéing wild mushrooms and vegetables brings out incredible depth of flavor when done thoughtfully. Start with a heavy-bottomed skillet over medium-high heat and choose quality fats like grass-fed butter, olive oil, or a combination of both. The key is getting your pan hot enough that mushrooms sizzle immediately upon contact, which prevents them from releasing too much moisture and becoming soggy.

Add your foraged mushrooms in a single layer, resisting the urge to stir for the first few minutes. This allows a beautiful golden-brown crust to develop, concentrating those earthy flavors. Season with just salt and freshly cracked pepper initially, letting the natural taste shine through. Wild greens like lamb’s quarters or nettles should be added toward the end of cooking, as they wilt quickly and can become bitter if overcooked.

Timing matters tremendously. Dense mushrooms like hen of the woods need about 8-10 minutes, while delicate chanterelles require only 4-5 minutes. Finish with fresh herbs and a squeeze of lemon to brighten the dish and honor these precious ingredients you’ve sustainably harvested from nature.

Infusions and Extracts: Capturing Wild Flavors

Preserving wild flavors through infusions and extracts lets you enjoy foraged ingredients year-round while building your sustainable pantry. Start with herb-infused oils using plants like wild garlic, rosemary, or oregano. Simply fill a clean jar with your washed, completely dried herbs and cover with olive oil. Let it steep for two to four weeks in a cool, dark place, shaking occasionally. Strain and store in the refrigerator for up to three months.

Wild flower vinegars showcase delicate flavors beautifully. Elderflowers, rose petals, and violet blossoms create stunning results. Fill a jar halfway with flowers, add white wine or apple cider vinegar, and steep for three to four weeks before straining.

For simple syrups, combine equal parts sugar and water, bring to a boil, then pour over foraged mint, pine needles, or spruce tips. Cool and strain after 24 hours. These syrups elevate beverages and desserts while reducing food waste.

Foraged teas are perhaps the easiest preservation method. Dry collected leaves like nettle, raspberry leaf, or mullein on screens in a well-ventilated area, then store in airtight containers away from light.

Fermentation and Pickling Techniques

Preserving your foraged treasures extends their enjoyment well beyond harvest season. Lacto-fermentation transforms wild greens like dandelion leaves, garlic mustard, and ramps into tangy, probiotic-rich foods. Simply submerge your cleaned wild edibles in a 2-3% salt brine, weight them down, and let beneficial bacteria work their magic at room temperature for 3-7 days. The same fermentation methods used for garden vegetables apply beautifully to foraged finds.

Quick pickling offers another accessible preservation option. Combine equal parts vinegar and water with sugar and salt, bring to a boil, then pour over foraged fiddleheads, wild mushrooms, or pickleweed in sterilized jars. This technique captures peak-season flavors while creating pantry staples that brighten winter meals. One forager’s tip: label your jars with harvest dates and locations to track which wild spots produce the tastiest results year after year.

Recipe Ideas to Showcase Your Foraged Finds

Wild Greens Pesto and Herb Blends

Wild greens pesto transforms foraged ingredients into a versatile condiment that preserves your harvest and adds vibrant flavor to countless dishes. The beauty of this approach is its adaptability—you can create delicious pestos using whatever wild greens you’ve gathered, from tender chickweed and mineral-rich lamb’s quarters to peppery garlic mustard leaves.

Start with about two cups of washed and dried wild greens, removing any tough stems. Combine them with a third cup of nuts or seeds (walnuts, sunflower seeds, or pine nuts work wonderfully), two cloves of garlic, and half a cup of olive oil in a food processor. Pulse until you reach your desired consistency, then stir in a quarter cup of grated cheese and season with salt and pepper to taste. For a dairy-free version, simply add nutritional yeast instead of cheese for that savory umami flavor.

Store your pesto in clean jars, covering the surface with a thin layer of olive oil to prevent oxidation. It’ll keep refrigerated for up to two weeks or frozen for several months. Use it on pasta, spread it on sandwiches, stir it into soups, or toss it with roasted vegetables. This simple preservation technique helps you enjoy the fruits of your foraging adventures long after the season ends.

Simple Salads That Let Wild Flavors Shine

Wild greens like dandelion, purslane, and chickweed pack intense flavors that shine brightest when balanced thoughtfully. The key is treating these foraged treasures with the same respect you’d give farmer’s market greens while acknowledging their bolder personalities.

Start with a simple citrus vinaigrette to mellow bitter greens. Mix lemon juice, olive oil, and a touch of honey to create harmony with strong-flavored wild mustards or dock leaves. For peppery watercress or nasturtium, try a creamy dressing with Greek yogurt and fresh herbs to soften their bite.

Texture matters too. Combine tender chickweed with crunchy nuts or seeds, adding familiar elements that help adventurous eaters embrace new flavors. Soften woody stems by massaging heartier greens like lamb’s quarters with olive oil before dressing.

Remember the 10 percent rule: start by mixing foraged greens with 90 percent familiar lettuces, gradually increasing wild ingredients as your palate adjusts. This gentle approach helps your community share members discover these nutrient-dense additions without overwhelming their taste buds, creating a bridge between backyard foraging and everyday meals.

Plated gourmet salad featuring wild greens, edible flowers and foraged mushrooms
Wild foraged ingredients elevate simple dishes into restaurant-quality presentations with unique flavors and textures.

Incorporating Foraged Foods into Everyday Meals

Wild foods blend beautifully into everyday cooking, transforming simple meals into nutrient-rich adventures. Start by adding young dandelion greens or chickweed to morning omelets alongside your garden vegetables. Tender wild garlic leaves elevate pasta dishes with their subtle, garlicky punch, while nettle leaves work wonderfully in soups when treated like spinach. Simply blanch them first to remove the sting.

Wild mushrooms like chanterelles or morels add earthy depth to risottos and cream sauces. Toss wild greens into salads, blend them into pesto, or fold them into quiche alongside your CSA box ingredients. The principles of cooking with local ingredients apply perfectly to foraged foods.

Begin by substituting just one wild ingredient in familiar recipes. A local forager in Ontario shares her tip: treat wild foods like premium herbs and greens, using them to enhance rather than overwhelm dishes. This gentle approach helps you develop confidence while discovering which wild flavors your family enjoys most.

Connecting Foraging to Community Supported Agriculture

Foraging beautifully complements Community Supported Agriculture by diversifying what you bring to your table throughout the growing season. Many CSA farmers already incorporate wild foods into their operations, recognizing that these nutrient-dense plants grow abundantly alongside cultivated crops without requiring additional resources or land.

Sarah Mitchell, who runs a 40-acre organic farm in Ontario, discovered that teaching her CSA members about foraging created unexpected benefits. “I started including wild garlic mustard and lamb’s quarters in spring share boxes with recipe cards,” she explains. “Members loved learning they could find these same greens growing wild in their neighborhoods. It deepened their connection to seasonal eating and reduced our spring workload since we were managing invasive species anyway.”

This integration strengthens local food systems by expanding the definition of local food beyond farm boundaries. Wild foods bridge the gaps between CSA delivery weeks and extend harvest seasons naturally. Early spring ramps and late fall rosehips provide fresh ingredients when cultivated crops are scarce.

Progressive farms now offer foraging workshops as CSA membership perks, creating community while educating members about sustainable harvesting. These workshops typically cover proper identification, ethical gathering techniques, and preparation methods for wild edibles found near the farm or in members’ own backyards.

Tom Rodriguez transformed his struggling farm by adding value-added products featuring foraged ingredients. His wild berry preserves and foraged herb salts became CSA favorites, creating additional income streams while celebrating regional biodiversity. “Foraging made our farm more resilient,” Tom shares. “We weren’t solely dependent on cultivated crops anymore.”

For CSA members, foraging skills mean you’re never without fresh ingredients. Between delivery weeks, you can supplement your farm box with wild greens, berries, and herbs, making your membership stretch further while deepening your understanding of local ecosystems and seasonal rhythms that farmers know intimately.

Your journey into foraging doesn’t need to begin with exotic mushrooms or obscure greens. Start with the easily identifiable plants that grow abundantly in your region—dandelions, purslane, or wild garlic are excellent beginner choices. These common wild foods offer remarkable flavor and nutrition while minimizing identification risks. As your confidence grows, you’ll naturally expand your repertoire, discovering new ingredients that transform your kitchen into a celebration of local, seasonal eating.

Foraging connects us to sustainable living in profound ways. When you gather wild foods responsibly, you’re reducing your carbon footprint, supporting biodiversity, and participating in the most local food system imaginable. Every foraged meal strengthens your understanding of the landscape around you and deepens your relationship with the changing seasons. Just like joining a community-supported agriculture program, foraging makes you an active participant in your food story rather than a passive consumer.

Remember that every expert forager once stood where you are now, guidebook in hand, wondering which plants were safe to harvest. Take your time, join local foraging groups, and never consume anything you cannot identify with complete certainty. The rewards extend far beyond the dinner plate—you’ll gain wilderness skills, environmental knowledge, and the extraordinary satisfaction of preparing meals from ingredients you gathered yourself.

Step outside, start observing, and let your culinary adventure begin. The wild pantry awaits, and nature is remarkably generous to those who approach with respect, curiosity, and patience.

How Crop Rotation Heals Your Soil (And Boosts Your Harvest)

Posted by darrell on
0
Regenerative Agriculture Insights
How Crop Rotation Heals Your Soil (And Boosts Your Harvest)

Rotate heavy feeders like tomatoes and corn with nitrogen-fixing legumes such as peas and clover to naturally replenish soil nutrients without synthetic fertilizers. Follow deep-rooted crops like carrots with shallow-rooted lettuce to access different soil layers and prevent nutrient depletion in any single zone.

Break pest and disease cycles by never planting the same plant family in the same spot for at least three years—this simple practice dramatically reduces soil-borne pathogens and insect populations that target specific crops. Map your garden beds by family groups (nightshades, brassicas, legumes, and cucurbits) and shift each group clockwise through your space annually.

Build soil structure progressively by alternating between crops that add organic matter and those that break up compaction. Plant cover crops like winter rye or crimson clover during off-seasons to protect bare soil, suppress weeds, and pump living roots into the ground year-round. When you turn these covers under, they become green manure that feeds soil microbes and increases water retention.

This regenerative approach transforms your growing space from a resource we extract from into a living system that becomes healthier and more productive with each passing season, creating resilient soil that supports abundant harvests while requiring fewer external inputs.

What Makes Crop Rotation ‘Regenerative’?

Traditional crop rotation is certainly beneficial—it helps prevent disease buildup and stops nutrients from becoming depleted. But regenerative crop rotation? That’s where the magic happens. The key difference lies in intention and outcome: regenerative practices don’t just maintain soil health, they actively improve it year after year.

Think of basic rotation as paying your bills on time—you’re staying afloat. Regenerative rotation is like investing for the future, building wealth that compounds over time. Instead of simply alternating crops to avoid problems, regenerative farmers strategically select plants that work together to heal and enrich the soil.

Here’s how it works: regenerative rotations incorporate deep-rooted plants that break up compacted soil layers, legumes that fix nitrogen naturally, and cover crops that blanket the earth during off-seasons. This approach promotes carbon sequestration by keeping living roots in the soil throughout the year, pulling carbon from the atmosphere and storing it underground where it belongs.

The biodiversity benefits are remarkable too. By planting diverse crop families in succession, you create habitats for beneficial insects, soil microbes, and pollinators. These organisms form a living network that naturally suppresses pests, cycles nutrients, and builds resilience against drought and disease.

Take Sarah Chen, a small-scale organic farmer in Ontario, who transformed depleted land using regenerative rotation. Within three years, her soil organic matter doubled, and she reduced external inputs by 60%. “The soil literally came back to life,” she shares. “Now it works for me, not against me.”

The bottom line? Regenerative rotation creates self-sustaining ecosystems that require fewer inputs while producing more nutritious food—a true win-win for farmers and the environment.

Farmer's hands holding rich dark soil with visible earthworms and organic matter
Healthy, biologically active soil teeming with earthworms and organic matter is the foundation of regenerative agriculture.

The Science Behind Soil Healing

How Different Crops Feed Your Soil

Different crops contribute unique benefits to your soil, each playing a specific role in building fertility and structure. Understanding these contributions helps you design a rotation that truly regenerates your land.

Legumes like clover, peas, and beans are nature’s fertilizer factories. Through their partnership with beneficial bacteria, these plants pull nitrogen from the air and store it in root nodules, enriching the soil for future crops. The legume rotation benefits extend beyond nitrogen, as their residues decompose quickly, feeding soil microorganisms and improving overall fertility.

Deep-rooted plants such as daikon radish, alfalfa, and sunflowers act as natural tillers. Their powerful roots break through compacted layers, creating channels that improve water infiltration and allow future crops to access nutrients from deeper soil horizons. When these roots decompose, they leave behind organic matter throughout the soil profile, not just at the surface.

Cover crops work year-round to protect and nourish your soil. Winter rye prevents erosion during dormant months, while buckwheat suppresses weeds in summer. These hardworking plants prevent nutrient leaching, add organic matter, and provide habitat for beneficial insects.

Sarah Chen, a third-generation organic farmer in British Columbia, shares her experience: “After incorporating a diverse rotation with legumes and deep-rooted covers, our soil went from hard clay to crumbly perfection in just three seasons. Our yields increased without adding any external fertilizers.”

Breaking Pest and Disease Cycles Naturally

One of the most powerful benefits of crop rotation is its ability to naturally interrupt pest and disease cycles, helping you reduce or eliminate the need for chemical interventions. When you plant the same crop family in the same spot year after year, you’re essentially setting up a buffet for pests and pathogens that specialize in attacking those plants. They overwinter in the soil, multiply, and wait for their favorite meal to return.

By rotating plant families, you break this cycle. For example, tomato hornworms and early blight thrive when tomatoes, peppers, and eggplants (all nightshade family members) occupy the same beds season after season. Move your nightshades to a different location, and those pests find themselves without their preferred host plants. Many simply die off or relocate.

The same principle applies to soil-borne diseases. Clubroot in brassicas and fusarium wilt in tomatoes can persist in soil for years, but rotating to unrelated plant families starves these pathogens and reduces their populations naturally over time.

Sarah Martinez, an organic farmer in Oregon, shares her success: “After implementing a four-year rotation, our fungal disease pressure dropped by about 70 percent. We went from spraying organic fungicides weekly to maybe twice a season.”

The key is understanding plant families and planning rotations that give soil at least two to three years before the same family returns. This simple practice transforms your garden or farm into a naturally resilient ecosystem where beneficial organisms can flourish while harmful ones struggle to establish themselves.

Planning Your Regenerative Rotation

Aerial view of agricultural field showing multiple crop varieties in rotation pattern
A well-planned crop rotation system creates a diverse patchwork of different plant families across the growing season.

The Four-Year Rotation Framework

One of the most accessible and effective approaches to building soil health is the four-year rotation framework. This time-tested pattern works by strategically grouping plants based on their nutrient needs and contributions to the soil, creating a natural cycle that keeps your land productive year after year.

The rotation follows this simple sequence: heavy feeders, light feeders, legumes, and soil builders. Each category plays a distinct role in maintaining balance.

Heavy feeders kick off the cycle in Year One. These are your nutrient-hungry crops like tomatoes, corn, squash, and brassicas such as broccoli and cabbage. They thrive in rich soil and consume significant nitrogen and other nutrients. Since you’re starting with well-nourished soil from the previous rotation’s completion, these demanding plants get exactly what they need.

Year Two introduces light feeders, which include root vegetables like carrots, beets, and radishes, along with alliums such as onions and garlic. These crops require fewer nutrients and help prevent soil depletion after the heavy feeders have taken their share.

Legumes take center stage in Year Three. Peas, beans, and clover are nitrogen-fixers that actually replenish the soil through their relationship with beneficial bacteria. They essentially create fertilizer naturally, setting the stage for the next cycle.

Year Four focuses on soil builders like cover crops, including buckwheat or winter rye. These crops add organic matter, prevent erosion, and improve soil structure.

Sarah, an organic farmer in Vermont, credits this rotation with transforming her depleted farmland into thriving gardens within just two cycles. Her tomato yields doubled, and she eliminated the need for purchased fertilizers entirely, proving that working with nature’s rhythms creates abundance while building soil health for future generations.

Adapting Rotation to Your Climate and Space

Successful crop rotation isn’t one-size-fits-all. Your climate, growing season length, and available space all play crucial roles in designing a rotation plan that actually works for you.

If you’re gardening in a region with short growing seasons, focus on quick-maturing varieties and consider succession planting within each rotation phase. Cold-climate gardeners might rotate cool-season crops like lettuce and peas with hardy brassicas, maximizing the productive months available. Conversely, warm-climate growers can extend rotations year-round, incorporating multiple successions of heat-loving crops like tomatoes and peppers alongside winter vegetables.

Space constraints don’t mean you can’t rotate effectively. Small garden enthusiasts can divide their plot into just three or four sections, rotating crop families annually. Try vertical growing for vining crops to maximize space, and incorporate container gardens into your rotation strategy. Even a 10×10 foot garden can support a simple legume-leafy green-root vegetable rotation that builds soil health over time.

For larger operations, consider your equipment and irrigation systems when planning rotations. Farmer Maria Gonzalez from Oregon successfully adapted her five-acre farm by creating rotation zones based on water access, placing water-intensive crops near established irrigation lines while rotating drought-tolerant varieties in drier sections.

Regional pest and disease pressures also matter. Research common issues in your area and lengthen rotation cycles for particularly problematic crops. If tomato blight is prevalent in your region, extend the time before nightshades return to the same bed from three to four or even five years.

Remember, observation is your best tool. Keep notes on what thrives where, adjust your plan seasonally, and don’t hesitate to modify rotations based on what your soil and crops tell you. Flexibility paired with fundamental rotation principles creates resilient, productive growing spaces.

Cover Crops: The Secret Weapon

If you’re ready to take your crop rotation to the next level, cover crops are about to become your new best friend. Think of them as nature’s multitaskers, working overtime between your main growing seasons to build soil health, crowd out weeds, and even add nutrients back into the ground.

Let’s start with nitrogen fixers, the workhorses of cover cropping. Legumes like crimson clover, hairy vetch, and field peas have a special relationship with soil bacteria that captures atmospheric nitrogen and converts it into plant-available forms. Plant these before heavy feeders like tomatoes or corn, and you’ll slash your fertilizer needs dramatically. Sarah Chen, who runs a three-acre market garden in Oregon, swears by her winter-planted crimson clover. “It’s like getting free fertilizer,” she says. “Plus, the bees go crazy for those gorgeous red blooms.”

For weed suppression, you want aggressive growers that create thick, light-blocking canopies. Winter rye and buckwheat excel here, smothering potential weed seeds before they can establish. Buckwheat grows so quickly it can fill a gap between spring and fall crops in just 30 to 40 days, and it’s a pollinator magnet to boot.

Got compacted soil? Enter the deep-rooted champions. Daikon radishes, also called tillage radishes, drill down up to three feet, creating natural channels that break up hardpan and improve drainage. When they decompose, those channels become highways for your next crop’s roots and earthworm activity.

Timing matters tremendously. Plant cool-season covers like cereal rye in fall for spring termination, or warm-season options like sudangrass after spring harvests. The key is matching your cover crop’s growth cycle with your main crop schedule, ensuring you’re building soil without sacrificing productive growing time.

Remember, cover crops aren’t just gap fillers. They’re actively regenerating your soil while your main crops rest, creating a healthier, more resilient growing system season after season.

Real Farmers, Real Results

Meet Sarah Chen, who transformed her struggling 5-acre farm in Ontario into a thriving ecosystem through strategic crop rotation. When she took over the property in 2018, her soil was compacted and depleted from years of monoculture corn. “I couldn’t push a shovel more than three inches into the ground,” she recalls. By implementing a four-year rotation of legumes, brassicas, root vegetables, and cover crops, Sarah witnessed remarkable changes. Within two seasons, her soil organic matter increased from 2.1% to 3.8%, and earthworm populations tripled. Her tomato yields jumped 40%, and customer retention at her CSA improved dramatically as produce quality soared.

Across the country in Manitoba, the Rodriguez family faced different challenges on their 80-acre operation. Persistent pest pressure and declining wheat yields had them questioning their future in farming. After attending a workshop on regenerative farming practices, they redesigned their entire system around a seven-year rotation incorporating perennial pasture, grains, and market vegetables. “The first year was financially tight,” admits Miguel Rodriguez, “but by year three, our input costs dropped 35% as soil health improved.” Their farm now supports 120 CSA members and hosts regular educational tours.

Even small-scale operations see impressive results. James Wilson gardens on just half an acre in Nova Scotia, supplying weekly vegetable boxes to 25 families. His challenge was limited space for effective rotation. His solution involved dividing his plot into twelve beds with staggered plantings throughout the season. “I never grow the same crop family in a bed more than once per year,” he explains. This intensive rotation strategy reduced his disease problems by 60% and eliminated his need for any pest interventions.

What unites these farmers is their commitment to observation and adaptation. They all emphasize keeping detailed records, testing soil regularly, and adjusting rotations based on what the land tells them. Their success proves that whether you’re managing five acres or fifty, thoughtful crop rotation delivers measurable improvements in both soil vitality and farm profitability.

Farmer examining healthy cover crop growth of clover and vetch in agricultural field
Farmers using cover crops as part of regenerative rotation report measurable improvements in soil structure and fertility.

Getting Started This Season

Ready to begin your crop rotation journey? The good news is that you don’t need to overhaul your entire farm or garden overnight. Start by assessing where you are right now. Take a walk through your growing space and note what you’ve planted in each area over the past few seasons. Even rough notes scratched in a notebook count as your first rotation record.

For simple record-keeping, grab a notebook or create a basic spreadsheet with columns for plot location, crops grown, planting dates, and observations about plant health and yield. You can also snap photos with your phone and organize them by season. This historical view becomes invaluable for planning future rotations.

If you’re completely new to rotation, begin with a straightforward three-year pattern. Divide your space into three sections and rotate between heavy feeders like tomatoes and squash, nitrogen-fixing legumes such as beans and peas, and light feeders including root vegetables and herbs. This basic approach fits beautifully into broader regenerative agriculture systems that restore soil vitality.

Before planting, assess your soil condition. Squeeze a handful of moist soil. Does it clump into a ball or fall apart? Observe the earthworm population when you dig. Check for crusting or compaction. These simple observations tell you plenty about soil structure and biological activity.

Remember Sarah, a community garden member in Ontario, who started with just one raised bed rotation? Within two seasons, she noticed healthier plants and reduced pest problems. Her success inspired neighboring gardeners to follow suit.

Small steps create meaningful change. Even rotating just two crop families instead of planting the same vegetables in identical spots makes a difference. Your soil will thank you, and your harvests will reflect your care.

Embracing regenerative crop rotation isn’t just about this season’s harvest—it’s about investing in the future health and productivity of your land. Whether you’re managing acres of farmland or a backyard garden, these time-tested practices work with nature to build resilient soil that gets better with each passing year.

The beauty of crop rotation is that it’s accessible to everyone. You don’t need specialized equipment or a degree in soil science to start. Begin with simple rotations between plant families, pay attention to what your soil tells you, and adjust as you learn.

Want to see these principles in action? Connect with your local CSA farms and ask about their rotation practices. Many farmers love sharing their approaches and the visible improvements they’ve witnessed. Farmer Maria Chen from Green Valley Farm notes, “When people visit during harvest season, they can literally see the difference between our rotated fields and neighboring plots—the soil structure, plant vigor, and biodiversity speak for themselves.”

Remember, every small step toward regenerative practices contributes to healthier food systems and a more sustainable future. Your soil improvement journey can start today.