Monthly Archives

40 Articles

What USDA Organic Standards Really Mean for Your CSA Farm

Posted by darrell on
0
Policy, Law & Certification
What USDA Organic Standards Really Mean for Your CSA Farm

Understanding USDA organic certification transforms your CSA operation from a local endeavor into a nationally recognized source of verified organic produce. The certification process requires documenting every aspect of your farming practices, from seed selection to harvest methods, but this rigor builds consumer trust that translates directly into member retention and premium pricing.

Review the National Organic Program standards focusing on three core requirements: maintaining soil health through approved amendments and crop rotation, using only substances on the National List of allowed materials, and keeping detailed records that trace every input back to its certified organic source. Your farm needs a three-year transition period where you follow all organic practices before crops can be certified, though you can market transitional produce during this time.

Create a comprehensive Organic System Plan that maps your fields, lists all inputs with their organic certifications, details your pest management strategies using cultural and biological controls, and outlines buffer zones separating your operation from conventional neighbors. This living document becomes your roadmap for compliance and your proof during annual inspections.

Calculate certification costs against potential benefits by comparing annual fees ranging from $400 to $2,000 plus inspector travel expenses against the 20-30% price premium most certified CSAs command and increased member confidence. Many farmers report that certification simplified their marketing message and opened doors to wholesale accounts requiring USDA verification.

Connect with certified CSA farmers in your region who navigate these same challenges successfully. Their experiences reveal practical solutions for record-keeping systems, approved pest control timing, and maintaining certification while experimenting with new crops that keep members excited about their weekly shares.

Breaking Down USDA Organic Standards: The Foundation

Farmer's hands holding dark organic soil with visible earthworms and organic matter
Healthy soil rich in organic matter forms the foundation of USDA organic certification standards.

The Three Pillars of Organic Certification

At the heart of USDA organic certification lie three essential pillars that guide every aspect of organic farming. Understanding these foundations will help you appreciate what goes into maintaining certified organic status on your local CSA farm.

The first pillar focuses on soil health and fertility management. Organic farmers must build and maintain healthy soil using natural methods like composting, cover cropping, and crop rotation. Instead of synthetic fertilizers, they rely on organic matter, beneficial microorganisms, and natural amendments to nourish the soil. This creates a living ecosystem beneath your feet that produces more nutritious, flavorful vegetables season after season.

The second pillar addresses pest and weed control through natural and mechanical methods. Organic farmers get creative here, using techniques like companion planting, biological pest controls, physical barriers, and good old-fashioned hand-weeding. While conventional farms might reach for chemical solutions, organic growers work with nature’s own pest management system. This approach aligns with broader pesticide regulations but goes even further in protecting environmental health.

The third pillar involves strictly prohibited substances and practices. The USDA maintains a detailed list of what organic farmers cannot use, including synthetic pesticides, herbicides, fertilizers, and genetically modified organisms. Farmers must also avoid sewage sludge and ionizing radiation. These restrictions ensure that when you bite into that organic tomato from your CSA box, you know exactly what didn’t go into growing it.

Timeline: From Application to Certification

The journey to USDA organic certification requires patience and planning. Before you can even apply, your farm must complete a three-year transition period where you follow all organic practices without using prohibited substances. This waiting period ensures your soil is genuinely free from synthetic chemicals.

Once your transition period nears completion, you’ll submit your application through a USDA-accredited certifying agent. The application includes detailed information about your growing practices, inputs used, and your farm’s history. Expect to provide field maps, seed sources, and records of everything applied to your land.

After submitting your application, an inspector will visit your farm to verify everything matches your documentation. They’ll walk your fields, review your recordkeeping system, and ask questions about your practices. This might feel similar to food safety compliance inspections if you’re already familiar with those.

The entire certification process typically takes three to six months from application to approval. Annual inspections become part of your routine, ensuring ongoing compliance. Many CSA farmers find that keeping meticulous records year-round makes these inspections straightforward. Remember, your certifier becomes a partner in your organic journey, offering guidance when questions arise about acceptable practices or new products.

SOE Compliance: Your Organic System Plan in Action

Creating Your Farm’s Organic System Plan

Your Organic System Plan (OSP) is the heart of your USDA certification—think of it as your farm’s organic blueprint. This living document tells your certifier exactly how you’ll meet organic standards across every aspect of your operation.

Start with a detailed field history for each growing area. Map out your crop rotation strategy, showing how you’ll build soil health while preventing pest and disease cycles. For CSA farms, this means planning diverse rotations that support your weekly harvest needs while maintaining organic integrity. Include specific planting schedules and succession plans that align with your member deliveries.

Your soil fertility section should outline every amendment you’ll use, from compost recipes to approved fertilizers. Document your composting process thoroughly—what goes in, how you turn it, temperature monitoring, and when it’s ready for application. This level of detail helps certifiers understand your soil-building approach.

The pest management portion requires listing potential challenges and your organic solutions. Include beneficial insect habitat plans, physical barriers like row covers, and any approved botanical sprays you might use as a last resort. CSA farmer Maria Rodriguez from Vermont shares: “My OSP became my teaching tool. When members ask about pest control, I show them exactly what’s in my plan—it builds incredible trust.”

Record-keeping requirements deserve special attention. You’ll need systems for tracking seed purchases, input applications, harvest logs, and sales records. Many CSA farmers use simple spreadsheets or farm management software to stay organized.

Remember, your OSP evolves with your farm. Plan for annual updates reflecting new fields, changed practices, or lessons learned. This flexibility allows your organic system to grow alongside your CSA operation while maintaining compliance.

Overhead view of farmer documenting harvest records with fresh vegetables in crates
Detailed record-keeping is essential for maintaining organic certification compliance on CSA farms.

Record-Keeping That Won’t Drive You Crazy

Keeping organic records doesn’t have to feel like drowning in paperwork. The key is building simple habits that capture what you need without consuming your entire day.

Start with a basic field notebook that lives in your pocket or truck. Jot down what you planted, when, and where immediately after doing the work. These quick notes become your official records later. Many farmers find that snapping photos with their phones creates instant documentation for field conditions, planting dates, and input applications.

Create a dedicated filing system, whether digital or physical, with clear categories: seeds and plants purchased, soil amendments, pest management, harvest records, and sales logs. A simple spreadsheet or even a three-ring binder with dividers works perfectly. The goal is knowing exactly where to find documentation when your certifier asks.

For traceability and record-keeping, batch your administrative tasks. Set aside 30 minutes each Friday to transfer field notes into your official log, file receipts, and update your field map. This weekly rhythm prevents the dreaded year-end scramble.

Successful farmer Maria Santos shares her tip: “I keep a camera roll album just for farm records. Every input bag, every planting, every harvest gets a photo with the date stamp. It’s saved me countless times during inspections.”

Remember to save all input receipts and labels, even for approved materials. Store product labels in page protectors for easy reference. Your future self will thank you when certification renewal arrives and everything is already organized and accessible.

Special Considerations for CSA Operations

Managing Multiple Crops and Rotation Requirements

Here’s the good news: the incredible diversity that makes your CSA so appealing to members also helps you meet USDA organic crop rotation requirements. Instead of viewing rotation planning as a burden, CSA farmers can leverage their multi-crop model as a certification advantage.

Organic standards require crop rotation to maintain soil health and disrupt pest cycles, typically avoiding planting the same crop family in the same location for at least two years. With CSAs commonly growing 30 to 50 different varieties across multiple plant families, you’re naturally positioned to meet these requirements while keeping your harvest boxes exciting and varied.

Consider the story of Green Valley Farm, a certified organic CSA in Vermont. Owner Maria Rodriguez tracks her 40-crop rotation using a simple spreadsheet color-coded by plant family. “We rotate brassicas, nightshades, legumes, and root vegetables through different beds each season,” she explains. “Our members love the variety, and it makes our certification audit straightforward.”

The key is maintaining clear records showing which crops grew where each season. Many farmers use field maps, planting logs, or farm management software to document rotations. This documentation serves double duty: satisfying certification requirements while helping you plan future plantings for optimal soil health and member satisfaction.

Diverse organic vegetable field showing multiple crop varieties with farmer tending plants
CSA farms benefit from crop diversity when meeting organic certification rotation requirements.

Handling Non-Organic Inputs in a Pinch

Sometimes life throws curveballs, and you might need to source transplants or soil amendments from non-certified suppliers. The good news? USDA organic standards account for this reality. You can use non-organic seedlings if the organic version isn’t commercially available in your area, but you’ll need to document your search efforts. Keep records of calls made, websites checked, and supplier responses. This paper trail proves you made a genuine attempt to source organically first.

For soil amendments during emergencies, like an unexpected pest outbreak, work closely with your certifier before applying anything questionable. They can guide you toward compliant solutions or help document why a specific intervention was necessary. Many experienced CSA farmers maintain relationships with multiple certified suppliers to avoid last-minute scrambles. One Vermont farmer shared how keeping a simple spreadsheet of backup suppliers saved her season when her primary seedling source had crop failure. Remember, transparency with your certifier is key. They’re partners in your success, not obstacles, and early communication prevents compliance headaches down the road while keeping your members’ boxes beautifully full.

Real CSA Farmer Success Stories

Meet Sarah Chen, who runs Willow Creek Farm in Vermont. When Sarah decided to pursue USDA organic certification in 2019, she worried about the paperwork and cost. “I thought certification was only for large operations,” she admits. Her biggest challenge was creating the required Organic System Plan while managing daily farm tasks. Her solution? She dedicated one hour each morning to documentation before field work began, and she connected with other certified farmers through her state’s organic farming association for guidance. After eighteen months, Willow Creek earned certification. Sarah’s advice for aspiring organic CSA farmers: “Start record-keeping early, even before you apply. Track everything from seed sources to compost inputs. It makes the application process so much smoother.”

Meanwhile, in North Carolina, Marcus Thompson of Abundant Harvest Farm faced different hurdles. His farm had been using sustainable practices for years, but transitioning fields that had previously received conventional treatments required patience. “The three-year transition period felt long, but we used that time to build soil health and educate our CSA members about why organic certification mattered,” Marcus explains. He found creative solutions by designating certain fields for immediate organic production while transitioning others gradually. His farm also struggled with organic pest management initially, particularly with cucumber beetles. Through trial and error, Marcus discovered that companion planting and beneficial insect habitat made a significant difference.

Today, both farms credit certification with strengthening customer loyalty and commanding premium prices that offset certification costs. Marcus offers this encouragement: “Don’t let fear of the unknown stop you. Reach out to your state’s organic certifying agency early. They want you to succeed and offer tremendous support throughout the process.”

Common Pitfalls and How to Avoid Them

Buffer Zone Requirements That Catch Farmers Off Guard

One of the most overlooked aspects of USDA organic certification is the buffer zone requirement, which can be a real surprise during your first inspection. Organic operations must maintain adequate separation from conventional fields to prevent prohibited substance contamination through drift or runoff. While the USDA doesn’t specify exact distances, inspectors generally look for 25 to 30 feet as a minimum, though this varies based on your specific situation and risk factors.

For small CSA farms working with limited acreage, this can feel like a significant chunk of productive land. The good news is that creative solutions exist. Many farmers plant hedgerows or windbreaks in their buffer zones, which serve double duty by providing habitat for beneficial insects and pollinators. Others use these areas for tool storage, composting stations, or educational walking paths for CSA member tours.

Take inspiration from Green Valley Farm in Oregon, where owner Maria Chen transformed her buffer zones into berry bushes and perennial flowers. These additions not only satisfied certification requirements but also became popular pick-your-own additions to member shares. The key is documenting your buffer strategy clearly in your organic system plan and demonstrating how it effectively prevents contamination from neighboring properties.

Is Organic Certification Worth It for Your CSA?

Deciding whether to pursue USDA organic certification is one of the biggest choices CSA farmers face. Let’s break down the real costs and benefits to help you make an informed decision.

The financial investment starts with certification fees, which typically range from $500 to $2,000 annually depending on your farm’s size and gross sales. Add inspection costs, recordkeeping systems, and the time required for documentation, and you’re looking at a significant commitment. Some farmers also face transition costs if converting conventional land, which requires a three-year period before certification.

On the flip side, organic certification can substantially boost your market value. Many CSA members willingly pay premium prices for certified organic produce, often 20-40% more than conventional options. This certified status can attract health-conscious consumers who specifically seek out organic food and trust the USDA label’s rigorous standards. The certification also opens doors to additional revenue streams, including accepting government benefits and selling to retailers or restaurants requiring certification.

However, certification isn’t the only path forward. Many smaller CSA operations find success with alternatives like Certified Naturally Grown, a grassroots certification designed specifically for direct-market farmers. CNG follows similar standards but costs significantly less, usually under $200 annually, with peer-review inspections instead of third-party auditors.

Consider Sarah Martinez, who runs a 2-acre CSA in Vermont. She chose CNG initially, building trust with her 40 member families through farm tours and transparency. After five years, her waiting list grew so long that she pursued USDA certification to expand and access wholesale markets. Her advice? Start where your budget allows and grow strategically.

The right choice depends on your farm’s size, target market, and growth goals. If your members value personal relationships and farm visits, they may trust your growing practices without needing official certification. For those planning to scale up or reach broader markets, USDA certification might justify the investment.

Pursuing USDA organic certification for your CSA farm is absolutely achievable with the right approach and resources. While the process requires dedication and attention to detail, thousands of farmers have successfully navigated certification and continue to maintain their organic status year after year. The key is breaking down the requirements into manageable steps and building systems that work for your unique operation.

If you’re considering certification, start by requesting the organic standards documentation and connecting with your local certifying agent for a preliminary consultation. Many offer free initial assessments to help you understand what changes you’ll need to make. Farmers already in transition should focus on meticulous record-keeping and lean on your certifier’s expertise when questions arise. For those maintaining compliance, remember that annual reviews are opportunities to refine your practices and strengthen your organic systems.

The commitment to organic farming extends beyond certification paperwork. It’s an investment in soil health, environmental stewardship, and the trust your CSA members place in you. Every certified organic farm strengthens the movement toward sustainable agriculture and demonstrates that growing food in harmony with nature isn’t just possible, it’s profitable and deeply rewarding. Your journey toward or within organic certification contributes to a healthier food system for everyone.

Why Sustainable Refilleries Are Changing How We Shop for Food

Posted by darrell on
0
Sustainable Consumer Practices
Why Sustainable Refilleries Are Changing How We Shop for Food

Refilleries are revolutionizing how we shop for everyday essentials by eliminating single-use packaging from the equation. Picture walking into a store with your own containers, filling them with grains, oils, household cleaners, and even locally sourced honey, then paying only for what you need. This zero-waste approach mirrors the community-focused values of farm-to-table movements, where knowing your food’s origin matters as much as the packaging it comes in.

The concept is refreshingly simple: bring reusable jars, bottles, or bags to a refillery, weigh them empty, fill them with bulk products, and pay by weight. Many refilleries partner with local farms and producers to stock organic grains, dried beans, nut butters, and seasonal produce, creating a direct connection between sustainable agriculture and conscious consumption. You’re not just reducing plastic waste; you’re supporting small-scale farmers who prioritize soil health and biodiversity.

What makes refilleries particularly powerful is their ability to transform routine shopping into an act of environmental stewardship. Every refill prevents another container from entering landfills or oceans, while building resilient local food systems that benefit farmers, communities, and the planet simultaneously.

What Is a Sustainable Refillery?

The Refill Model Explained

The refill model is beautifully simple and puts you in control of reducing waste. Here’s how it works: bring your own clean containers from home—mason jars, cloth bags, or any reusable container works perfectly. When you arrive at the refillery, you’ll first weigh your empty container at the designated station. This “tare weight” gets noted so you only pay for the product itself, not the container.

Next comes the fun part: filling up! Browse the selection of bulk items, from organic grains and dried beans to cleaning supplies and personal care products. Use the dispensers or scoops to fill your container with exactly the amount you need—no more, no less. This means zero food waste and complete portion control.

Finally, weigh your filled container again. The staff subtracts the tare weight and charges you only for the product. Many refilleries price items per pound or ounce, making it easy to budget and buy precisely what you need. The entire process eliminates single-use packaging while supporting local sustainable businesses and reducing your environmental footprint with every visit.

Hands filling reusable glass jar with dried lentils from bulk dispenser at sustainable refillery
Customers bring their own containers to fill with bulk items, eliminating single-use packaging waste.

Beyond the Bulk Bins

Today’s refilleries have evolved far beyond bulk bins of grains and beans. Many now showcase an impressive array of locally sourced treasures that connect you directly to regional farmers and producers. Imagine filling your containers with cold-pressed olive oil from a nearby grove, raw honey harvested just miles away, or fresh-ground nut butters made from local almonds and peanuts. Some refilleries partner with community farms to offer seasonal produce, farm-fresh eggs, and even artisanal dairy products. This expanded selection transforms your shopping trip into a journey through your local food landscape. By choosing these options, you’re not only eliminating packaging waste but also supporting small-scale farmers who prioritize sustainable growing practices. Each refill becomes an opportunity to taste the difference that local, seasonal eating makes while building resilience in your community’s food system.

How Refilleries Support Local Farms and Food Systems

Creating Direct Farm-to-Consumer Connections

Refilleries are revolutionizing local food sourcing by creating direct partnerships with nearby farms. Instead of sourcing products through traditional distributors, these zero-waste stores work hand-in-hand with local producers to stock bulk items like grains, legumes, honey, dried fruits, and seasonal produce. This farm-to-shelf approach eliminates multiple middlemen, ensuring farmers receive fair prices while customers enjoy fresher products at competitive rates.

Take Sarah’s organic grain farm in Ontario, for example. By partnering with three local refilleries, she increased her income by 40% compared to selling through conventional channels. Customers can now scoop her heritage wheat, oats, and barley directly into reusable containers, knowing exactly where their food comes from.

These partnerships strengthen community food systems while reducing transportation emissions and packaging waste. Many refilleries display information about their farming partners, including growing practices and harvest dates, fostering transparency and trust. For consumers, this means access to traceable, often organic products while directly supporting the hardworking farmers who grow their food. It’s a win-win arrangement that keeps dollars circulating within local communities.

Farmer and refillery owner meeting in store with local farm products displayed on shelves
Direct partnerships between refilleries and local farms create stronger community food networks and support small-scale producers.

Supporting Small-Scale Organic Producers

Refilleries create meaningful partnerships with small-scale organic producers who might otherwise struggle to reach retail customers. Take Meadowbrook Farm in Vermont, where farmer Sarah Chen started supplying her herb-infused vinegars and raw honey to a local refillery. Within six months, her products reached 200 households without the need for expensive individual packaging or complicated distribution networks.

These partnerships work beautifully because refilleries handle the logistics of storage, dispensing, and customer education while farmers focus on what they do best: growing quality organic products. Small producers can test new items like flavored oils, fermented foods, or specialty grains with minimal upfront investment. If a product doesn’t sell well, there’s no waste from unused packaging materials.

The model also helps beginning farmers establish steady income streams. Many refilleries commit to purchasing set quantities throughout the season, providing financial predictability that’s often missing in farmers market sales alone. This stability allows producers to reinvest in soil health, expand certified organic acreage, and experiment with regenerative growing practices. For customers, it means accessing truly local products while supporting the people growing their food sustainably.

Environmental Benefits That Go Beyond Reducing Plastic

The True Cost of Single-Use Packaging

Every year, North Americans generate over 35 million tons of plastic packaging waste, with single-use containers making up a staggering portion of what ends up in our landfills and oceans. To put this in perspective, that’s like filling an entire garbage truck every minute. The average household throws away approximately 70 pounds of plastic packaging annually, much of it from food and personal care products.

These containers don’t just disappear. Most take 400-1,000 years to decompose, releasing harmful chemicals into our soil and waterways along the way. When we consider that only 9% of plastic ever produced has been recycled, the picture becomes clearer: our convenience comes at a steep environmental price.

Here’s where reducing packaging waste through refilleries makes real impact. By choosing reusable containers over single-use packaging, one person can eliminate hundreds of plastic bottles, jars, and bags each year. This shift doesn’t just reduce waste, it cuts down the energy and resources needed to produce new packaging. Small changes in how we shop create ripples that benefit our communities and planet for generations to come.

Shorter Supply Chains Mean Lower Carbon Footprints

One of the most compelling environmental benefits of shopping at a refillery is the dramatic reduction in transportation emissions. When refilleries partner with local farmers and producers, your food travels dozens of miles instead of thousands. Think about it: conventional grocery items often journey across continents, burning fossil fuels every step of the way. A tomato from California to New York logs about 3,000 miles, while your local refillery’s tomatoes might travel just 30 miles from a nearby farm.

These shorter supply chains mean dramatically lower carbon footprints. Food miles matter because transportation accounts for a significant portion of our food system’s greenhouse gas emissions. By sourcing seasonally from regional growers, refilleries eliminate the need for long-haul trucking, air freight, and refrigerated storage.

Here’s a practical tip: ask your refillery which local farms they work with. Many proudly display maps showing their supplier radius, often within 100 miles. Supporting these businesses creates a ripple effect—encouraging more farmers to sell locally and further reducing our collective environmental impact. It’s a simple choice that makes a measurable difference in fighting climate change while enjoying fresher, more nutritious food.

Starting Your Refillery Journey: A Practical Guide

What to Bring and How to Prepare

Your first refillery visit is easier than you might think! Start by gathering clean, dry containers from home—mason jars, glass bottles, cloth bags, and food-safe plastic containers all work perfectly. Don’t worry if your collection is mismatched; refilleries welcome any reusable container.

Before heading out, give your containers a quick wash and let them dry completely. Most refilleries will weigh your empty containers first, then you fill them with products, and pay based on the weight of just the contents. It’s that simple!

First-timers should know that staff members are genuinely excited to help you navigate the space. Don’t hesitate to ask questions about products, container sizes, or the weighing process. Many refilleries offer a starter selection of containers for purchase if you need them.

Consider bringing a shopping list and start small with a few staple items like grains, beans, or cleaning supplies. This helps you get comfortable with the process without feeling overwhelmed. Remember, every refill—no matter how small—makes a positive environmental impact. Local farmer Maria from Green Valley Farm shares, “Switching to refillery shopping reduced our farm store’s packaging waste by 60 percent while strengthening our community connections.”

Best Products to Start With

Starting your refillery journey doesn’t have to be overwhelming. Begin with pantry staples you already use regularly in your kitchen. Dry goods like rice, quinoa, oats, and lentils are perfect first choices since they’re easy to measure, transport in reusable containers, and store at home. Flour, sugar, and various beans are also excellent beginner options that keep well and integrate seamlessly into everyday cooking.

Once you’re comfortable with dry goods, expand to cooking oils, honey, maple syrup, and nut butters. These items significantly reduce single-use plastic waste while supporting local producers. Many refilleries also stock cleaning products and personal care items, making them ideal for extending your zero-waste cooking practices beyond food preparation.

Choose products you use frequently to maximize your environmental impact and create lasting sustainable habits in your home.

Finding Refilleries Near Your CSA or Farmers Market

Finding a refillery near your CSA pickup location or farmers market is easier than you might think. These eco-conscious businesses often pop up in the same neighborhoods that support local food systems, creating convenient hubs for sustainable shopping. Start by searching online directories like Litterless or Zero Waste Near Me, or simply ask your CSA coordinator and fellow members for recommendations. Many farmers markets now host refillery vendors alongside produce stands, letting you stock up on pantry staples, cleaning products, and personal care items in one trip.

Don’t overlook natural food co-ops and independent grocery stores, which increasingly offer bulk refill stations. Sarah Chen, who runs an organic vegetable farm in Vermont, discovered that partnering with a nearby refillery helped her customers adopt a more holistic zero-waste lifestyle. She now keeps reusable containers at her farm stand for members who want to refill cleaning supplies after picking up their weekly harvest, proving that local food communities naturally embrace these sustainable solutions.

Return Programs: Closing the Loop on Food Packaging

How Return Programs Work in Practice

The deposit-return system is beautifully simple and helps close the loop on packaging waste. Here’s how it typically works: When you purchase items like milk, yogurt, or specialty sauces from participating farms and producers, you pay a small deposit on each glass container, usually between $1 to $3. Keep those jars and bottles safe at home, then bring them back on your next shopping trip or delivery day.

The producer collects the empties, sanitizes them according to food safety standards, and refills them with fresh products. Once you return your containers, you receive your deposit back, often as credit toward your next purchase. Many local dairies have perfected this system over generations. Take Green Valley Dairy, whose founder shares that their bottle return rate hits 95 percent because customers love the nostalgia and environmental impact of reusable glass bottles.

Some farms make returns even easier by collecting containers during regular delivery routes or at farmers market booths. The key is keeping containers clean and returning them promptly so they can get back into circulation. This simple practice significantly reduces single-use packaging while strengthening the connection between you and your local food producers.

Collection of clean reusable glass containers and jars arranged for return program
Container return programs allow bottles and jars to be sterilized and reused multiple times, closing the loop on packaging waste.

Success Stories from Local Farms

Green Valley Cooperative in Vermont has transformed their dairy operation by partnering with local refilleries to distribute milk, yogurt, and cream in returnable glass containers. Since launching their return program two years ago, they’ve eliminated over 50,000 single-use plastic containers from their distribution chain. Farmer Sarah Mitchell explains their success: “Customers love the nostalgic feel of glass bottles, and we’ve seen a 30% increase in repeat purchases. The deposit system ensures a 95% return rate, and we simply sanitize and refill.” The cooperative now saves $8,000 annually on packaging costs while building stronger relationships with customers who appreciate knowing exactly where their food comes from and how it’s packaged sustainably.

Making Refilleries Work in Your Community

Talk to Your Local CSA or Farm Stand

Your local CSA or farm stand might be closer to offering refill options than you think! Many farmers are already passionate about reducing waste and would welcome the conversation. Start by asking if they’d consider accepting clean containers for items like honey, maple syrup, grains, or dried beans. You could say something like, “I’m trying to reduce my packaging waste. Would you be open to filling my own containers?” Most farmers appreciate customer feedback and are part of broader community food networks where sustainable ideas spread quickly. If enough customers express interest, you might inspire a whole new service. Bring clean glass jars or cloth bags on your next visit and gauge their response. Remember, farmers are innovators at heart, and your request could spark the next step in their sustainability journey.

Starting Small: DIY Community Refill Initiatives

You don’t need a storefront to start making a difference! Community-based refill initiatives are sprouting up everywhere, bringing zero-waste shopping closer to home. Consider organizing a neighborhood buying club where members pool orders for bulk staples like grains, beans, and oils, then divide them into personal containers during monthly meetups.

Co-op refill programs work beautifully in community gardens or farmer’s markets. Local growers we’ve spoken with have successfully partnered with neighbors to offer weekly refills of honey, maple syrup, or pantry essentials alongside their fresh produce. One farmer in Vermont started small, offering just olive oil and vinegar refills at market, and now serves 50 regular customers.

Start by connecting with like-minded friends, reach out to local farms about sourcing products in bulk, and designate a regular pickup spot. Even a garage or community center works! These grassroots efforts build strong local food networks while dramatically cutting packaging waste. The key is starting simple and growing organically as your community embraces the refill mindset.

Every time you choose a refillery or participate in a return program, you’re casting a vote for the kind of food system you want to see flourish. These simple acts ripple outward, supporting the organic farmers who nurture your soil, reducing waste that burdens our environment, and strengthening the local economy right in your community. The beauty of this movement is that it doesn’t require perfection. Start small: bring one jar to your next refillery visit, return those glass bottles, or ask your local CSA about their container programs.

Across the country, farmers and entrepreneurs are reimagining how we access wholesome food without the packaging waste. From the small-town refillery partnering with nearby organic growers to the urban farm offering bottle deposits, these pioneers are proving that convenient and sustainable can go hand in hand. Their success stories remind us that change happens one reusable container at a time. By embracing refilleries and return programs, you’re not just reducing your environmental footprint—you’re becoming part of a growing community committed to waste-free living and thriving local farms. Your choices matter, and together, we’re building a more sustainable future, one refill at a time.

Why Your CSA Jam Won’t Set (And the Pectin Science That Fixes It)

Posted by darrell on
0
Culinary and Food Preservation
Why Your CSA Jam Won’t Set (And the Pectin Science That Fixes It)

Match your pectin type to your fruit’s natural pectin level—use regular pectin with high-pectin fruits like apples and citrus, but reach for low-sugar or no-sugar pectin when working with strawberries, peaches, or other low-pectin CSA favorites. Test your fruit’s readiness by mixing one tablespoon of rubbing alcohol with one tablespoon of raw juice; high-pectin fruit forms a solid clump, while low-pectin fruit creates small, separate pieces.

Extract homemade pectin from apple cores and peels saved throughout the season by simmering them in water for 40 minutes, straining, and freezing in measured portions—a perfect zero-waste solution that aligns with your CSA values and gives you complete control over your preserving process. This method works beautifully alongside other food storage techniques for maximizing your harvest.

Calculate pectin amounts based on your desired set firmness rather than blindly following package directions. Soft spreads need less pectin, while firm jellies require the full recommended amount. Add pectin at the right temperature—traditional pectin demands a rolling boil, while low-methoxyl pectin activates at lower temperatures with calcium water.

Understanding how pectin works transforms frustrating preserve failures into consistent successes. When you know why your strawberry jam stayed runny or your grape jelly turned rubbery, you gain the confidence to experiment with each week’s CSA fruit share. Whether you’re processing a bumper crop of raspberries or creating small-batch preserves from heirloom plums, mastering pectin science ensures your homemade jams and jellies capture the pure essence of local, organic fruit.

What Pectin Actually Does in Your Jam Jar

Mason jar of perfectly set strawberry jam with wooden spoon showing gel consistency
Properly set jam with ideal gel consistency demonstrates the successful interaction of pectin, sugar, and acid.

The Natural Pectin in Your CSA Fruit Box

Opening your CSA box each week is like receiving a surprise gift from nature, and understanding which fruits are naturally pectin-rich can transform your jam-making adventures. High-pectin fruits are your allies in creating perfectly set preserves without adding commercial pectin.

Apples, especially tart varieties like Granny Smith, top the list of pectin powerhouses. Their cores and peels contain the highest concentration, making them perfect for creating natural pectin stock. Cranberries, currants, and underripe plums also pack substantial pectin levels. When your CSA delivers these gems, you’re in excellent shape for firm-set jams and jellies.

Citrus fruits deserve special mention. The white pith and seeds of lemons, oranges, and grapefruits are pectin goldmines. Many jam-makers keep citrus peels specifically to boost pectin in other recipes.

On the other end of the spectrum, you’ll find low-pectin favorites like strawberries, peaches, cherries, and ripe pears. These sweet summer treasures taste amazing but need a helping hand to achieve that spreadable consistency. Blueberries and apricots fall somewhere in the middle, containing moderate pectin levels.

Here’s a practical tip from experienced preservers: combine high and low pectin fruits in your recipes. Mixing strawberries with some chopped apple creates a naturally balanced jam. This approach honors the whole-fruit philosophy many CSA members embrace while reducing waste. Understanding your fruit’s pectin personality helps you work with nature rather than fighting against it, creating delicious preserves that celebrate each season’s bounty.

Assortment of fresh CSA fruits including strawberries, peaches, cherries and apples on wooden table
Different fruits contain varying natural pectin levels, requiring different approaches for successful jam-making.

The Magic Triangle: Pectin, Sugar, and Acid

Creating perfect jam or jelly is like conducting a beautiful symphony where three key players must work in harmony: pectin, sugar, and acid. Understanding this magic triangle will help you transform your CSA fruit bounty into gorgeous preserves every time.

Think of pectin as the framework builder. These natural plant fibers need the right conditions to link together and form that satisfying gel structure. But pectin can’t do it alone. This is where sugar steps in as the essential assistant. Sugar pulls water away from pectin molecules, allowing them to bond more easily. It typically takes about 55-65% sugar content in your mixture to achieve the ideal gel. While that might sound high, this concentration is what gives your preserves their characteristic texture and helps preserve them safely.

The third player, acid, acts as the catalyst that makes everything happen. Pectin needs an acidic environment with a pH between 2.8 and 3.4 to gel properly. Without enough acid, your pectin molecules remain too negatively charged and repel each other rather than bonding. That’s why lemon juice or citric acid often appears in jam recipes, especially when working with low-acid fruits like strawberries or pears.

During cooking, heat activates this chemical dance. As your fruit mixture boils, water evaporates, concentrating the sugar and bringing all three elements into the perfect balance. The mixture reaches its gel point typically around 220°F, when the magic triangle aligns just right.

Understanding these interactions helps you troubleshoot problems. Runny jam? You might need more acid or pectin. Too stiff? Perhaps you used excess pectin or overcooked the mixture. With this knowledge, you’ll confidently preserve every precious fruit from your farm share.

Types of Pectin and When to Use Each One

Regular vs. Low-Sugar Pectin for Organic Fruit

When you’re transforming your CSA fruit haul into delicious preserves, choosing between regular and low-sugar pectin can make all the difference in your final product. Understanding these options helps you match pectin type to your taste preferences and the natural sweetness of your organic fruit.

Regular pectin, also called high-methoxyl pectin, needs substantial sugar to work its magic—typically a 1:1 fruit-to-sugar ratio. This means if you’re working with 4 cups of crushed strawberries, you’ll need about 4 to 7 cups of sugar. The chemistry behind this is fascinating: regular pectin requires both sugar and acid to create that perfect gel structure. While this produces traditional, sweet preserves with excellent shelf stability, it can sometimes mask the bright, fresh flavors of your farm-fresh organic fruit.

Low-sugar or no-sugar-needed pectin offers wonderful flexibility for CSA members who prefer less sweetness or want to highlight their produce’s natural flavors. These modified pectins work through different chemistry, using calcium rather than sugar to gel. You can use anywhere from no sugar to about half the amount required by regular pectin. This is perfect when you receive extra-sweet peaches or perfectly ripe berries that don’t need much enhancement.

Many sustainable-minded preservers appreciate low-sugar pectin for reducing overall sweetener consumption and letting organic fruit shine. However, these preserves typically have a softer set and shorter shelf life. Choose regular pectin for classic, firm jellies and low-sugar varieties when showcasing your harvest’s authentic taste.

Making Your Own Pectin from Apple Scraps

If you’re part of a CSA and find yourself with an abundance of apples, don’t toss those cores and peels! Making your own pectin is a rewarding zero-waste solution that transforms scraps into liquid gold for your preserving projects.

Apple scraps are naturally high in pectin, especially when slightly underripe. Start by collecting cores, peels, and any bruised portions from about four pounds of apples. Place them in a large pot with enough water to just cover the scraps, plus two tablespoons of lemon juice to help extract the pectin. Bring to a boil, then reduce heat and simmer for about 45 minutes until the apples are soft and mushy.

Strain the mixture through a fine-mesh sieve or cheesecloth, pressing gently to extract all the liquid. You’ll end up with a cloudy, slightly thick liquid that’s your homemade pectin. To test its strength, pour a tablespoon into a small bowl and refrigerate for 20 minutes. If it gels nicely, you’ve got high-pectin extract perfect for low-sugar jams.

Store your homemade pectin in clean jars in the refrigerator for up to one week, or freeze it in ice cube trays for convenient portions that last up to six months. Each ice cube equals roughly one tablespoon, making it easy to add pectin power to small batches of jam.

When using homemade pectin, remember it’s less concentrated than commercial versions. Generally, you’ll need about one cup of homemade pectin per four cups of crushed fruit, though some experimentation helps you find your perfect gel.

Hands pouring homemade apple pectin into copper preserving pan with apple scraps
Homemade pectin extracted from apple scraps offers a zero-waste solution for CSA members with abundant fruit.

Matching Pectin to Your CSA Harvest

Your CSA box arrives brimming with gorgeous fruit, and you’re ready to preserve that peak-season flavor. But which pectin approach will give you the best results? Let’s match common CSA fruits to their ideal pectin partners.

Strawberries, the quintessential early summer treat, have low natural pectin and benefit from added pectin. Use commercial low-sugar pectin if you want to showcase their delicate sweetness without excessive sugar. These beauties also pair wonderfully with a splash of lemon juice to boost both flavor and natural pectin levels.

Peaches and apricots are moderate in natural pectin but require some assistance for proper gelling. Traditional powdered pectin works beautifully here, creating those classic spreadable preserves. Since stone fruits can be quite sweet, you might experiment with reduced-sugar pectin formulas to let their natural flavor shine through.

Blueberries and blackberries contain moderate pectin levels, making them forgiving preserving partners. You can often use less commercial pectin than package directions suggest, or try combining them with high-pectin fruits like tart apples for a completely natural set. A local farmer, Maria from Riverside Farm, shared that she adds grated apple to her wild blackberry jam with stunning results and no commercial pectin needed.

Cherries need substantial pectin assistance, as they’re quite low in natural pectin. Liquid pectin added at the end of cooking helps preserve their vibrant color and prevents overcooking. Don’t skip the lemon juice with cherries, as the acidity is crucial for both safety and gelling.

Plums offer a pleasant surprise: they’re naturally high in pectin, especially when slightly underripe. You can often make plum jam with minimal or no added pectin, relying on the fruit’s natural thickening power combined with adequate cooking time.

Here’s your quick decision framework: Check your seasonal fruit against these categories. High-pectin fruits need little help. Low-pectin fruits need commercial pectin or a high-pectin companion fruit. When in doubt, start with small test batches to discover what works best for your taste preferences and the specific characteristics of your locally grown harvest.

Troubleshooting Common Pectin Problems

Even experienced preservers encounter pectin challenges, but understanding what went wrong helps you create perfect preserves next time. Here are the most common issues and their solutions.

Runny jam is perhaps the most frustrating problem. This usually happens when pectin levels are too low, cooking time was insufficient, or the fruit-to-sugar ratio was off. Always test for the gel point using a cold plate test before removing your jam from heat. If you’ve already made runny jam, you can actually remake it by measuring the quantity, adding fresh pectin according to package directions, and reprocessing. For future batches, ensure you’re using ripe (not overripe) fruit and following tested recipes exactly.

Overly stiff preserves occur when there’s too much pectin or the mixture was cooked too long. This often happens with high-pectin fruits like apples or when combining commercial pectin with naturally pectin-rich ingredients. The solution is reducing cooking time or using less pectin. Some experienced preservers even skip commercial pectin entirely with high-pectin fruits, relying on natural sources instead.

Sugar crystals forming in finished jam indicate either too much sugar, insufficient acid, or crystallization during cooling. Always wipe down pan sides during cooking to remove sugar crystals, and ensure proper acid balance. Adding a tablespoon of lemon juice can prevent this issue.

Uneven setting, where some jars gel perfectly while others remain liquid, typically results from inconsistent processing or filling jars with mixture at different temperatures. Keep your preserve mixture at a consistent simmer while filling jars, and process all jars together. Mastering these food preservation techniques takes practice, but each batch teaches valuable lessons.

Remember, small variations in fruit ripeness and natural pectin content mean some adjustments are normal. Keep notes on what works with your particular fruit sources, and you’ll develop an intuitive sense for creating perfect preserves every time.

Farmer arranging homemade preserve jars at farm stand with berry fields in background
Small-scale farmers successfully turn CSA fruit into value-added preserves by understanding pectin science.

Farmer Success Story: Sarah’s Berry Farm Preserves

When Sarah Mitchell started her 50-member CSA near Guelph, Ontario, she quickly realized her abundant berry harvests were overwhelming her members. “People loved getting fresh strawberries and raspberries, but they couldn’t use them all before spoilage,” she recalls. That challenge sparked her journey into preserve-making, which eventually became her farm’s signature product line.

Sarah’s first attempts were frustrating. “I followed recipes exactly, but results were wildly inconsistent. One batch would set perfectly, the next would be syrupy.” The breakthrough came when she started testing different pectin types with her specific fruit varieties. She discovered that her early-season strawberries needed commercial pectin for reliable results, while her late-summer berries naturally contained enough pectin when combined with apple scraps from a neighboring orchard.

Her biggest lesson? Temperature matters more than most recipes admit. “I invested in a good candy thermometer and learned the gel point for each fruit type,” Sarah explains. “Strawberries hit gel at 220°F, but my low-sugar raspberry preserves needed 218°F to avoid overcooking.”

Sarah now teaches preserve-making workshops at her farm, sharing her tested formulas with CSA members. Her practical tip for beginners: start with high-pectin fruits like tart apples or currants mixed with lower-pectin berries. This natural approach gave her confidence before exploring commercial pectins and various canning methods.

“The key is keeping detailed notes,” she advises. “Write down fruit variety, ripeness, pectin type, and cooking time. After a season, you’ll have your own customized preserve recipes that work every time with your specific ingredients.”

Tips for Sustainable Jam-Making with Seasonal Fruit

Making jam with seasonal fruit from your CSA share is about more than just preserving—it’s about celebrating the full potential of your local harvest. Understanding pectin helps you transform every piece of fruit into delicious preserves, even those that aren’t picture-perfect.

Those slightly bruised peaches or oddly shaped strawberries? They’re jam gold. Simply trim away any damaged spots and use the rest. The pectin doesn’t care about cosmetic imperfections, and you’ll reduce food waste while creating something wonderful. Peak-ripeness fruit contains optimal pectin levels, so when your CSA box arrives overflowing with berries or stone fruit, jam-making preserves that perfect moment.

Consider the pectin content of different fruits when planning your preserves. High-pectin fruits like apples, currants, and citrus need less added pectin, while strawberries, peaches, and cherries benefit from supplemental pectin. You can even save citrus peels and apple cores in your freezer throughout the season—they’re packed with natural pectin perfect for making your own pectin extract.

Match your jam-making schedule to your CSA calendar. Early summer brings strawberries and rhubarb, mid-summer offers abundant berries, and fall delivers apples and grapes. This rhythm connects you to the natural growing season while building a pantry that tells the story of your local harvest. Each jar becomes a time capsule of flavor, capturing sunshine and supporting your community’s farmers with every spoonful.

You now have everything you need to turn your CSA fruit bounty into beautiful, spreadable preserves. Understanding pectin—whether it’s naturally occurring in your berries or added from a package—takes the guesswork out of jam-making and gives you confidence to experiment. Each fruit that arrives in your weekly share is an opportunity to practice your new skills.

Remember, there’s no single “right” way to make preserves. Some batches will be perfectly gelled, while others might turn out softer or firmer than expected. That’s part of the learning process, and even imperfect preserves taste delicious on morning toast or swirled into yogurt.

By mastering pectin, you’re doing more than creating pantry staples—you’re preventing food waste, preserving the peak-season flavors your local farmers worked hard to grow, and building a deeper connection to your food. Start with a simple recipe using high-pectin fruit, then branch out as your confidence grows. Your CSA box is filled with potential, and now you have the knowledge to unlock it. Happy preserving, and don’t be afraid to get creative with flavor combinations as you work through those beautiful fruit shares.

How to Feed Your Pastures Without Breaking the Bank (or the Earth)

Posted by darrell on
0
Livestock & Grazing
How to Feed Your Pastures Without Breaking the Bank (or the Earth)

Test your soil before adding anything to your pastures—a $20 soil test reveals exactly which nutrients your land needs and saves you from wasting money on unnecessary amendments. Many small-scale graziers discover their pastures lack phosphorus or potassium rather than nitrogen, fundamentally changing their fertilization approach.

Start with what you already have by managing manure distribution through rotational grazing. Moving livestock frequently across paddocks naturally fertilizes your pastures while preventing nutrient hot spots near water sources or shade areas. This zero-cost method builds soil health while improving forage quality.

Consider composted chicken manure as your first purchased input if soil tests show nitrogen deficiency—it releases nutrients slowly, costs less than commercial fertilizers, and improves soil structure with each application. Apply 1-2 tons per acre in early spring or split applications between spring and late summer for cool-season grasses.

Time your fertilization with plant growth cycles rather than calendar dates. Cool-season grasses like orchardgrass and fescue respond best to nutrients in early spring and again in late summer, while warm-season grasses thrive with mid-spring applications after soil temperatures reach 60°F.

Build long-term fertility through frost-seeding legumes like clover and vetch into existing pastures each February or March. These plants capture atmospheric nitrogen and share it with neighboring grasses, reducing your fertilizer needs by 50-100 pounds of nitrogen per acre annually. Sarah Chen, who runs a 30-cow grazing operation in Virginia, eliminated her fertilizer budget entirely within three years by establishing a robust clover-grass mix and tightening her rotation schedule to 2-day moves.

Why Your Pasture Needs More Than Just Grass and Good Intentions

Picture your pasture as a bank account. Every time your animals graze, they’re making withdrawals—pulling nutrients from the soil to build muscle, produce milk, and grow healthy coats. The grass itself acts as the teller, converting soil minerals into edible forage. But here’s the catch: without regular deposits, that account runs dry faster than you might think.

The nutrient cycle in healthy pastures works like a well-choreographed dance. Plants draw nitrogen, phosphorus, potassium, and trace minerals from the soil. Animals eat the plants, and some nutrients return through manure. Sounds simple, right? The problem is that this cycle leaks. When you sell meat, milk, or wool, those nutrients leave your farm permanently in the bodies and products of your animals. Meanwhile, nutrients also escape through leaching, erosion, and even the wind carrying away dried manure.

Continuous grazing intensifies this depletion. Without proper rest periods, grass plants can’t develop deep root systems that mine minerals from lower soil layers. The soil structure breaks down, reducing its ability to hold both nutrients and water. What started as lush, diverse pasture gradually transforms into tired ground dominated by weedy species that animals won’t even touch.

The connection between sustainable soil health and forage quality is direct and undeniable. Nutrient-poor soil produces nutrient-poor grass. Animals grazing depleted pastures need more forage to meet their nutritional needs, which means more grazing pressure and further degradation. It’s a downward spiral that affects everything from animal health to your farm’s profitability.

Take Sarah, a grazier from Ontario, who noticed her cattle needed supplemental minerals despite abundant grass. Soil testing revealed severe phosphorus and sulfur deficiencies. By addressing these gaps through targeted fertilization, she saw dramatic improvements in both pasture vigor and herd condition within a single growing season. Her story illustrates a fundamental truth: good intentions can’t replace the minerals your soil is missing.

Farmer's hands holding dark soil sample above green pasture with cattle grazing in background
Soil testing reveals the nutrient status of pastures and guides fertilization decisions for optimal forage production.

Reading What Your Pasture Is Actually Telling You

When and How to Test Your Soil

Testing your soil at the right time makes all the difference in getting accurate results. The best window is late summer through early fall, after the growing season but before you need to make fertilization decisions for next year. Early spring works too, though you’ll want to test before applying any amendments.

For sampling, grab a clean bucket and a soil probe or spade. Walk a zigzag pattern across your pasture, taking 10-15 cores from the top 4 inches of soil. Mix them thoroughly in your bucket, then send about two cups to the lab. Avoid sampling near gates, water troughs, or areas where animals congregate, as these spots aren’t representative of your overall pasture health.

Choose a lab that specializes in agricultural testing and specifically offers pasture analysis. Many university extension services provide affordable testing with recommendations tailored to your region’s soil conditions. Request a test that includes pH, nitrogen, phosphorus, potassium, and organic matter content.

Sarah, a third-generation farmer in Vermont, shares this tip: “Testing each paddock separately helped me discover nutrient variations I never knew existed. Now I fertilize strategically instead of treating everything the same, saving money and boosting productivity.”

Spotting Deficiencies Before They Become Problems

Your pasture will tell you what it needs if you know how to listen. The key is catching nutrient deficiencies early, before they significantly impact your forage quality and animal health.

Start by observing grass color and vigor. Healthy, well-nourished pasture displays rich green coloration and steady growth throughout the growing season. Pale, yellowish grass often signals nitrogen deficiency, while purplish tints can indicate phosphorus needs. Stunted growth or thin stands suggest multiple nutrient limitations that require attention.

Weed patterns provide valuable diagnostic clues too. Dense patches of broadleaf weeds like dandelions, plantain, or dock often indicate compacted soil or imbalanced fertility. Certain weeds thrive where specific nutrients are lacking – for example, clovers naturally fix nitrogen but may dominate when phosphorus levels are adequate while nitrogen isn’t. While some beneficial weeds add diversity, overwhelming weed pressure usually means your desirable grasses aren’t getting what they need to compete effectively.

Walk your pastures regularly during the growing season, paying attention to uneven growth patterns. Bare patches, areas where livestock consistently avoid grazing, or sections that green up later than others all warrant investigation. Take notes and photos to track changes over time.

Emma Rodriguez, who manages a small grazing CSA in Vermont, conducts weekly pasture walks with a simple notebook. This practice helped her identify a calcium deficiency in one paddock before it affected milk production. She says, “My pasture became my teacher once I learned to really see it.”

Fertilization Options That Make Sense for Small-Scale Graziers

Organic Amendments: Working With What Nature Provides

Organic amendments offer a time-tested approach to pasture fertilization that works in harmony with your soil’s natural systems. While they release nutrients more slowly than synthetic options, they provide lasting benefits that build soil health season after season.

Composted manure stands as the workhorse of organic pasture management. Well-aged cattle or horse manure delivers a balanced nutrient profile while improving soil structure and water retention. Apply 2-4 tons per acre annually, ideally in early spring before active growth begins. Fresh manure requires caution due to high nitrogen content that can burn plants and harbor pathogens, so always let it cure for at least six months before spreading.

Raw manure from your own livestock offers a cost-effective solution for small operations. Many graziers successfully spread aged manure during winter months when pastures are dormant, allowing weathering to mellow the nutrients before spring growth kicks in. Just remember that dragging manure across actively grazed areas requires proper timing to avoid parasite cycles.

Bone meal and blood meal provide targeted nutrient boosts when soil tests reveal specific deficiencies. Bone meal supplies phosphorus at rates of 200-400 pounds per acre, particularly valuable for establishing legumes. Blood meal delivers quick nitrogen but costs more than manure-based options, making it better suited for small problem areas rather than entire pastures.

One Wisconsin farmer shared how she transformed tired pastures by spreading two inches of municipal compost each fall. Within three years, her forage production doubled and earthworm populations exploded. Her secret? Patience and consistency rather than expecting overnight miracles.

Set realistic expectations with organic amendments. You’re feeding soil biology first, which then feeds your plants. This slower process means visible results may take a full growing season, but the long-term payoff in soil health makes the wait worthwhile.

Lime and Mineral Amendments: The Foundation No One Talks About

Before you spread a single bag of fertilizer, there’s something even more fundamental to address: your soil’s pH and mineral balance. Think of lime and minerals as the foundation of a house—without them, everything else you build won’t stand strong.

Most pasture grasses thrive between 6.0 and 7.0 pH. When soil becomes too acidic, nutrients get locked up where plant roots can’t reach them, no matter how much fertilizer you apply. That’s where agricultural lime comes in. A simple soil test will tell you if liming is needed, and applying it in fall gives it time to work its magic before spring growth kicks in.

But pH is just the beginning. Calcium, often delivered through lime, strengthens plant cell walls and helps legumes like clover fix nitrogen more efficiently. Sulfur plays a quiet but crucial role in protein synthesis and works hand-in-hand with nitrogen. Many graziers find their pastures transform after addressing sulfur deficiencies, especially on sandy soils.

Don’t overlook trace elements like boron, copper, and selenium. While needed in tiny amounts, these minerals impact everything from legume nodulation to animal health. Sarah Martinez, a Georgia grazier, discovered her pasture’s slow growth wasn’t a nitrogen problem at all—a soil test revealed boron deficiency. After a targeted application, her clover stands doubled.

The beauty of getting your foundation right? You’ll need less fertilizer overall, saving money while building genuinely healthy, resilient pastures. Start with that soil test—it’s the best investment you’ll make.

Legumes as Living Fertilizer Factories

Nature has provided pasture farmers with an elegant solution to one of their biggest expenses: nitrogen fertilizer. Legumes like clover, alfalfa, vetch, and birdsfoot trefoil essentially manufacture their own nitrogen through a remarkable partnership with soil bacteria. These plants host special rhizobia bacteria in tiny nodules on their roots, which convert atmospheric nitrogen into a plant-usable form. When these legumes grow, die back, or get grazed, they release this captured nitrogen into the soil, feeding neighboring grasses at no cost to you.

The numbers are impressive. A healthy stand of white clover mixed into your pasture can fix 100-200 pounds of nitrogen per acre annually, while alfalfa in a rotation can provide even more. This biological fertilizer factory works around the clock during the growing season, reducing or completely eliminating your need for purchased nitrogen fertilizers.

Beyond nitrogen production, legumes deliver additional benefits that make them indispensable for sustainable pastures. Their deep taproots break up compacted soil layers, improving water infiltration and drought resilience. These same roots access minerals from deeper soil horizons, bringing nutrients to the surface where shallow-rooted grasses can use them. Livestock also benefit directly, as legumes typically contain higher protein levels than grasses, improving animal nutrition and weight gains.

Getting started is straightforward. For most pastures, frost-seeding white or red clover in late winter requires minimal equipment and investment. Sarah Mitchell, who manages a grazing operation in Vermont, transformed her pastures by introducing clover five years ago. “My fertilizer bills dropped by 60 percent the first year,” she shares. “The cattle performance actually improved, and I’m building soil health instead of just mining it.”

Aim for a pasture composition of 20-30 percent legumes mixed with grasses for optimal nitrogen fixation and grazing balance.

Close-up of clover flowers growing among pasture grasses in sunlight
Clover and other legumes naturally fix nitrogen from the air, reducing fertilizer costs while improving forage quality.

Timing Your Applications for Maximum Impact

Getting your fertilization timing right can make all the difference between a thriving pasture and wasted effort. The key is synchronizing your applications with both your grass’s natural growth cycles and your livestock’s grazing patterns.

Spring fertilization typically delivers the biggest bang for your buck. Apply fertilizer in early spring when soil temperatures reach about 50°F and grass begins actively growing. This timing gives plants the nutrients they need during their most vigorous growth phase, building forage reserves for the entire grazing season. Sarah Martinez, who runs a sheep grazing CSA in Vermont, schedules her spring applications for mid-April. “I wait until I see that first flush of green,” she explains. “The grass is hungry then, and my animals aren’t out yet, so nothing gets wasted.”

Fall applications offer a second opportunity, particularly if you’re using slower-release organic amendments like compost. Apply six to eight weeks before your first expected frost. This timing allows nutrients to establish in the soil over winter, ready to fuel early spring growth. Fall is also ideal for lime applications, giving it time to adjust soil pH before the next growing season.

Coordinating with your rotational grazing plans requires some strategic thinking. Always fertilize paddocks right after grazing and moving livestock to the next area. This gives the grass a recovery period without animals compacting treated soil or consuming excess nutrients. Plan for at least a three-week rest period before grazing freshly fertilized areas, though organic amendments may allow shorter waiting times.

Split applications work beautifully for budget-conscious farmers. Rather than applying all your fertilizer at once, divide it into smaller doses throughout the growing season. This approach matches nutrient availability with plant uptake, reduces waste, and spreads costs over multiple months. Many successful graziers apply half their annual fertilizer in spring and the remainder in early summer after their first rotation cycle completes.

Making Your Animals Part of the Fertility Solution

Your livestock can be your best fertilization crew—if you know how to direct them. Instead of purchasing expensive inputs, you can harness the natural fertilization power of grazing animals through strategic management that puts nutrients exactly where you need them.

The secret lies in understanding that your animals are mobile fertilizer spreaders. Each cow, sheep, or goat deposits approximately 12-15 manure pats per day, along with nitrogen-rich urine. When animals stay in one spot too long, nutrients concentrate in waste areas while other parts of your pasture go hungry. But through careful planning, you can transform this pattern into an asset.

The rotational grazing benefits extend far beyond just grass management—they’re fundamental to pasture fertility. By moving animals to fresh paddocks every 1-3 days, you create an even distribution of manure and urine across your entire pasture. This regular movement prevents overgrazing while ensuring that nutrients return to the soil uniformly.

Consider Sarah Chen’s 15-acre Oregon farm, where she rotates her mixed herd of cattle and chickens through paddocks. “I was spending thousands on fertilizer until I realized my animals were already providing it,” she explains. “Now I just focus on moving them strategically, and my soil tests keep improving year after year.”

Effective livestock management means matching stocking density to your fertility goals. Higher density for shorter periods concentrates nutrients, while lower density spreads them more thinly. Many farmers find that following cattle with poultry helps break up manure pats and distribute nutrients even more effectively, while adding valuable nitrogen through chicken droppings.

The timing matters too. Grazing during active growing seasons ensures nutrients become available when plants need them most, maximizing recycling efficiency.

Cattle and sheep grazing on green pasture with rotational paddock divisions visible
Rotational grazing distributes manure evenly across pastures, turning livestock into mobile fertilizer applicators.

A Real CSA’s Journey to Better Pasture Fertility

When Sarah Martinez took over Green Meadow CSA in Vermont, her 15-acre pasture told a troubling story. Sparse grass growth, declining animal health, and bare patches had become the norm. Her 25 sheep and rotating flock of laying hens weren’t thriving, and her 40 CSA members were starting to notice the difference in meat and egg quality.

The turning point came after a comprehensive soil test revealed severely depleted phosphorus levels and a pH of 5.2, far too acidic for optimal grass growth. Sarah’s pastures had been grazed for years without any fertility inputs, and the soil was exhausted.

Her solution was both strategic and budget-conscious. She started with lime application to raise the pH, spreading two tons per acre in early fall. The following spring, she divided her pasture into smaller paddocks and began a rotational grazing system that gave each section adequate rest between grazing periods.

For fertilization, Sarah chose a hybrid approach. She applied composted chicken manure from her own flock at 1.5 tons per acre on half the pasture, while treating the other half with a balanced organic fertilizer blend containing rock phosphate and greensand for slow-release minerals. She also introduced white clover into her seed mix, which naturally fixed nitrogen in the soil.

The results were remarkable. Within 18 months, Sarah saw a 60 percent increase in forage density. Her animals gained weight more efficiently, and egg production jumped by 25 percent. The improved pasture quality meant she could reduce supplemental feed costs by nearly 40 percent during the growing season.

Perhaps most telling was the feedback from her CSA members. They noticed richer-tasting eggs and better-quality meat, validating that healthy soil truly does create better food. Sarah now conducts soil tests annually and maintains a rotating fertilization schedule that keeps her pastures productive while building long-term soil health.

Farmer with clipboard examining pasture grass growth and taking notes
Developing a multi-year pasture fertility plan helps CSA graziers balance soil health goals with budget realities.

Building Your Pasture Fertility Plan on a CSA Budget

Year One Priorities: Start Here

Starting your pasture fertility journey doesn’t require massive upfront investments or complicated strategies. Focus on understanding what you’re working with first. Get a baseline soil test within your first month—this single step prevents wasted money on unnecessary amendments and reveals exactly where your pastures need help. Most county extension offices offer affordable testing that provides actionable results.

Your first quick win is addressing any glaring deficiencies the soil test reveals, particularly pH issues. Lime applications can transform struggling pastures within a single growing season, and it’s one of the most cost-effective interventions available. Meanwhile, establish a simple rotation grazing pattern if you haven’t already. Even basic paddock divisions improve nutrient cycling as animals distribute manure more evenly.

Consider Sarah Chen, a first-year grazier in Vermont, who focused solely on soil testing and lime application her first season. “I was tempted to buy expensive fertilizers immediately, but addressing our acidic soil first meant everything else worked better,” she shares. Her pastures showed visible improvement within months, setting a solid foundation for future fertility investments. Keep it simple, measure your baseline, fix the fundamentals, and watch your pastures respond.

Long-Term Thinking for Sustainable Soil Health

Building healthy pastures isn’t about quick fixes—it’s about creating a long-term vision that works with your land and your wallet. Most successful graziers think in 3-5 year cycles, allowing pastures to respond gradually while spreading costs over manageable timeframes.

Start by mapping your pastures and identifying priority areas. Maybe one paddock gets the most use during calving season, or another section has visibly poor growth. Focus your initial investments where you’ll see the biggest returns, then expand year by year as cash flow allows.

A practical approach might look like this: Year one, conduct soil tests and address critical pH issues with lime. Year two, tackle phosphorus deficiencies in your most productive paddocks. Year three, introduce compost applications or add diversity with legumes. This staggered strategy prevents budget overwhelm while building momentum.

Consider Emily Rodriguez, a Montana rancher who transformed depleted grassland over four years. She started with just lime and grazing rotation adjustments, then added compost from local organic farms in year two. By year four, her pasture productivity doubled, and feed costs dropped by 40 percent. “Patience paid off,” she shared. “Each season built on the last.”

Remember that improvements compound over time. Better soil structure means increased water retention, which reduces drought stress. Healthier pastures support more diverse plant communities, which naturally cycle nutrients more efficiently. Your investment today creates resilience that pays dividends for years ahead, making your operation more sustainable and profitable.

Pasture fertilization isn’t just an expense—it’s a strategic investment in the health and longevity of your entire CSA operation. When you nourish the soil, you’re creating a foundation that supports vigorous grass growth, healthier livestock, and ultimately, a more profitable and sustainable business model. The beauty of this approach is that you don’t need to transform your pastures overnight. Start with a single paddock or a manageable test area, apply what you’ve learned about soil testing and fertilization timing, and carefully observe the results. Notice how your animals gravitate toward better-nourished areas and how recovery times improve after grazing.

Many successful graziers have built thriving operations by starting small and scaling up based on what works. One farmer in Vermont began with just composted manure on two acres and gradually expanded her fertilization program as she saw increased stocking rates and fewer health issues in her flock. Remember, resilient pastures act as your farm’s solar panels, converting sunlight into nutrient-dense forage that feeds your animals and nourishes your community. By prioritizing soil health today, you’re building a regenerative system that will support generations of grazing to come. Your pastures—and your CSA members—will thank you.

Never Lose Your CSA Produce Again: How Vacation Holds Keep Your Membership Fresh

Posted by darrell on
0
CSA Finder & Directory
Never Lose Your CSA Produce Again: How Vacation Holds Keep Your Membership Fresh

Filter your CSA search by vacation policy to identify farms that allow you to pause deliveries, swap pickup dates, or donate shares when you’re away. Most Community Supported Agriculture programs understand that life happens—summer getaways, business trips, and family emergencies shouldn’t mean throwing away fresh produce or feeling locked into an inflexible commitment.

Check whether farms offer vacation holds (typically 1-3 weeks per season), rolling credits for missed pickups, or the option to send a friend in your place. Some CSAs provide freezer-friendly items or preserved goods as makeup options, while others partner with food banks to donate your share if you can’t make it. When finding CSA farms with openings, prioritize those with clearly stated vacation terms that match your travel patterns.

Compare how different farms handle advance notice requirements—some need two weeks’ warning while others allow last-minute notifications through member portals or apps. Look for CSAs that build flexibility into their membership structure rather than treating it as an inconvenient exception. Farms with robust vacation policies often demonstrate stronger member retention and community relationships because they recognize that supporting local agriculture shouldn’t add stress to your life.

Understanding these policies before committing helps you maximize the value of your membership while maintaining the consistent support farmers need to plan their harvests. The right vacation policy transforms CSA participation from a rigid obligation into a sustainable, long-term relationship with your local food system.

What Are CSA Vacation Holds and Pause Policies?

Fresh CSA vegetable harvest basket on porch next to travel suitcase
CSA members can enjoy fresh local produce without worrying about waste during vacation periods when farms offer flexible hold policies.

How Vacation Holds Work

Understanding how vacation holds work helps you plan worry-free getaways without losing your investment. Most CSA farms require advance notice, typically ranging from one to two weeks before your scheduled pickup. This gives farmers time to adjust harvest quantities and distribution planning accordingly.

When you activate a vacation hold, your weekly share is essentially paused for the specified period. Some farms allow you to hold one or two weeks per season, while others offer more flexibility based on share length. A 20-week membership might include up to three vacation weeks, for example.

During your hold period, the farm won’t prepare a box for you, which means less food waste and helps farmers plan more accurately. Think of Sarah, a CSA member who travels each summer for work—she schedules her holds in spring, ensuring her greens and tomatoes go to someone who can enjoy them fresh.

What happens to those missed weeks varies by farm. Some extend your membership, adding hold weeks to the end of your season. Others might offer credit toward next year’s share or allow you to donate your portion to local food banks. A few farms use a swap system where members can trade pickup dates, creating a supportive community solution that benefits everyone involved.

Types of Vacation Policies Farms Offer

CSA farms recognize that life happens and members travel, so many have developed flexible vacation policies to accommodate their subscribers. The most common approach is share credits, where you receive a credit for missed weeks that applies to future pickups or next season’s membership. Some farms offer donation options, allowing you to designate your share to local food banks, community organizations, or neighbors in need when you’re away.

Friend pickup policies let you authorize someone else to collect your box, ensuring nothing goes to waste while you’re traveling. This works wonderfully for sharing the farm-fresh experience with family or coworkers. Extended season options give you flexibility by spreading your paid shares across a longer timeframe, so you can skip weeks without losing value.

It’s worth noting that some smaller farms operate with no-pause policies due to operational constraints. These farms plan their harvests precisely based on member counts, making week-to-week adjustments challenging. Understanding why these limitations exist helps you make informed choices when selecting a CSA. Many members find creative solutions like coordinating pickups with friends or preserving extra produce during heavy harvest weeks to balance out vacation times.

Why Vacation Policies Matter for Your CSA Experience

The Cost of Wasted Shares

Let’s say your CSA share costs $30 per week. If you’re away for three weeks during the summer season without a vacation hold policy, that’s $90 worth of fresh, organic produce going to waste. Over two separate vacation periods, you could lose $180 or more from your annual membership. When you’re calculating your share value, these missed weeks significantly impact your investment. Many families find themselves giving away shares to neighbors or watching beautiful vegetables spoil in their absence. With a vacation hold, those same funds get you the produce you actually use, making your CSA membership more affordable and practical for your lifestyle.

Supporting Food Security in Your Community

Many CSA farms have transformed their vacation policies into community support programs that make a real difference. When you can’t pick up your share during vacation, some farms donate those items to local food banks, shelters, or community organizations serving families in need. This means your membership continues supporting local agriculture while helping neighbors facing food insecurity.

Farms like Johnson Family Farm in Vermont have partnered with regional food pantries for years, delivering donated CSA shares weekly. These partnerships provide fresh, organic produce to community members who might not otherwise have access to it. When you choose a CSA with this donation option, taking a vacation becomes an opportunity to give back. You maintain your commitment to the farm through your membership payment, and your absence helps stock community food resources with nutritious, locally grown vegetables. It’s a win-win approach that strengthens community food systems while giving you flexibility.

Farmer recording notes in notebook while standing in vegetable field
Farms track member vacation holds carefully to ensure fair distribution and proper planning throughout the growing season.

Using the CSA Finder Vacation Policy Filter

Finding Farms That Match Your Travel Schedule

Start by honestly assessing your typical vacation pattern. Do you take one two-week trip annually, or several long weekends throughout the growing season? Most CSA Finder tools let you filter farms by their vacation policy specifics. Look for options that show whether farms offer skip weeks, pausing services, or alternative pickup arrangements.

When browsing results, pay attention to the minimum notice requirements. Some farms need three weeks’ advance notice, while others offer more spontaneous flexibility. If your travel schedule is unpredictable due to work, prioritize farms with generous policies or those offering share swaps with other members.

Consider the total number of vacation weeks allowed. A farm permitting four skips might work perfectly if you vacation annually, but could feel restrictive if you travel frequently for business. Many farmers understand life happens and build reasonable accommodations into their programs. Reading member reviews often reveals how accommodating a farm truly is beyond their stated policy. This transparency helps you find a partnership that respects both your commitment to local agriculture and your lifestyle needs.

Questions to Ask Before Joining

Before committing to a CSA membership, ask farms specific questions about their vacation policy to avoid surprises. Start by clarifying how much advance notice they require for pausing deliveries—some farms need a week, while others may require two weeks or more. Find out if there’s a limit on how many weeks you can skip per season, as this varies widely between farms. Ask whether you can donate skipped shares to food banks or if you’re allowed to designate someone else to pick up your box. Understanding the administrative process is crucial—some farms handle vacation requests through online portals, while others prefer email or phone calls. Inquire about refund policies versus credit systems, and whether unused vacation weeks roll over to the next season. These conversations are part of choosing the right farm that matches your lifestyle and travel habits, ensuring a positive experience for both you and your local grower.

Happy family unpacking fresh CSA vegetables in kitchen after vacation
Members who use vacation hold policies return home to fresh shares waiting for them, maintaining the value and joy of their CSA membership.

Real Stories: How Vacation Policies Save Memberships

Meet Sarah, a teacher who joins Green Valley Farm’s CSA every spring. She loves supporting local agriculture but used to dread summer vacation because her fresh produce would go to waste. Last year, she discovered their flexible vacation policy through CSA Finder. “I put my share on hold for three weeks while visiting my parents,” Sarah explains. “When I returned, I didn’t feel guilty about wasted food or money. It made me realize this farm truly values its members.” She’s now in her fourth year with Green Valley and has recommended them to six colleagues.

For farmers like Miguel at Harvest Moon Farm, vacation policies are about building community, not just preventing cancellations. “We started offering a four-week vacation hold after losing several members who traveled frequently for work,” Miguel shares. “Initially, I worried about the logistics, but it’s actually simplified our planning. Members tell us their schedules in advance, and we adjust harvest quantities accordingly.” The result? His member retention rate jumped from 68 percent to 91 percent in just two seasons.

Miguel also noticed an unexpected benefit: members who take vacation holds often return more enthusiastic about their shares. “They miss the fresh vegetables,” he laughs. “We get emails saying they can’t wait to pick up their next box.” This enthusiasm translates into word-of-mouth marketing and stronger community connections at the farm.

Both stories illustrate how vacation policies create genuine partnerships between farmers and members, ensuring everyone thrives while reducing food waste and supporting sustainable agriculture year-round.

What to Do If Your CSA Doesn’t Offer Vacation Holds

Not every CSA offers vacation holds, but that doesn’t mean you’re stuck with wasted produce. With some creative planning, you can make the most of your share even when you’re away.

Consider finding a share buddy to split your weekly box. This arrangement works particularly well with neighbors, coworkers, or friends who’ve been curious about CSAs but hesitant to commit to a full share. You alternate pickup weeks or divide the contents, and they cover your weeks when you travel. Many farms welcome this approach since it keeps members engaged and introduces new people to community-supported agriculture.

Designate a regular recipient for your share during absences. Local food banks, senior centers, community kitchens, and neighbors appreciate fresh, organic produce. Some members even establish standing arrangements where their shares automatically go to a specific organization when they’re traveling. This transforms potential waste into meaningful community support.

Master preserving your produce before your trip. Dedicate time the week before departure to blanch and freeze vegetables, make pestos or sauces, pickle items, or dehydrate herbs. This extends your harvest’s life and provides farm-fresh meals when you return home.

Ask about flexible pickup schedules. While some farms don’t offer formal vacation policies, they might allow occasional pickup day swaps or let you collect a double share before traveling. Open communication with your farmer often reveals unofficial workarounds that benefit everyone while maintaining the farm’s operational needs.

How Smart CTAs Transform Your CSA Farm From Unknown to Sold Out

Posted by darrell on
0
Technology and Innovation
How Smart CTAs Transform Your CSA Farm From Unknown to Sold Out

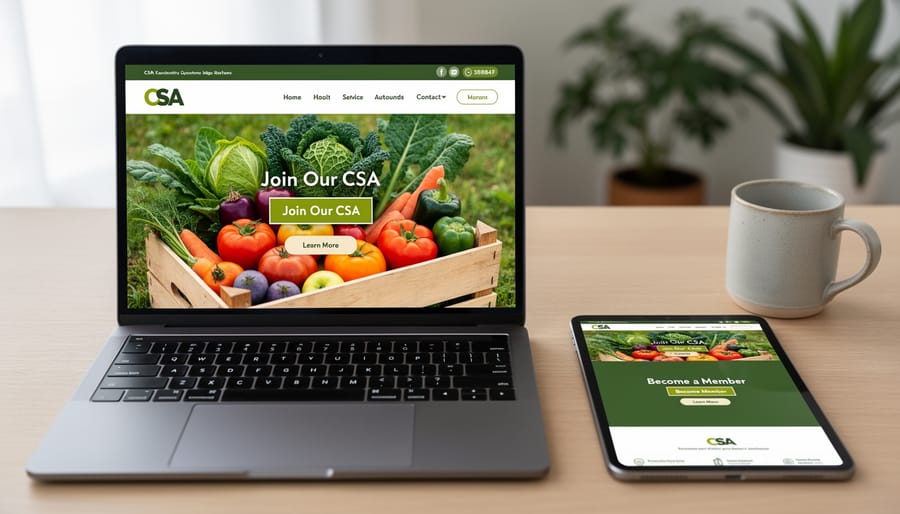
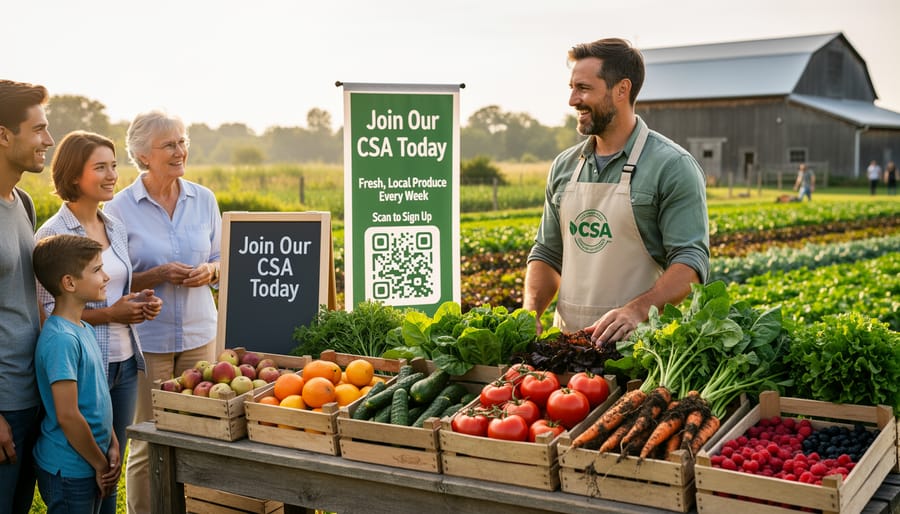
Place a bright “Join Our CSA Today” button above the fold on your homepage where visitors can see it within three seconds of landing—this single change can boost signup rates by up to 40% for small farms. Your call-to-action (CTA) is the bridge between interested visitors and committed CSA members, yet most farm websites bury these crucial conversion points in dense paragraphs or place them where nobody clicks.

Transform your farm’s online presence by treating CTAs as digital farm stands—clear, inviting, and impossible to miss. Unlike corporate marketing, CSA farms have a unique advantage: you’re offering real relationships with real farmers, fresh weekly harvests, and a tangible connection to the land. Your CTAs should reflect this authenticity while making the signup process effortless.

Consider how Green Valley Farm in Ontario increased their CSA membership by 65% in one season simply by adding action-oriented buttons throughout their website and email campaigns. They replaced vague links like “Learn More” with specific prompts like “Reserve Your Share for Spring” and “Get Farm-Fresh Eggs Delivered.” These weren’t aggressive sales tactics—they were helpful guideposts for people already interested in supporting local agriculture.

Effective digital marketing strategies for CSA farms hinge on understanding that your audience wants to say yes—they just need clear direction on how. This guide will show you exactly how to create CTAs that convert curious visitors into loyal CSA members while staying true to your farm’s values and community-focused mission.

What Makes a CTA Work for CSA Farms (Hint: It’s Not Just a Button)

Farmer's hand pointing to call-to-action button on CSA farm website
Effective call-to-action buttons on CSA websites guide visitors toward membership signup with clear, compelling design.

The Difference Between Generic and CSA-Specific CTAs

Generic CTAs like “Learn More” or “Click Here” are the marketing equivalent of saying “something’s here” without explaining what makes it special. For CSA farms, these vague phrases miss the opportunity to connect with your community’s unique interests and concerns.

Instead, craft CTAs that speak directly to what your members care about. When someone visits your CSA website, they’re wondering about harvest timing, getting to know who grows their food, and understanding what they’ll receive. A CTA like “Reserve Your Summer Harvest” immediately addresses seasonal planning and creates urgency, while “Meet Your Farmers” builds the personal connection that sets CSAs apart from grocery stores.

Context makes all the difference. Consider the farm that changed their homepage button from “Sign Up” to “Join Our Farm Family for 2024.” Their conversion rate jumped because the new CTA emphasized community belonging rather than just a transaction. Another successful example: “Get Your Weekly Veggie Guide” performs better than “Download Now” because it clearly communicates the value members receive.

The key is specificity. Your CTAs should reflect the real reasons people choose CSA membership: fresh seasonal produce, supporting local agriculture, and becoming part of a sustainable food system.

Where to Place CTAs That Actually Get Clicked

Your Homepage: The First Handshake

Your homepage is where potential members first discover your farm, so think of your CTA as a warm, welcoming handshake rather than a pushy sales pitch. Position your primary CTA above the fold—that’s the portion visitors see without scrolling. A clear, action-oriented button like “Join Our CSA Today” or “Reserve Your Weekly Harvest” works beautifully here, paired with a brief sentence explaining the immediate benefit: “Get farm-fresh vegetables delivered every week starting this spring.”

Below the fold, consider softer CTAs that nurture interest without demanding commitment. A newsletter signup with copy like “Get Growing Tips & Farm Updates” invites visitors to stay connected at their own pace. One successful organic farm in Vermont increased signups by 40% by offering a free seasonal planting guide in exchange for email addresses—a gentle way to build relationships before asking for full membership commitments. Remember, your homepage should guide visitors naturally toward action while respecting their decision-making journey.

Blog Posts and Educational Content

Your blog content offers the perfect opportunity to naturally guide readers toward membership. When sharing a seasonal recipe featuring heirloom tomatoes, include a simple CTA like “Join our CSA to enjoy these varieties in your weekly box.” This feels organic because readers are already imagining the produce.

Farming updates work beautifully for CTAs too. After describing your recent strawberry harvest, add “Reserve your share for next season’s berry bounty.” This creates excitement and urgency without feeling pushy.

Gardening tips attract engaged readers who value growing food. When explaining crop rotation techniques, try “Want expert-grown organic produce without the guesswork? Our CSA delivers weekly.” This acknowledges their interest while offering a solution.

The key is matching your CTA to the content context. Educational posts build trust, making readers more receptive when you invite them to take the next step. These CTAs complement your broader digital marketing channels by converting curious visitors into committed members. Keep CTAs concise, relevant, and focused on the value members receive rather than just asking for a purchase.

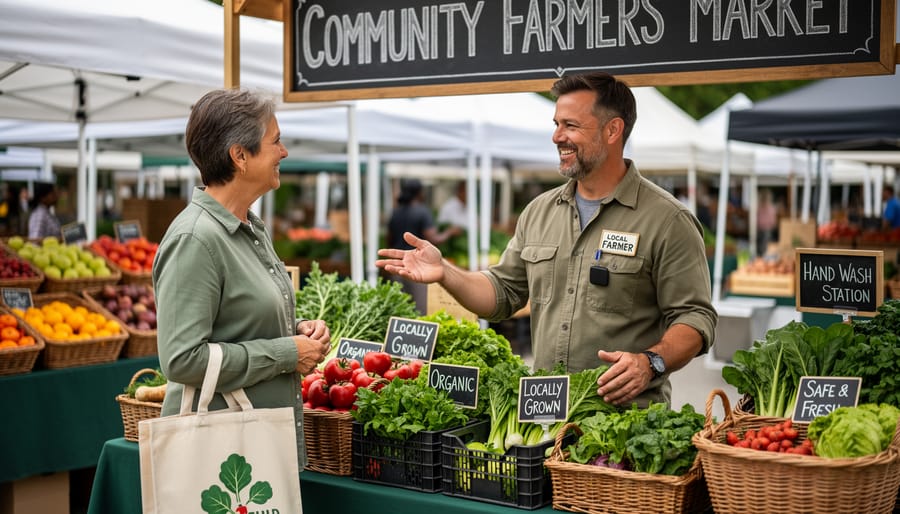
Farm Visit and Market Pages

Your farm visit and market pages naturally attract engaged community members who are already curious about your operation. This is prime real estate for strategic CTAs that guide visitors toward membership. After listing your farmers market schedule, add a simple button: “Reserve Your Weekly Box – Skip the Market Rush!” This taps into convenience while maintaining that personal connection. On farm tour pages, include CTAs like “Loved What You Saw? Join Our Farm Family Today” immediately following visit details. Consider adding a seasonal urgency element: “Only 15 Spring Shares Remaining” creates gentle motivation without pressure. One successful Pennsylvania farmer includes a post-visit CTA offering a 10% discount code for attendees who sign up within 48 hours of their tour, converting that warm in-person experience into immediate action.

Writing CTAs That Speak to Your Community

Use Action Words That Reflect CSA Values

The words you choose for your CTAs can make all the difference in connecting with potential CSA members. Action verbs that reflect community values and sustainable living resonate deeply with environmentally conscious consumers.

Start with “Join” to emphasize the community aspect of your CSA. This simple word invites people to become part of something larger than a transaction. “Reserve Your Share” works beautifully for seasonal signups, creating a sense of exclusivity while highlighting the share-based model.

“Connect With Your Farmer” bridges the gap between producer and consumer, addressing the desire for transparency that many organic food seekers value. For donation or volunteer opportunities, use “Support Local Agriculture” to appeal to community-minded individuals.

“Grow With Us” serves double duty, suggesting both personal growth through sustainable living and the literal growing of your farm community. “Start Your Farm Fresh Journey” works well for newcomers unfamiliar with CSAs.

Other effective phrases include “Discover Seasonal Eating,” “Commit to Local Food,” and “Build Food Security Together.” These action words go beyond simple transactions and speak to the values-driven decisions your target audience makes daily. Choose verbs that feel authentic to your farm’s mission while inspiring immediate action.

Address Common Hesitations Head-On

Potential CSA members often hesitate due to understandable concerns about commitment, variety, and convenience. Your CTAs can directly address these worries with reassuring language that removes barriers to signup. Instead of a generic “Join Now,” try “Start with a Half Share—No Long-Term Commitment” to ease fears about overcommitting. This approach speaks directly to what members look for when considering a CSA investment.

For variety concerns, CTAs like “Get 15+ Different Vegetables Weekly” or “See This Week’s Harvest” provide concrete details that build confidence. Address pickup logistics head-on with phrases such as “Three Convenient Pickup Locations” or “Switch Your Pickup Day Anytime.” Consider seasonal flexibility too—”Join Anytime, Cancel Between Seasons” respects members’ need for control.

Successful farmer Melissa from Green Valley Farm increased signups by 40% after adding “First Box Free if You’re Not Delighted” to her main CTA. This guarantee-style language transforms risk into opportunity. Remember that building community connections starts with trust, and your CTAs should reflect that understanding by acknowledging real concerns while offering practical solutions.

Create Urgency Without Sounding Pushy

Creating urgency in your CTAs doesn’t require aggressive sales language. Instead, align your messaging with the natural rhythms of farming to create authentic scarcity. For example, “Spring Shares Filling Fast – Reserve Your Spot by March 15th” works because it reflects reality: you genuinely have limited shares available based on your planting capacity.

Frame deadlines around agricultural milestones that your audience understands. Try “Lock in Your Summer Harvest – Planting Starts April 1st” or “Final Week to Join Our Fall CSA Before Seed Orders Close.” These create legitimate time pressure while educating members about farm operations.

Share real updates that build natural urgency: “Only 8 shares remaining for this season” or “We’re at 75% capacity for our winter CSA.” Transparency about your actual numbers builds trust while encouraging action.

Seasonal language resonates particularly well. “Get Fresh Strawberries This June – Spring Shares Closing Soon” connects the signup deadline to something members can taste and anticipate. One Massachusetts farm saw a 40% increase in signups by simply adding “Don’t miss tomato season” to their summer CTA, reminding people what they’d be missing. Authentic urgency respects your audience while motivating timely decisions.

Design Elements That Make Your CTAs Impossible to Miss

Colors, Buttons, and Visual Hierarchy

Your call-to-action buttons should stand out like a vibrant red tomato in a field of green lettuce. For farm websites with earthy tones like greens, browns, and creams, choose button colors that create contrast. Bright orange, deep blue, or bold red work beautifully against natural backgrounds without clashing with your farm’s aesthetic.

Size matters when it comes to buttons. Make them large enough to tap easily on mobile phones, since many customers browse while on the go. A good rule is to keep buttons at least the size of your thumb pad. Place your most important buttons, like “Join Our CSA” or “Reserve Your Share,” above the fold where visitors see them immediately.

White space is your friend. Give your buttons breathing room by surrounding them with empty space, making them impossible to miss. Think of it like proper plant spacing in your garden—crowding reduces impact. Keep your button text short and action-focused: “Get Started,” “Sign Up Today,” or “Claim Your Box” work better than lengthy explanations. Test different colors and placements to see what resonates with your community, just like you’d trial different crop varieties to find what grows best.

Mobile-Friendly CTAs for Market Shoppers

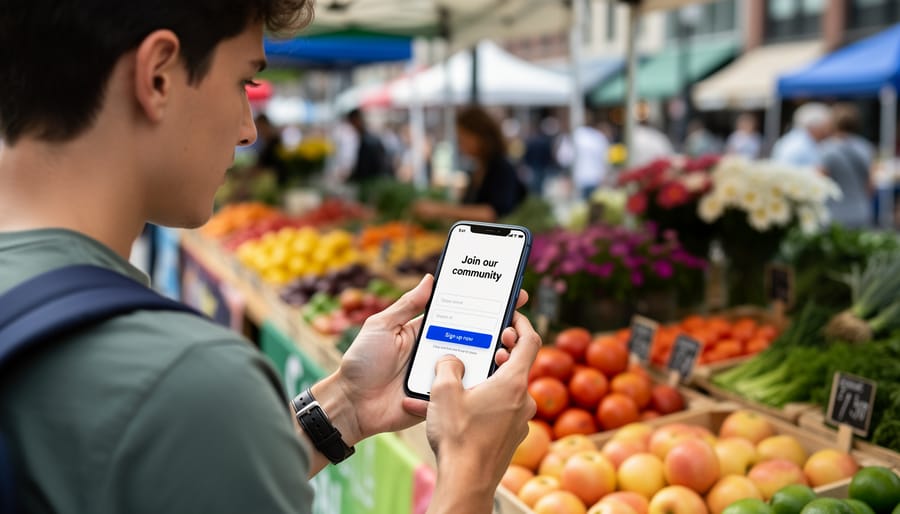
Most of your potential CSA members are discovering your farm while scrolling through their phones at the farmers market or researching dinner options during their commute home. That’s why mobile-friendly CTAs aren’t just nice to have—they’re essential for converting interested shoppers into committed members.

Your CTA buttons need to be thumb-friendly, ideally 44×44 pixels or larger, so people can easily tap them without frustration. Think about those moments when someone’s juggling grocery bags or standing in line—your “Join Our CSA Today” button should be impossible to miss and effortless to click.

Place your CTAs where mobile users naturally look: near the top of your homepage and immediately after compelling content like a farmer success story about this season’s heirloom tomatoes. Avoid tiny text links that require pinching and zooming. Instead, use contrasting colors that pop against your background and create generous spacing around buttons to prevent accidental clicks.

Consider adding quick-action CTAs like “Text Us to Reserve Your Share” or “Call Now for Farm Tour” that leverage smartphone capabilities. When Sarah’s Farm implemented larger mobile buttons and simplified their signup form for phone users, they saw a 40 percent increase in mobile conversions within just two weeks.

Person holding smartphone displaying mobile-friendly CSA farm website at farmers market
Mobile-optimized CTAs allow potential members to sign up while browsing at farmers markets or researching on the go.

Real CSA Success Stories: CTAs That Changed Everything

When Green Valley Farm in Vermont was struggling with only 45 CSA signups in their second season, founder Maria Chen knew something had to change. Her website had a simple “Learn More” button buried at the bottom of her homepage. After attending a local farm marketing workshop, she transformed her approach with a vibrant green button reading “Reserve Your Share of Fresh Organic Veggies Today.” She placed it prominently above the fold and added another at the end of her farm story. The result? Her next season brought 112 signups, more than doubling her membership.

Brookside Community Farm in Oregon faced a different challenge. Owner James Park had plenty of website visitors but few conversions. His generic “Sign Up” button wasn’t creating urgency. He redesigned his CTA to read “Join 50 Families Eating Fresh This Summer” and added a countdown showing spots remaining. He also included a secondary button saying “Take a Virtual Farm Tour First” for hesitant visitors. This two-pronged approach increased his conversion rate by 67 percent, filling his 80-member CSA three weeks earlier than previous years.

Perhaps most inspiring is Sunrise Acres, a small family farm in Pennsylvania. Owner Rachel Thompson had no CTA at all, just her email address listed on a basic webpage. After creating a simple button with the words “Start Your Farm-Fresh Journey” linked to a straightforward signup form, she went from 12 members to 34 in one season. Rachel’s experience proves you don’t need fancy technology or a huge budget. Sometimes a clear, welcoming invitation makes all the difference.

CSA farm owner working at computer with fresh harvest vegetables beside them
CSA farms that implement strategic call-to-action improvements see increased member signups and stronger community connections.

Testing and Tweaking: How to Know What’s Working

Understanding whether your CTAs are working doesn’t require fancy software or a degree in data analysis. Start with the free tools you likely already have access to. Most website builders, email platforms, and social media accounts include basic analytics that show how many people clicked your buttons or links. For example, if you send an email newsletter promoting your summer CSA shares with a “Reserve Your Box” button, check how many subscribers actually clicked it. This simple metric tells you if your message resonated.

Pay attention to conversion rates rather than just total clicks. If 500 people saw your CTA but only 5 clicked, that’s a 1% conversion rate, which suggests something needs adjusting. Try changing one element at a time – maybe swap “Learn More” for “Join Our Farm Family Today” – then compare the results over a week or two.

Sarah, a small-scale organic farmer in Vermont, discovered her signup rates doubled when she tested buttons with warmer language like “Start Your Fresh Food Journey” instead of generic phrases. She simply kept notes in a spreadsheet tracking each version’s performance.

Watch for patterns in timing too. Do CTAs in Tuesday morning emails perform better than Friday afternoons? Does your Instagram story CTA for farm tours get more taps on weekends? These insights help you optimize when and where you place your calls to action. Remember, even small improvements in CTA performance can mean several new CSA members throughout the season, making this simple testing worthwhile for your farm’s growth.

Your CTAs are the digital handshake between curious visitors and committed CSA members. They’re the moment when someone’s interest in fresh, organic produce transforms into real support for your sustainable farming mission. Every button, form, and link on your website holds the potential to grow your farm community and strengthen local food systems.

Take a moment this week to audit your current CTAs. Choose just one to improve—maybe it’s adding urgency to your signup button, creating a mobile-friendly form, or testing a more personal message that reflects your farm’s unique story. Small changes can yield significant results, just like the careful tending of seedlings leads to abundant harvests.

Remember, you’re not just marketing vegetables; you’re inviting people into a meaningful relationship with their food and the land that grows it. Every CSA member who joins through an effective CTA becomes part of your farm’s success story, supporting sustainable agriculture and enjoying the freshest produce their region has to offer.

Your farm has an incredible story to tell and a community waiting to be nurtured. With thoughtful, well-crafted CTAs, you’re building bridges that connect passionate growers with conscious eaters, one click at a time. Start today, and watch your community flourish.

How Compost Facilities Are Transforming CSA Food Waste Into Farm Gold

Posted by darrell on
0
Community Partnerships and Networks
How Compost Facilities Are Transforming CSA Food Waste Into Farm Gold

Partner with an established compost facility within 30 miles of your CSA operation to handle agricultural waste while securing nutrient-rich amendments for your soil. Contact local municipal composting programs first—many offer reduced rates or free compost in exchange for providing steady streams of clean, organic material from farm operations.

Transform crop residues, unsold produce, and plant trimmings into revenue streams by collecting member food scraps through your CSA distribution model. Successful farms like Green Acre Organics increased soil fertility by 40% while cutting amendment costs in half by implementing member drop-off bins at pickup locations, creating a closed-loop system that strengthens community connections.

Establish on-farm windrow composting for operations processing over 50 cubic yards annually, which pays for itself within two growing seasons through reduced input costs. This approach works particularly well when building food networks that prioritize sustainability—members appreciate transparency about waste management and often pay premium share prices for farms demonstrating environmental stewardship.

Negotiate collection agreements with restaurants, grocers, and schools to supplement your compost feedstock, diversifying material sources while generating tipping fee income. Start small with two to three local partners who share your organic values, ensuring contamination-free inputs that meet organic certification standards. Many CSA farmers report that strategic composting partnerships reduce their fertility expenses by 30-60% while improving soil structure, water retention, and crop yields within just three seasons.

The Role of Compost Facilities in CSA Networks

Aerial view of commercial compost facility with steaming windrow rows
Commercial compost facilities process organic waste through windrow composting methods, creating valuable soil amendments for agricultural operations.

What Makes a Compost Facility CSA-Friendly

Not all compost facilities are created equal when it comes to serving CSA farms. The best partnerships happen when certain key factors align perfectly with a farm’s unique needs.

Location matters tremendously. Ideally, a CSA-friendly compost facility sits within 30 miles of the farm, keeping transportation costs reasonable and carbon footprint low. When Green Valley Farm partnered with a nearby municipal composting site, they cut their soil amendment costs by 40% simply because delivery was affordable and convenient.

Processing capacity is another crucial consideration. CSA farms need facilities that can handle their waste volume while also supplying enough finished compost for their growing needs. A small farm producing 2-3 tons of plant waste annually needs a facility that won’t be overwhelmed by regular drop-offs. Similarly, when spring planting rolls around, you want assurance there’s enough quality compost available.

Quality standards separate exceptional facilities from mediocre ones. Look for operations that conduct regular testing for nutrient content, pH levels, and potential contaminants. CSA-friendly facilities typically follow strict protocols, ensuring their finished compost meets organic certification standards if needed. Temperature monitoring during the composting process guarantees proper pathogen elimination.

Communication and flexibility round out the picture. The best facilities work collaboratively with farmers, offering pickup schedules that match harvest rhythms and providing technical advice about application rates. Some even offer custom blending services, mixing compost with other organic materials to meet specific crop requirements. This partnership approach transforms a simple vendor relationship into a valuable resource for sustainable growing success.

Types of Composting Methods Used

Compost facilities serving CSA networks typically employ several proven methods, each offering unique advantages for different scales and operational styles.

Windrow composting remains the most popular choice for larger operations. This method arranges organic materials into long, narrow rows that are periodically turned to introduce oxygen. It’s cost-effective and straightforward, making it perfect for CSAs processing significant volumes of farm waste. The main drawback? It requires substantial land space and can take several months to produce finished compost. However, many successful CSA farmers appreciate its simplicity and reliability for creating nutrient-rich soil amendments.

Aerated static pile systems offer a middle ground between simplicity and efficiency. These piles remain stationary while air is forced through pipes embedded in the material. This approach speeds up decomposition and reduces odors, which is particularly valuable for facilities near residential areas. The trade-off involves higher initial equipment costs, but many CSA partnerships find the investment worthwhile for consistent, quality results.

In-vessel composting represents the high-tech option, containing materials in enclosed systems with carefully controlled temperature, moisture, and airflow. This method produces finished compost in just weeks rather than months and works beautifully in limited spaces. The catch? Higher upfront costs and technical expertise requirements. Still, for CSAs focused on year-round production or working in urban settings, it’s often the ideal solution.

Vermicomposting uses red wiggler worms to transform organic matter into nutrient-dense castings. This gentle process excels at handling kitchen scraps and creates exceptional fertilizer for vegetable production. It’s wonderfully suited for small-scale CSAs or educational programs where members can participate directly in the composting process, fostering deeper connections between growers and community members.

Building Effective Food Recovery Partnerships

Setting Up Collection and Drop-Off Systems

Getting your food scrap collection system up and running doesn’t have to be complicated. Start by communicating with your CSA members about what materials can be composted and what should stay out. Most facilities accept fruit and vegetable scraps, coffee grounds, eggshells, and plant trimmings, but meat, dairy, and oils typically need different handling.

For collection, provide members with five-gallon buckets or compostable bags they can fill at home. Many successful CSAs set up drop-off stations at weekly pickup locations, making it convenient for members to bring their scraps when they collect their produce boxes. One farmer in Vermont shares how she placed clearly labeled bins at her farm stand, and participation jumped from 30 percent to over 75 percent within two months.

Storage is crucial to prevent odors and pests. If you’re collecting scraps at your farm, invest in sealed containers or a walk-in cooler for temporary storage. During warmer months, plan to transport materials to the compost facility at least twice weekly. In cooler weather, you might stretch this to once a week.

Transportation logistics depend on your volume. Small operations can often manage with a pickup truck and covered bins, while larger CSAs might benefit from partnering with other farms to share a refrigerated trailer. Calculate your expected weekly volume by estimating each household generates about three to five pounds of food scraps per week.

Consider creating a simple tracking system to monitor participation rates and volumes. This data helps you adjust collection schedules and proves valuable when discussing partnership terms with compost facilities. Remember, clear communication and convenient systems are key to maintaining member enthusiasm for your composting program.

What Materials Compost Facilities Accept

Understanding what your compost facility accepts helps CSA members participate confidently in your sustainability efforts. Most facilities welcome a wide variety of organic materials, though guidelines can vary by location.

Food scraps form the backbone of compostable materials. Facilities typically accept fruit and vegetable peels, cores, and rinds, along with coffee grounds, tea bags, eggshells, and bread products. Many also process dairy items like cheese and yogurt, though some smaller operations prefer to avoid these. Cooked foods, grains, pasta, and rice are generally acceptable, making it easy for households to divert nearly all their kitchen waste.

Agricultural waste is another major category. CSA farms can contribute crop residues, plant trimmings, leaves, grass clippings, and even small woody materials like pruned branches. Some facilities accept livestock manure from herbivores, which enriches the final compost product. Straw and hay bedding from animal operations also breaks down beautifully.

Materials to avoid include meat and bones at many facilities, as these attract pests and require higher processing temperatures. Plastic-coated paper, treated wood, pet waste, and diseased plants should stay out of your compost bins. Stickers on produce, rubber bands, and twist ties are common contaminants that members should remove before composting.

When educating your CSA community, provide a simple, visual guide showing acceptable items. One Vermont farm created a refrigerator magnet checklist that members loved. Clear communication prevents contamination and keeps your composting partnership running smoothly, turning what was once waste into nutrient-rich soil that feeds future harvests.

Real-World Success Stories from CSA Farms

Real-world examples show just how powerful these partnerships can be. At Green Meadow Farm in Vermont, partnering with their regional compost facility has transformed their operation over the past five years. The farm now diverts approximately 15 tons of plant waste annually, reducing their waste disposal costs by nearly 40 percent. In return, they receive high-quality finished compost that has dramatically improved their soil structure. Farm manager Sarah Chen reports that their tomato yields increased by 25 percent after two seasons of incorporating the compost, while their water retention improved so much they reduced irrigation needs by a third.

Over in Oregon, Sunrise Valley CSA took a slightly different approach by joining forces with three neighboring farms to create a cooperative composting arrangement with a local facility. This collaborative model, which is transforming communities across the country, allows them to share transportation costs and negotiate better rates for both drop-off and finished compost pickup. The four farms collectively process over 30 tons of organic waste each year. What makes this story particularly inspiring is how they’ve engaged their CSA members in the process. Members can drop off their kitchen scraps at weekly pickup points, creating a closed-loop system that strengthens community bonds while reducing household waste.

Meanwhile, Harvest Moon Farm in Michigan demonstrates what’s possible even for smaller operations. Working with a municipally-run compost facility just 10 miles away, this 8-acre CSA has eliminated their burn pile entirely. They compost everything from crop residues to biodegradable packaging materials. Farmer Tom Rodriguez shares that his soil organic matter has increased from 3.2 percent to 5.8 percent in just four years, leading to healthier plants and fewer pest problems. His members have noticed the difference too, often commenting on the exceptional flavor and shelf life of their produce.

These success stories prove that compost facility partnerships aren’t just environmentally sound—they make solid business sense while delivering better food to your community.

The Economic Benefits for Your CSA

Partnering with a compost facility can transform your CSA’s bottom line while supporting your environmental mission. Let’s explore the tangible financial benefits that make composting partnerships a smart business decision.

First and foremost, you’ll dramatically reduce waste disposal costs. Most farms pay significant fees to haul away organic waste—think culled produce, damaged vegetables, and plant material. By diverting these materials to composting instead, many CSAs report savings of $500 to $2,000 annually on disposal fees alone. Green Acres CSA in Vermont cut their waste hauling costs by 60% after partnering with a local compost facility, redirecting those funds toward member education programs.

Access to high-quality compost at member rates represents another substantial advantage. Commercial compost can cost $30 to $60 per cubic yard, but facility partnerships often provide discounted or even free finished compost. This nutrient-rich amendment improves soil health, increases yields, and reduces the need for external inputs. Over time, better soil means stronger harvests and happier shareholders.

Many CSAs are discovering an innovative revenue stream through member food scrap collection programs. By offering drop-off points for household food waste, you can negotiate better rates with compost facilities based on increased volume. Some farms charge members a small annual fee ($25 to $50) for this convenient service, creating a win-win situation. Members appreciate the sustainability option while your CSA generates modest additional income.

Consider Harvest Moon Farm in Oregon, which launched a member food scrap program generating $1,200 annually while strengthening community engagement. Members feel more connected to the farm’s sustainability mission, leading to improved retention rates.

The financial case is clear: reduced costs, valuable soil amendments, and new revenue opportunities make compost facility partnerships a practical investment in your CSA’s future sustainability and profitability.

Farmer holding dark finished compost with visible organic matter and earthworms
Finished compost from facility partnerships provides CSA farms with nutrient-rich soil amendments that improve crop health and productivity.

Engaging CSA Members in Composting Efforts

CSA members dropping off food scraps at community collection bins during farm pickup
CSA members participate in food scrap collection programs at pickup locations, closing the loop on organic waste.

Creating a Member Food Scrap Program

Launching a member food scrap program is a fantastic way to close the loop in your CSA operation while engaging your community in sustainable practices. Start by assessing your composting capacity and determining how much food waste you can realistically handle each week. If you’re just beginning, consider starting small with 10-20 participating households.

Next, establish convenient collection points at your regular CSA pickup locations. Provide members with five-gallon buckets with tight-fitting lids to transport their scraps. Create a simple guide listing acceptable items like fruit and vegetable peels, coffee grounds, and eggshells, while clearly noting what to avoid such as meat, dairy, and oils that can attract pests or create odor issues.

Communication is key to success. Send a welcome packet explaining the program’s environmental benefits and practical guidelines. Many farmers find that members appreciate knowing exactly how their scraps become nutrient-rich compost that grows their future produce. Consider sharing updates about the composting process through newsletters or social media posts showing the transformation from waste to finished compost.

Set up a simple tracking system to monitor participation and weight collected. This data helps you adjust bucket quantities and demonstrates the program’s impact. One Vermont CSA reported diverting over 2,000 pounds of food scraps from landfills in their first year, creating enthusiasm that attracted new members who valued the farm’s commitment to zero-waste practices.

Finding Compost Facilities Near Your Farm

Finding the right composting solution for your farm doesn’t have to be overwhelming. Start by searching online directories like the US Composting Council’s “Find a Composter” tool or BioCycle’s facility database, which list commercial composters by region. Many state departments of agriculture and environmental protection also maintain lists of certified composting facilities that accept agricultural waste.

Don’t overlook municipal composting programs in your area. Many cities now operate facilities that welcome farm waste and may even offer reduced rates for local agricultural producers. Contact your county extension office—they’re goldmine resources for connecting with nearby composting operations and understanding local regulations.

If existing facilities are too distant or don’t meet your needs, consider collaborative approaches with neighboring farms. Jake Martinez, a vegetable farmer in Oregon, teamed up with three nearby farms to create a shared composting site. “We split equipment costs and labor, turning what seemed impossible into our most valuable resource,” he shares. This cooperative model works especially well for smaller operations.

Check if local landscaping companies, breweries, or food processors might partner with you. They often have organic waste streams and may appreciate a farm pickup service. Some farmers have even turned this into additional revenue by charging tipping fees.

Remember, starting small is perfectly fine. A simple windrow system can grow into something larger as you build experience and identify the best partners for your operation’s unique needs.

Starting Your Own On-Farm Composting

Running your own on-farm composting operation can be a game-changer for CSAs looking to close the loop on organic waste. Before diving in, it’s essential to understand what you’re taking on.

First, assess your space requirements. A basic composting setup typically needs at least 100-200 square feet for active composting, plus additional area for curing and storage. You’ll want a flat, well-drained location with good air circulation but away from property lines to minimize any odor concerns for neighbors.

Permit requirements vary significantly by state and county. Small-scale operations processing only farm waste may fall under agricultural exemptions, while accepting materials from CSA members or other sources often requires solid waste permits. Contact your local agricultural extension office and environmental health department early in your planning process. They can guide you through specific regulations and help you avoid costly mistakes.

Equipment needs depend on your scale. Many farmers start with a simple three-bin system using pallets or concrete blocks, which costs under $500. As you grow, you might invest in a tractor with a bucket loader for turning windrows or a small turner attachment.

Consider processing your own compost when you generate at least two cubic yards of organic waste weekly, have adequate space and equipment, and can dedicate staff time to regular monitoring and turning. The payoff includes nutrient-rich soil amendments, reduced waste hauling costs, and a powerful marketing story for your CSA members.

However, partnering with established facilities often makes more sense for smaller operations or those just testing composting programs. Take inspiration from Green Valley Farm in Vermont, which started by partnering with a local facility before eventually building their own successful operation three years later.

Partnering with compost facilities isn’t just a waste management solution—it’s a transformative step toward building resilient, regenerative CSA operations. By closing the loop between farm, table, and soil, these partnerships create thriving circular food systems that benefit everyone involved. Your members witness firsthand how their food scraps return as nutrient-rich soil amendments, strengthening their connection to the land and deepening their investment in your farm’s success.

The productivity gains are equally compelling. Farmers who’ve embraced composting partnerships report healthier soil structure, improved water retention, and more vigorous crop yields—all while reducing input costs. These tangible results make your operation more sustainable both environmentally and economically, positioning your CSA for long-term viability.

Beyond the practical benefits, composting partnerships demonstrate genuine environmental leadership to your community. Members appreciate supporting farms that walk the talk on sustainability, turning what could be landfill waste into valuable resources.

Ready to explore composting for your CSA? Start by reaching out to local composting facilities to discuss partnership possibilities. Many operators are eager to work with farms and can customize programs to fit your specific needs. Whether you’re processing member contributions, farm waste, or both, there’s a composting solution that can work for your operation. Take that first step today—your soil, your members, and your bottom line will thank you.

How the Journal of Food Protection Keeps Your Local Farm Safe (And Your Family Healthier)

Posted by darrell on
0
Local Food Systems and Distribution
How the Journal of Food Protection Keeps Your Local Farm Safe (And Your Family Healthier)

The Journal of Food Protection bridges the critical gap between laboratory research and the real-world safety practices that keep your family’s food secure. This peer-reviewed publication translates complex food science into actionable guidelines that directly impact how farmers, distributors, and CSA operations handle everything from soil amendments to harvest procedures.

Understanding this connection matters because local food systems face unique challenges that large-scale operations never encounter. Small farms often lack dedicated food safety staff, yet they’re handling fresh produce that moves from field to table within days—sometimes hours. The journal’s research addresses pathogen control during hand-harvesting, proper wash water management for small-batch processing, and temperature monitoring for farmers market vendors. These aren’t abstract concepts; they’re the difference between a thriving local food business and a devastating recall.

For consumers choosing farm-fresh foods, this knowledge base provides reassurance. When your farmer mentions GAPs certification or explains their post-harvest cooling system, they’re applying decades of peer-reviewed science published in venues like the Journal of Food Protection. The research empowers small-scale producers to match—and often exceed—the safety standards of industrial agriculture while maintaining the quality and freshness that drew you to local food in the first place. This intersection of science and sustainable practice makes community-supported agriculture not just environmentally responsible, but genuinely safe for your family.

What the Journal of Food Protection Reveals About Local Food Safety

Farmer washing fresh leafy greens under running water at farm washing station
Proper washing and handling practices at the farm level are critical food safety measures informed by research published in journals like the Journal of Food Protection.

Research That Changes How Your Local Farmer Operates

The Journal of Food Protection might sound like academic territory, but its research directly shapes how your neighborhood farmers handle the food you bring home. Consider leafy greens: studies published in the journal revealed that certain soil amendments and irrigation practices significantly reduced pathogen contamination. Many small-scale farmers now adjust their composting timelines and water sources based on these findings, keeping local food safety standards high.

Egg producers have particularly benefited from journal research on proper washing and storage temperatures. One Wisconsin farmer shared how implementing research-backed cooling protocols extended her eggs’ shelf life by nearly a week while maintaining quality. These aren’t expensive interventions, just science-backed timing adjustments that make real differences.

For farmers creating value-added products like jams, pickles, or fermented foods, the journal provides crucial pH level guidelines and processing temperatures. A Massachusetts farm transformed their preservation methods after learning about specific acidity requirements for safe canning, allowing them to confidently expand their product line.

The beauty of this research is its accessibility through extension services and farming networks. You don’t need a lab coat to benefit from findings about optimal produce washing techniques or storage container materials. These practical applications mean the tomatoes and cucumbers in your CSA box arrive safer and stay fresher, all thanks to ongoing scientific investigation that farmers can actually use.

From Lab to Farm Stand: The Translation Process

The bridge between research published in the Journal of Food Protection and your local farm stand is shorter than you might think. When scientists discover better ways to prevent foodborne illness—whether it’s improved washing techniques for leafy greens or safer composting methods—these findings don’t just sit in academic journals gathering dust.

Extension agents and food safety organizations regularly review this research, translating complex studies into practical guidelines that farmers can actually use. For instance, when researchers identify the ideal temperature for storing tomatoes to prevent bacterial growth, this knowledge becomes part of Good Agricultural Practices (GAPs) certification programs that many small farms pursue.

Your local organic farmer might attend workshops hosted by university extension services, where experts break down the latest science into actionable steps. These same findings influence USDA organic standards and state-level food safety regulations. What started as a controlled laboratory experiment eventually becomes the reason your farmer uses specific water sources for irrigation or maintains certain time intervals between composting and planting.

This translation process ensures that even small-scale growers have access to cutting-edge food safety knowledge, helping them protect their customers while maintaining the sustainable practices that make local food special. The result? Safer produce on your dinner table, backed by solid science.

Critical Food Safety Issues for Local Food Distribution

Overhead view of CSA box filled with fresh colorful vegetables and produce
CSA boxes represent a direct connection between farms and consumers, where research-backed food safety practices ensure quality from harvest to delivery.

Produce Safety Standards You Should Know About

Research published in the Journal of Food Protection offers valuable insights that directly impact how we handle produce from farm to table. For fresh produce, proper washing is your first line of defense. Running water works best – studies show that gently rubbing fruits and vegetables under cool running water removes more contaminants than soaking. Skip the soap or produce washes; plain water is equally effective and won’t leave residues.

Temperature control matters more than many realize. Keep your refrigerator at 40°F or below, and store leafy greens and berries promptly after harvesting or pickup. Research consistently shows that cold temperatures slow bacterial growth significantly. Pro tip from successful farmers: harvest produce in the cooler morning hours when possible to maintain freshness.

Cross-contamination prevention is straightforward but crucial. Use separate cutting boards for produce and raw meats, and wash your hands for at least 20 seconds before handling fresh vegetables. These simple practices, validated through countless studies, protect both you and your family. Remember, locally grown produce from your CSA starts with excellent safety practices at the farm level, and you complete that chain of care in your own kitchen.

Temperature Control and Cold Chain Management

Keeping food at proper temperatures is one of the most critical factors in preventing foodborne illness and maintaining nutritional quality. From the moment vegetables are harvested or dairy products leave the farm, the clock starts ticking. Research published in the Journal of Food Protection consistently shows that even brief temperature fluctuations can accelerate bacterial growth and reduce shelf life.

For local farmers and CSA operations, effective cold chain management means more than just having a refrigerator. It involves pre-cooling harvested produce quickly, maintaining consistent temperatures during transport, and ensuring proper storage at distribution points. One Ontario farmer shared how investing in a portable cooler for market trips reduced spoilage by 40 percent and extended the freshness of leafy greens by three days.

The temperature danger zone, between 4°C and 60°C (40°F and 140°F), allows harmful bacteria to multiply rapidly. Simple practices like harvesting in cooler morning hours, using insulated containers, and monitoring temperatures with affordable thermometers can make a significant difference in food safety and quality for your local food system.

Cross-Contamination Prevention at Small Scales

Small-scale farms successfully prevent cross-contamination through simple, science-backed strategies that don’t require expensive machinery. The key starts with proper handwashing stations positioned at field entrances and packing areas. Many successful farmers use color-coded cutting boards and knives, dedicating specific tools to different crops to prevent pathogen transfer.

Physical separation proves incredibly effective. Creating distinct zones for washing, packing, and storage reduces contamination risks significantly. Research published in food safety journals confirms that even basic spacing between activities dramatically improves safety outcomes.

Smart farmers also implement the “clean-to-dirty” workflow principle, processing freshly harvested produce before handling field equipment or containers. They schedule high-risk items like leafy greens early in the wash cycle, changing water frequently.

One inspiring success story comes from a Michigan farm that eliminated contamination issues by installing simple foot baths at greenhouse entrances and designating harvest-only containers that never touch the ground. These low-cost solutions, backed by evidence-based research, prove that food safety excellence doesn’t require industrial budgets. Regular training sessions where farmers share what works create communities of practice that keep everyone’s standards high while maintaining the personal touch that makes local farming special.

Success Story: How One CSA Farm Improved Safety Using Research-Based Practices

When Sarah Martinez took over Green Valley Farm in Oregon, she knew her CSA operation needed to meet higher food safety standards, but she wasn’t sure where to start. Like many small-scale farmers, she felt overwhelmed by conflicting advice and worried that implementing proper protocols would be too expensive or complicated for her 40-member CSA.

Everything changed when Sarah attended a workshop where an extension agent shared research from the Journal of Food Protection about practical interventions for small farms. One study particularly resonated with her: it showed that simple, science-backed practices could dramatically reduce contamination risks without breaking the bank.

Sarah’s biggest challenge was water management. Her well water tested positive for coliform bacteria during routine testing, putting her entire harvest box operation at risk. Rather than installing an expensive treatment system immediately, she consulted the research and discovered a staged approach. She started by designating separate water sources for irrigation versus washing produce, implementing a basic chlorination system for wash water based on published guidelines, and establishing regular testing schedules.

The transition wasn’t without obstacles. Her team initially resisted the new handwashing protocols and harvest bin sanitization routines, viewing them as unnecessary extra steps. Sarah addressed this by sharing the science behind each practice, explaining how even invisible contamination could make families sick. She also connected these efforts to similar farmers market practices used by successful vendors in her region.

Within one growing season, Sarah’s water tests came back clean, and she experienced zero foodborne illness complaints. Better yet, her CSA membership grew by 35% as word spread about her commitment to safety. Sarah now mentors other farmers, proving that research-based food safety practices aren’t just achievable for small operations—they’re essential for building customer trust and long-term success.

Farmer engaging with customers at farmers market produce stand
Direct communication between farmers and consumers at markets builds trust and allows shoppers to learn about the food safety practices protecting their purchases.

What CSA Members and Farmers Market Shoppers Should Look For

Good Signs Your Farmer Takes Food Safety Seriously

When you’re picking up your farm share or shopping at a local stand, several visible signs indicate your farmer prioritizes food safety. Look for clean, organized displays where produce isn’t touching the ground and harvest containers appear well-maintained. Temperature-controlled storage is crucial—notice if items like leafy greens and berries are kept cool, not sitting in direct sunlight. Farmers who practice good hand hygiene, provide handwashing stations, or use gloves when handling ready-to-eat items demonstrate their commitment.

Pay attention to how farmers discuss their practices. Those who openly share their food safety protocols, explain their washing and cooling procedures, or mention attending food safety workshops show they’re staying informed about best practices. Research published in food safety journals emphasizes that these visible practices directly correlate with microbial safety. Clean water sources for washing produce, proper composting distance from growing areas, and thoughtful harvest timing after rain events all matter. A farmer who welcomes questions about their safety practices is typically one who takes these responsibilities seriously and stays current with recommended standards.

Questions to Ask (Without Seeming Difficult)

Building a relationship with your farmer starts with genuine curiosity. When visiting a farm stand or market, try opening with, “I’d love to learn more about how you keep your produce safe—can you walk me through your harvest process?” This shows interest rather than skepticism.

You might also ask, “What steps do you take to protect your crops from contamination?” or “How do you handle and store produce after harvesting?” These questions invite farmers to share their expertise and pride in their work.

For farms offering CSA shares, consider asking, “Do you follow any specific food safety guidelines or certifications?” Many small-scale farmers implement rigorous practices inspired by research from publications like the Journal of Food Protection, even if they’re not formally certified.

Remember, most farmers are passionate educators who welcome thoughtful questions. Frame your inquiries as learning opportunities: “I’m trying to understand more about food safety—what should I look for when choosing where to buy?” This collaborative approach builds trust while helping you make informed decisions about your food sources.

How Small Farmers Can Stay Current with Food Safety Science

Staying current with food safety science doesn’t require a university library card or an advanced degree. Small-scale farmers have numerous accessible resources at their fingertips to keep their operations safe and compliant.

Your local Cooperative Extension Service is your first stop for practical, research-based guidance. Extension agents translate complex studies from journals like the Journal of Food Protection into actionable steps for real-world farm operations. They offer free or low-cost workshops, farm visits, and personalized consultations tailored to small producers.

Online resources have democratized access to food safety knowledge. The National Sustainable Agriculture Information Service provides downloadable guides on everything from proper washing techniques to record-keeping systems. Many universities now offer free webinars and video tutorials specifically designed for direct-market farmers.

Building connections within your farming community creates invaluable knowledge-sharing networks. Join your regional farmers market association or organic growers group to learn from peers who’ve successfully implemented food safety improvements. These relationships often reveal budget-friendly solutions that work in real farm conditions, not just laboratory settings.

Don’t overlook social media farmer groups where producers share recent research findings and discuss practical applications. Many food safety experts actively participate in these online communities, offering free advice and clarifying new recommendations.

Start small by implementing one improvement at a time. Perhaps it’s upgrading your wash water system or improving your harvest container sanitation. Document what works, share your experiences with fellow farmers, and keep building on your success. Remember, food safety is a journey of continuous improvement, not an impossible destination.

Food safety in local food systems thrives when farmers and consumers work together as partners. The research published in journals like the Journal of Food Protection provides valuable, science-backed guidance that helps small-scale growers implement practical safety measures without losing the personal touch that makes CSA relationships so meaningful. When farmers adopt evidence-based practices for washing, handling, and storing produce, and consumers understand proper food handling at home, everyone benefits from safer, fresher food. This partnership doesn’t diminish the transparency and connection that draw people to local food; rather, it strengthens these relationships through mutual commitment to quality and care. By staying informed about food safety best practices and maintaining open communication, farmers and their CSA members create a food system that’s not only more sustainable and personal, but genuinely safer than ever before.

How Your CSA Farm’s Zinc Use Could Be Harming the Soil You’re Trying to Protect

Posted by darrell on
0
Environmental Sustainability
How Your CSA Farm’s Zinc Use Could Be Harming the Soil You’re Trying to Protect

Zinc plays a curious double role in farming—it’s an essential micronutrient your crops need to thrive, yet when concentrations build up beyond natural levels, this heavy metal becomes a silent threat to soil health, water quality, and the very sustainability we work to protect. In community-supported agriculture operations, zinc typically enters the system through galvanized equipment, certain fertilizers, and livestock feed supplements, accumulating gradually in soils where generations of vegetables will grow.

Understanding zinc’s environmental footprint matters because what happens in your CSA fields doesn’t stay there. Excess zinc interferes with beneficial soil microorganisms, disrupts earthworm populations, and can leach into groundwater or wash into nearby streams during heavy rains. For organic farmers and environmentally conscious growers, this creates a particular challenge—you’re committed to building living soil, but hidden zinc accumulation may be working against you without obvious warning signs.

The encouraging news? Managing zinc impact is entirely achievable with awareness and practical strategies. By testing soil regularly, choosing zinc-conscious inputs, and implementing proven remediation techniques, you can maintain the delicate balance your crops need while protecting the broader ecosystem. The farmers who’ve successfully navigated this challenge share a common thread—they treat zinc management not as a burden, but as another opportunity to demonstrate their commitment to truly sustainable agriculture that nourishes both people and planet.

Why CSA Farms Use Zinc (And Why It Matters)

Zinc plays several important roles on Community Supported Agriculture farms, even though you might not immediately think about this trace element when picking up your weekly veggie box. Understanding these uses helps us appreciate both its value and why managing it responsibly matters so much.

First and foremost, zinc is an essential micronutrient that crops absolutely need to thrive. Plants use zinc to produce chlorophyll, regulate growth hormones, and build strong immune systems against disease. Without adequate zinc, you’ll see stunted growth, yellowing leaves, and disappointing harvests. This is especially crucial for diverse CSA operations growing everything from leafy greens to squash to corn, as different crops have varying zinc requirements.

Many CSA farms also raise livestock as part of their integrated farming systems. Zinc serves as a vital feed additive, supporting animal health, wound healing, and reproductive success. Chickens, pigs, and cattle all need zinc in their diets to stay healthy and productive.

Here’s something that surprises many organic produce enthusiasts: zinc sulfate is actually approved for organic farming as a fungicide. CSA farmers battling common problems like downy mildew on cucumbers or leaf spot on tomatoes can use zinc-based treatments while maintaining their organic certification. This gives farmers another tool in their integrated pest management toolkit without resorting to synthetic chemicals.

Take Sarah Martinez from Green Valley Farm in Vermont, who successfully uses zinc applications strategically during her diverse seven-crop rotation. She applies zinc only where soil tests indicate deficiency and rotates zinc-sensitive crops with those needing higher levels. This approach has increased her yields by 15 percent while keeping her soil balanced.

The key takeaway? Zinc isn’t optional for CSA operations. It’s necessary for healthy crops and animals. The challenge lies in using it wisely to prevent buildup that could harm the very ecosystem these farms work so hard to protect.

The Hidden Zinc Problem in Organic Farming

Compost and Manure: The Double-Edged Sword

When you think of healthy compost and manure, zinc contamination probably isn’t the first thing that comes to mind. Yet these beloved soil amendments can quietly introduce elevated zinc levels into your farmland, creating a challenge that compounds with each growing season.

The source of this problem lies in modern livestock operations. Zinc oxide serves as a common feed additive in poultry, swine, and cattle diets, promoting animal health and growth. While beneficial for livestock, much of this zinc passes through animals undigested and concentrates in their manure. When farmers and gardeners apply these amendments year after year, zinc accumulates in the soil faster than plants can absorb it or natural processes can remove it.

Consider a typical scenario: A CSA farm purchases chicken manure compost to boost soil fertility. The first application works wonderfully, delivering nutrients and improving soil structure. But after five or ten years of annual applications, soil tests reveal zinc levels creeping upward. This gradual accumulation happens because zinc doesn’t break down or wash away easily. It binds tightly to soil particles and organic matter, building up incrementally with each application.

Research shows that fields receiving regular manure applications can accumulate 2-10 pounds of zinc per acre annually, far exceeding what crops remove. Over time, this surplus zinc can reach levels that harm beneficial soil organisms, inhibit plant growth, and potentially contaminate nearby water sources.

The good news? Understanding this dynamic empowers you to make informed choices. Testing both your soil and organic amendments before application helps you track zinc levels and adjust your management practices accordingly. Some farmers have successfully rotated between different amendment sources or reduced application rates while maintaining healthy, productive soils.

Farmer holding dark compost material with visible earthworms
Compost and manure are valuable soil amendments for organic farms, but testing for zinc content helps prevent long-term accumulation problems.

Organic Fungicides and Foliar Sprays

Many organic growers rely on zinc-containing products for disease management, particularly zinc sulfate and zinc oxide formulations approved for organic certification. These foliar sprays effectively combat fungal issues like downy mildew and help correct zinc deficiencies in crops. However, even organic-approved products require thoughtful application.

The challenge lies in soil accumulation over time. While zinc is essential for plant health, repeated applications can slowly build up in your soil, potentially reaching levels that affect beneficial microorganisms and earthworm populations. Think of it like saving money in a bank account—small deposits add up over years of use.

At Green Valley Farm in Vermont, Sarah Martinez discovered elevated zinc levels after a decade of regular fungicide applications. She adjusted her approach by rotating with copper-based alternatives and incorporating soil testing into her annual routine. Her soil zinc levels stabilized within three growing seasons.

To manage zinc accumulation responsibly, apply fungicides only when necessary rather than on a preventive schedule, use the minimum effective rate, and test your soil every two to three years. Consider cultural practices like improved air circulation and resistant varieties as your first line of defense, reserving zinc sprays for when fungal pressure demands intervention.

When ‘Organic-Approved’ Doesn’t Mean ‘Harmless’

Here’s a common misconception: if something is approved for organic farming, it must be completely safe for the environment. While organic standards prioritize natural inputs over synthetic ones, this doesn’t guarantee zero environmental impact. Zinc sulfate, for instance, is permitted in organic agriculture as a micronutrient supplement and fungicide. However, repeated applications can still lead to soil accumulation that disrupts microbial communities and impacts earthworm populations.

The reality is that “natural” and “harmless” aren’t interchangeable terms. Even organic-approved zinc products require thoughtful management. Think of it like vitamins for your garden—beneficial in appropriate doses, but problematic when overused. Many beginning farmers assume organic certification means unlimited use, but sustainable farming demands we look beyond labels to understand actual environmental consequences.

The good news? Understanding this distinction empowers you to make smarter choices. Regular soil testing becomes your ally, helping you apply only what your crops truly need. By recognizing that organic-approved doesn’t automatically mean consequence-free, you’re taking an important step toward genuinely sustainable farming practices that protect soil health for future growing seasons.

What Excess Zinc Actually Does to Your Farm Ecosystem

Close-up of plant roots with visible mycorrhizal fungi in healthy soil
Healthy soil microorganisms and mycorrhizal fungi are essential partners in sustainable farming but can be disrupted by excess zinc accumulation.

Soil Health and Microbial Life

Healthy soil is the foundation of any thriving organic farm, and zinc contamination can throw this delicate ecosystem seriously out of balance. When zinc levels climb too high—often from contaminated compost, recycled water, or nearby industrial activities—the invisible workforce beneath our feet starts to struggle.

The soil microorganisms that break down organic matter and make nutrients available to plants are particularly sensitive to zinc excess. These beneficial bacteria and fungi can experience reduced populations at elevated zinc concentrations, slowing down the natural nutrient cycling that organic farmers depend on. Without these hardworking microbes, plants struggle to access the food they need, even in nutrient-rich soil.

Mycorrhizal fungi, those amazing underground partners that extend plant root systems and improve water uptake, also take a hit from zinc toxicity. These fungal networks can be disrupted at zinc levels well below what would visibly harm the plants themselves, creating a hidden handicap for your crops.

Earthworms, nature’s tillers and soil aerators, are equally vulnerable. Excessive zinc can reduce earthworm populations and reproduction rates, leaving soil more compacted and less productive. Maria Chen, a CSA farmer in Oregon, noticed her earthworm counts dropping after using zinc-rich compost amendments. After switching to tested, low-zinc inputs, she saw her earthworm populations rebound within two growing seasons, along with noticeable improvements in soil structure and crop yields.

Water Contamination Risks

When zinc accumulates in soil through repeated applications of galvanized materials, contaminated compost, or certain fertilizers, rain and irrigation water can carry it beyond your fields. This runoff process poses serious concerns for farms located near streams, rivers, or wetlands. As zinc-laden water moves through soil layers, it can leach into groundwater systems that feed local wells and waterways.

Aquatic ecosystems are particularly vulnerable to zinc contamination. Even moderate concentrations can harm fish populations, disrupting their growth and reproduction. Invertebrates like insects and crustaceans that form the base of aquatic food chains show sensitivity to zinc exposure, creating ripple effects throughout the ecosystem. Algae and aquatic plants may also experience stunted growth, reducing oxygen levels in the water.

For CSA farms committed to environmental stewardship, protecting local waterways means monitoring zinc sources carefully. Regular soil testing helps identify elevated levels before they become problematic. Consider Emma’s organic farm in Vermont, which switched from galvanized irrigation systems to food-grade alternatives after testing revealed zinc migration patterns toward a nearby creek. Her proactive approach maintained both water quality and her farm’s organic certification while safeguarding downstream habitats.

The Plant Nutrient Imbalance Cascade

When zinc accumulates in soil beyond healthy levels, it doesn’t just sit there harmlessly. Instead, it creates a domino effect that can seriously compromise your crops’ ability to absorb other essential nutrients.

Here’s what happens: excess zinc competes directly with iron and copper for the same uptake pathways in plant roots. Think of it like too many people trying to squeeze through the same doorway at once. When zinc floods these pathways, iron and copper get blocked out, leading to deficiencies even when these nutrients are present in the soil. You’ll notice this first in younger leaves, which may show yellowing or stunted growth.

The problem deepens when zinc also interferes with phosphorus uptake, a nutrient critical for root development and energy transfer. Plants struggling with phosphorus deficiency develop weaker root systems, which ironically makes them even less capable of selectively absorbing the nutrients they actually need while avoiding excess zinc.

This vicious cycle means your crops become progressively weaker, more susceptible to diseases, and less productive. Sarah Chen, an organic farmer in Vermont, noticed this cascade firsthand when her tomato yields dropped 30% over two seasons before soil testing revealed elevated zinc levels from old galvanized irrigation equipment.

Smart Zinc Management for Your CSA Operation

Test Your Soil (And Your Inputs)

Knowledge is power when it comes to managing zinc levels on your farm. Implementing regular soil testing protocols—ideally annually or every other year—gives you a clear picture of what’s happening beneath your crops. But here’s something many farmers miss: you also need to test your inputs before they hit the ground.

Compost and manure can be hidden sources of heavy metals, including zinc. Animals often receive zinc supplements in their feed, and those metals concentrate in their waste. Before incorporating any new compost or manure source into your operation, request a heavy metal analysis. Many extension services offer affordable testing options specifically designed for organic amendments.

One Vermont CSA farmer discovered through input testing that her trusted manure supplier had zinc levels three times higher than expected. By switching sources and adjusting application rates, she prevented years of potential accumulation. This proactive approach protects your soil health, keeps your organic certification secure, and ensures you’re growing the cleanest produce possible for your community.

Choose Your Amendments Wisely

Smart amendments make all the difference in managing zinc levels on your farm. Start by choosing your compost sources carefully – vegetable-based composts typically contain less zinc than those heavy in animal manures. If you use manure, proper composting techniques help break down zinc compounds and reduce their bioavailability before application.

Consider rotating away from zinc-based fungicides when possible. Many organic farmers successfully control fungal diseases using copper alternatives, sulfur sprays, or biological controls like Bacillus subtilis. These options protect your crops while keeping zinc levels in check.

Test your amendment sources before widespread use. A simple soil lab analysis can reveal zinc concentrations in your compost or manure, helping you make informed decisions. Mount Pleasant Farm in Vermont reduced their soil zinc by 40% over three years simply by switching to vegetable-based compost and limiting their use of zinc sulfate sprays.

Remember, building healthy soil takes time. Each thoughtful choice about amendments moves your farm toward better balance and long-term sustainability.

Rotation and Recovery Strategies

Smart rotation practices can give zinc-heavy soils the breathing room they need to recover naturally. Consider incorporating zinc-accumulating cover crops like certain varieties of mustard greens or Indian mustard into your rotation plan. These plants act like nature’s vacuum cleaners, drawing excess zinc from the soil into their tissues. Once harvested, you can safely dispose of them away from your farm system.

Adjusting your field rotations means being strategic about what you plant where. If soil tests reveal elevated zinc levels in certain areas, rotate out sensitive crops like beans and lettuce for a season or two, replacing them with more zinc-tolerant plants like sunflowers or certain grains. This approach keeps your land productive while problem areas recover.

Recovery periods matter too. Sometimes the best action is giving affected fields a rest season with non-food cover crops that improve overall soil health. Local farmer Maria Santos from Green Valley CSA discovered that letting her zinc-affected plots grow clover for one full season, combined with compost applications, brought her zinc levels back to healthy ranges. Her patient approach meant healthier vegetables and happier members the following year, proving that sometimes slowing down speeds up real solutions.

A CSA Farmer’s Success Story: Turning Around Zinc Buildup

When Sarah Martinez took over her family’s 15-acre CSA farm in Vermont, she inherited more than just rich soil and loyal customers. Soil tests revealed zinc levels nearly three times the recommended threshold, a legacy of decades of using zinc-rich fungicides and livestock feed supplements.

“I was devastated,” Sarah recalls. “Here I was, trying to launch an organic CSA, and my soil was basically toxic to the very crops I wanted to grow.”

The symptoms were undeniable. Tomatoes showed yellowing between leaf veins, beans struggled to germinate, and her prized heirloom lettuce varieties grew stunted and bitter. Customer retention became a challenge as produce quality declined.

Rather than give up, Sarah partnered with her local extension office to create a comprehensive recovery plan. She started by immediately eliminating all zinc-containing inputs and switching to organic-approved alternatives. The real game-changer came through phytoremediation, planting zinc-accumulating cover crops like Indian mustard and sunflowers during off-seasons. These plants acted as natural sponges, drawing excess zinc from the soil.

Sarah also adjusted her soil pH using sulfur amendments, making zinc less available to her vegetable crops while the accumulator plants did their work. She divided her farm into zones, rotating heavy feeders away from the most affected areas and focusing on zinc-tolerant crops like squash and cucumbers in problem spots.

Three years later, the transformation is remarkable. Zinc levels dropped by 60 percent, and Sarah’s tomatoes now win awards at the county fair. Her CSA membership grew from 40 to 120 families, with customers raving about the improved flavor and vibrancy of the produce.

“The key was patience and consistent monitoring,” Sarah explains. “I test my soil twice yearly now and keep detailed records. What seemed like a disaster became an opportunity to truly understand my land and become a better steward of it.”

Diverse vegetable rows in community supported agriculture farm field
Successful CSA farms balance productivity with environmental stewardship through careful management of all farm inputs including zinc sources.

What CSA Members Can Do

As a CSA member, you play a vital role in supporting environmentally responsible agriculture. Start by having open conversations with your farmers about their approach to inputs like zinc-containing supplements and treatments. Ask questions during farm visits or newsletters: How do they manage mineral supplementation? What soil testing practices do they follow? These inquiries show your interest and encourage transparency.

Remember that your farmers are constantly learning and adapting their sustainable farming practices. They balance numerous factors, from animal health to soil wellness, and sometimes face tough decisions about inputs. Your understanding and patience matter tremendously.

Support your CSA by staying engaged throughout the season, even during challenging times. Attend farm events, participate in work shares if offered, and share your farm’s story with friends and neighbors. This strengthens the farm’s economic resilience, allowing them to invest in soil testing, organic alternatives, and continuing education.

Consider asking your farm if they conduct regular soil tests or work with agricultural extension services. Many farmers appreciate members who understand the complexity of managing nutrients sustainably. You might also inquire about their composting practices and whether they accept food scraps, creating a closed-loop system that reduces external inputs.

Most importantly, recognize that sustainable agriculture is a journey, not a destination. Your CSA farmers are your partners in creating a healthier food system, and your informed support helps them continue improving their environmental stewardship year after year.

True environmental stewardship in CSA farming means looking beyond the obvious—it’s about paying attention to subtle challenges like zinc accumulation that can quietly undermine your farm’s ecological health. While zinc serves essential functions in plant growth and animal nutrition, awareness of its potential to build up in soils is what separates good farming from truly sustainable farming.

The encouraging news? You don’t need to choose between productivity and environmental responsibility. By implementing thoughtful management practices—regular soil testing, rotating pastures, choosing feed wisely, and maintaining healthy soil biology—you can keep zinc levels in check while growing nutritious food for your community.

For farmers, make zinc monitoring part of your annual farm review. Share your soil test results with your CSA members; transparency builds trust and educates your community about the complexity of sustainable agriculture.

For consumers, support your local CSA farmers by asking curious questions about their soil management practices. Your interest encourages continuous improvement and reinforces that environmental stewardship matters to the people who depend on their harvest.

Together, we can create food systems that nourish both people and planet—one mindful decision at a time. Start your conversation about zinc management today.

How Smart Technology Is Bringing Your Farm and Dinner Plate Closer Than Ever

Posted by darrell on
0
Farm-to-Table Experiences
How Smart Technology Is Bringing Your Farm and Dinner Plate Closer Than Ever

Picture a tomato that texts your farmer when it needs water, or lettuce beds monitored by drones that detect pest problems before your eye can see them. This is high tech farming today—where cutting-edge innovations meet the soil to grow your food more sustainably than ever before.

Modern farmers are revolutionizing agriculture by combining traditional organic practices with smart sensors, automated irrigation systems, and data analytics. These technologies aren’t replacing the farmer’s wisdom; they’re amplifying it. Local CSA operations now use soil moisture monitors to conserve water, predictive weather models to optimize planting schedules, and blockchain systems to give you complete transparency about your produce’s journey from seed to plate.

The farm-to-table movement has found its perfect partner in agricultural technology. Small-scale organic farms that once struggled to compete with industrial operations now leverage precision agriculture tools to increase yields while maintaining their commitment to chemical-free growing. Solar-powered sensors track soil health in real time, mobile apps connect you directly with farmers for pre-orders, and automated greenhouse systems extend growing seasons without compromising organic certification.

This technological transformation means you get fresher produce, farmers waste fewer resources, and local food systems become more resilient. Whether you’re an aspiring farmer exploring sustainable methods or a conscious consumer wanting to understand where innovation meets your dinner plate, high tech farming represents agriculture’s most exciting frontier—one that honors the earth while feeding communities more efficiently.

The New Face of Farm-to-Table: Where Technology Meets Tradition

Why Small Farms Are Embracing Smart Tools

The way small farms are transforming their operations through technology isn’t about abandoning their values—it’s about protecting them. Across North America, organic and CSA farms face mounting challenges that technology helps solve while keeping sustainability at the forefront.

Labor shortages top the list. Finding workers willing to handle repetitive tasks like weeding or transplanting has become increasingly difficult. Smart tools like automated seeders and AI-powered weeding robots allow farmers to maintain production levels without compromising organic practices or exhausting small crews.

Consumer expectations have also evolved. Today’s farm members want to know exactly where their carrots were grown, when they were harvested, and how they traveled from field to box. Digital tracking systems and farm management apps provide this transparency effortlessly, building trust and strengthening the farm-community connection.

Climate unpredictability makes traditional farming knowledge less reliable. Soil sensors and weather monitoring systems help farmers make informed decisions about irrigation and planting schedules, reducing water waste and crop losses. For Sarah Chen of Green Valley Farm, “Smart irrigation cut our water use by 40 percent while actually improving our yields.”

These technologies aren’t replacing the heart of small-scale farming—they’re helping farmers do what they do best, more efficiently and sustainably.

The Balance Between High-Tech and Hands-On

Many people worry that technology might strip away the soul of farming, but the reality is quite different. Modern farming technology isn’t replacing the farmer’s expertise—it’s enhancing it. Think of precision sensors and data analytics as powerful assistants that handle the monitoring and number-crunching, freeing up farmers to focus on what they do best: making informed decisions based on years of hands-on experience.

Successful organic farmers today blend traditional farming practices like crop rotation, composting, and natural pest management with smart tools that help them execute these methods more effectively. For example, a soil moisture sensor doesn’t replace a farmer’s knowledge of when to water—it provides real-time data that helps them make better decisions based on that knowledge. Similarly, weather tracking apps complement years of reading the sky and understanding local climate patterns.

The key is balance. Technology handles repetitive monitoring tasks and provides valuable insights, while farmers apply their judgment, intuition, and commitment to sustainable practices. This partnership allows small-scale organic farms to compete more effectively while maintaining their core values of environmental stewardship and quality produce.

Smart Growing: Technologies Transforming the Field

Farmer using tablet and soil sensor in organic vegetable field
Modern soil sensors and farm management software help organic farmers make data-driven decisions while maintaining sustainable practices.

Precision Agriculture Tools for Organic Farms

Modern organic farmers are harnessing precision agriculture tools to grow healthier crops while treading lightly on the earth. These smart technologies take the guesswork out of daily farming decisions, helping growers work with nature rather than against it.

Soil sensors have become game-changers for organic operations. These small devices measure nutrient levels, pH balance, and microbial activity in real-time, allowing farmers to understand exactly what’s happening beneath the surface. Instead of applying amendments across entire fields, farmers can target specific areas that need attention, reducing waste and keeping costs down.

Moisture monitoring systems track water content at various soil depths, sending alerts directly to farmers’ smartphones when irrigation is needed. This precision prevents overwatering, which can leach nutrients and promote disease, while ensuring plants never experience drought stress. One California organic vegetable grower reduced water usage by 30% after installing moisture sensors, all while increasing crop yields.

Weather tracking technology combines satellite data with hyperlocal weather stations to provide accurate forecasts tailored to individual farms. These systems help farmers time their planting, predict pest pressure, and plan harvests around optimal conditions. Many platforms even offer frost warnings, giving growers precious hours to protect vulnerable crops.

The beauty of these tools lies in their ability to support sustainable practices. By using only the water, amendments, and interventions truly needed, organic farmers minimize their environmental footprint while maximizing the quality of produce heading to your local farmers market.

Automated Irrigation and Water Management

Water conservation meets cutting-edge technology in modern smart irrigation systems, transforming how sustainable farms manage their most precious resource. These automated systems use soil moisture sensors, weather data, and plant-specific algorithms to deliver precisely the right amount of water at exactly the right time.

At Full Belly Farm in California’s Capay Valley, farmers use soil moisture monitoring technology that sends real-time data to their smartphones. When sensors detect adequate moisture levels, the system automatically delays irrigation, saving thousands of gallons weekly while maintaining optimal growing conditions for their organic vegetables.

Smart irrigation technology offers multiple benefits beyond water conservation. Drip irrigation systems equipped with sensors reduce water usage by up to 50% compared to traditional methods while actually improving crop yields. By delivering water directly to plant roots and avoiding overwatering, these systems prevent fungal diseases and nutrient runoff that can harm both crops and surrounding ecosystems.

Stone’s Throw Farm in upstate New York combines weather station data with automated timers to adjust their irrigation schedule based on rainfall predictions and temperature fluctuations. This approach has cut their water bills significantly while ensuring their leafy greens and herbs receive consistent moisture throughout the growing season.

For aspiring farmers, these technologies are becoming increasingly affordable, with basic automated systems starting around a few hundred dollars, making water-smart farming accessible to operations of all sizes.

Vertical Farming and Controlled Environment Agriculture

Imagine walking into a multi-story building where lettuce, herbs, and microgreens grow on stacked shelves beneath LED lights, producing fresh harvests year-round regardless of the weather outside. That’s the promise of vertical farming, and it’s transforming how we think about local food production.

Vertical farms use controlled environment agriculture to maximize space while minimizing resource use. These innovative systems stack growing beds vertically, using precisely calibrated LED lighting that mimics natural sunlight. The result? Farms can produce significantly more food per square foot than traditional field farming, often using 95% less water through recirculating systems.

Greenhouse automation is another game-changer for extending growing seasons. Automated systems monitor and adjust temperature, humidity, and ventilation, creating ideal conditions for plants even during harsh winters. Some farmers are combining traditional greenhouse structures with smart sensors and climate controls, allowing them to offer fresh tomatoes, peppers, and cucumbers to their communities twelve months a year.

One inspiring success story comes from an urban farm in Detroit that converted an old warehouse into a vertical growing space, now supplying fresh greens to local restaurants and families year-round. The controlled environment means no pesticides are needed, keeping produce naturally organic while reducing the farm’s environmental footprint.

These technologies are making hyperlocal food production more accessible than ever before.

Indoor vertical farming system with multiple tiers of leafy greens in greenhouse
Vertical farming systems allow small-scale farmers to maximize production space and extend growing seasons year-round.

Connecting Farms to Your Table: Distribution and Transparency Tech

Farm Management Software for CSA Operations

Managing a CSA operation involves juggling countless details, from planning what to plant to keeping members informed about their weekly shares. Thankfully, specialized farm management software has transformed how farmers handle these tasks, making operations smoother and member relationships stronger.

These platforms streamline everything from membership sign-ups and payment processing to harvest tracking and distribution planning. Farmers can map out crop rotations based on member preferences, monitor yields throughout the season, and adjust planting schedules to ensure consistent weekly shares. Many systems include mobile apps that let farmers update harvest data directly from the field, saving precious time during busy growing seasons.

Communication features are particularly valuable, allowing farmers to send automated newsletters, share recipes for unusual vegetables, and notify members about farm events or share pickup changes. Some platforms even let members customize their preferences or swap items they don’t want.

Take Sarah Martinez, who runs a 50-member CSA in Vermont. After implementing farm management software, she reduced her administrative time by 15 hours weekly, freeing her to focus on soil health and crop quality. Her members love receiving personalized texts with storage tips for each week’s vegetables.

These digital tools help small farms operate more efficiently while maintaining the personal touch that makes CSA relationships special.

Blockchain and QR Codes: Knowing Your Food’s Story

Ever wonder about the hands that grew your heirloom tomatoes or how far your lettuce traveled? Thanks to blockchain technology and QR codes, you can now discover your produce’s complete story with a simple smartphone scan.

Progressive farms are placing scannable codes right on their packaging, revealing a transparent trail from seed to your kitchen table. When you scan that little square, you might learn which field your carrots grew in, the farmer who tended them, what organic practices were used, and even the harvest date. Some farms share photos of their growing process, soil health reports, and details about their water conservation methods.

This technology builds genuine trust between farmers and consumers. You’re no longer just buying vegetables—you’re connecting with the people and practices behind your food. For small-scale organic farmers, this transparency becomes a powerful marketing tool that showcases their dedication to sustainable practices.

Meet Sarah, a third-generation farmer in Vermont, who implemented QR codes last season. Her customers loved learning that their greens were harvested just 12 hours before delivery. Sales increased by 30% as shoppers appreciated the accountability and authenticity. This farm-to-table transparency helps you make informed choices while supporting farmers who prioritize environmental stewardship and quality over quantity.

Customer scanning QR code on farm produce box with smartphone at local market
QR code technology allows consumers to instantly access information about their produce’s journey from farm to table.

Online Marketplaces and Direct-to-Consumer Platforms

The digital revolution has made it easier than ever for farmers to bypass traditional distribution channels and sell directly to you. Online marketplaces and direct-to-consumer platforms are transforming how local food communities connect with their growers, putting fresh, organic produce just a few clicks away.

These platforms work like online farmers’ markets, allowing you to browse seasonal offerings, place orders, and arrange pickup or delivery—all from your phone or computer. Many farms use specialized software that manages inventory in real-time, ensuring you know exactly what’s available and when it was harvested. Some platforms even let you customize your produce boxes based on dietary preferences or family size.

Take Sarah Chen, a small-scale organic farmer in Ontario, who tripled her customer base within six months of joining an online marketplace. “I spend less time worrying about distribution and more time growing quality food,” she shares. The platform handles payments, sends harvest updates to customers, and even provides recipe suggestions for seasonal items.

For consumers, these digital tools mean transparency about where your food comes from, reduced food waste through better planning, and the satisfaction of supporting local agriculture. You’re not just buying vegetables—you’re investing in your community’s food future.

Real Farmers, Real Results: Success Stories from the Field

Technology isn’t just for industrial-scale operations. Small and mid-sized farms across North America are proving that high-tech tools can work beautifully alongside traditional sustainable practices. These stories behind your food reveal how smart innovation enhances rather than replaces the care and expertise of dedicated farmers.

Take Green Meadow Farm in Vermont, where Sarah Jenkins runs a 40-acre CSA serving 200 families. After implementing soil sensors and a simple irrigation management app, she reduced water usage by 35% while increasing yields by 20%. “I was skeptical at first,” Sarah admits. “But now I can monitor soil moisture from my phone and know exactly when crops need water. It’s freed up hours each week and helped us weather two drought seasons without crop loss.”

Meanwhile, Riverbend Organic Farm in Ontario embraced drone technology for crop monitoring. Owner Marcus Chen uses aerial imagery to spot disease pressure and nutrient deficiencies before they’re visible from ground level. “We caught a pest outbreak in one section of our lettuce field early enough to manage it organically,” he explains. “Without the drone, we might have lost the entire planting.” The investment paid for itself in the first season through reduced crop losses.

Community-supported agriculture farms are also finding success with member management software. Willow Creek Farm in British Columbia streamlined their operations by switching to digital tracking for share distribution and member communications. “Our members love getting harvest updates via text,” says co-owner Lisa Park. “And we’ve cut our administrative time in half, which means more time actually farming.”

The common thread in these success stories? Technology serves as a tool to enhance sustainable practices, not replace them. These farmers started small, testing one or two technologies before expanding. They chose solutions that aligned with their values and addressed specific challenges on their farms.

The lesson is clear: you don’t need a huge budget or technical expertise to benefit from agricultural innovation. Start with what makes sense for your operation, learn as you go, and let technology handle the data while you focus on growing exceptional food for your community.

How Consumers Benefit from Farm-to-Table Technology

The real magic of farm-to-table technology isn’t just happening in the fields—it’s transforming your weekly grocery experience in ways that benefit both your wallet and your well-being.

Thanks to advanced harvesting and distribution technologies, produce travels from farm to table in record time, often within 24 hours of being picked. This means you’re getting vegetables at their peak nutritional value and flavor, unlike conventional produce that might spend a week in transit. Smart tracking systems allow you to see exactly when your tomatoes were harvested and which field they came from, bringing unprecedented transparency to your food choices.

Technology-enabled direct sales platforms connect you straight to local farmers, cutting out middlemen and their markups. Many farmers report offering better prices through their online farm stores while still earning more than they would through traditional distribution channels. It’s a genuine win-win that benefits everyone involved.

Mobile apps and digital marketplace platforms make discovering and supporting local farms easier than ever. You can browse available produce, place orders, and arrange pickup times—all from your smartphone. Some farms even offer virtual farm tours through video technology, letting you see exactly where and how your food grows without leaving your couch.

Perhaps most importantly, these innovations dramatically reduce food miles and environmental impact. GPS-optimized delivery routes and community pickup points mean your lettuce isn’t logging hundreds of unnecessary miles. You’re not just eating healthier—you’re supporting sustainable practices that protect the land for future generations.

These technological advancements create meaningful connections between you and the people growing your food, fostering the kind of community relationships that make eating local truly rewarding.

Getting Started: Tips for Supporting Tech-Savvy Sustainable Farms

Ready to support farms embracing innovation while staying true to sustainable values? Start by searching for CSA programs that highlight their use of technology on their websites or social media. Look for mentions of precision agriculture, renewable energy systems, or smart irrigation practices. Many tech-forward farms proudly share their commitment to both innovation and environmental stewardship.

When connecting with potential CSA farms, ask thoughtful questions about their operations. How do they use technology to reduce water usage or minimize waste? What tools help them grow healthier crops without synthetic inputs? Do they offer digital platforms for managing your share preferences or tracking what’s coming in your weekly box? These conversations reveal whether a farm aligns with your values while using innovation responsibly.

Consider joining farm tours or workshops offered by tech-savvy operations. Many farmers love sharing their journey and explaining how sensor systems or data analytics enhance their organic practices. These visits deepen your connection to where your food comes from and help you understand the real-world impact of agricultural technology.

Support these farms by committing to seasonal memberships, sharing their stories on social media, and encouraging friends to join CSA programs. Your consistent patronage helps farmers invest in sustainable technologies that benefit both the land and your community. Remember, every subscription box purchased from an innovative, eco-conscious farm reinforces the viability of high-tech sustainable agriculture, proving that cutting-edge tools and organic values can thrive together.

The marriage of technology and agriculture isn’t creating distance between farmers and consumers—it’s building bridges. Smart sensors, precision irrigation, and data analytics are simply modern tools that empower farmers to grow healthier food more sustainably, just as previous generations embraced tractors and greenhouses. These innovations allow small-scale farmers to compete with industrial operations while maintaining their commitment to organic practices and environmental stewardship.

As you explore your local food scene, seek out farms embracing these technologies. Visit their operations, ask questions about their methods, and understand that a farmer checking soil moisture on a smartphone is every bit as connected to the land as one relying solely on intuition. Many innovative farms offer tours where you can see technology and traditional farming wisdom working hand in hand.

The future of sustainable agriculture looks bright. Each advancement—from automated composting systems to renewable energy solutions—helps farmers reduce waste, conserve resources, and deliver fresher produce to your table. By supporting tech-savvy local farms, you’re investing in a food system that honors both environmental responsibility and agricultural innovation. Together, we’re cultivating a future where technology serves the land, the farmers, and the communities they nourish.